Many people tend to underestimate the final step of the creative process when it comes to outputting video and uploading their work online on platforms such as YouTube or Vimeo. Even if your footage was shot in Raw and edited using high-quality intermediate codecs like ProRes, Cineform or DNxHD, you still might end up with poor final results if you don’t know how to set up your NLE correctly utilizing the optimal export settings.
There are still many misconceptions related to rendering files using the Adobe Premiere Pro CC in particular as the software already provides a plethora of useful export settings. Tweaking and optimizing them further to get the highest quality possible seems to be the trickiest and most challenging part of the process for the majority of editors and filmmakers alike. The platform works well in this regard, but only when you know how to utilize it properly.
Here is a quick video tutorial produced by Roberto Blake that covers some of the basics you should be aware of when exporting videos for YouTube.
First and foremost, it’s worth mentioning that it doesn’t matter what version of Adobe Premiere Pro you’re using as long as you have Adobe Premiere Pro CS6 or later as nothing significant has changed in terms of exporting settings in the latest iterations of the software.
Video Codec settings
With that in mind, when you finish your edit just navigate to File “Export” Media. In the Export Settings panel under format select H.264 which is the officially supported video codec by YouTube required for all videos uploaded on the platform.
Secondly, make sure that your Source and Output settings match perfectly. If for any reason this is not the case in the Basic Video Settings window hit the Match Sourcebutton. To get the maximum quality out of your edit, you need to tweak the bitrate settings further which is indeed the trickiest part of the process where most people get confused.
Bitrate Settings
According to official YouTube recommendations, the typical bitrate of your HD videos should be set to 8 Mbps. It’s worth mentioning that there is no bitrate limit required, though, YouTube offers some recommended bit rates for reference that you can find below. If you are uploading 4K video, then you should set a bitrate between 35 and 68 Mbps depending on the frame rate of your footage.
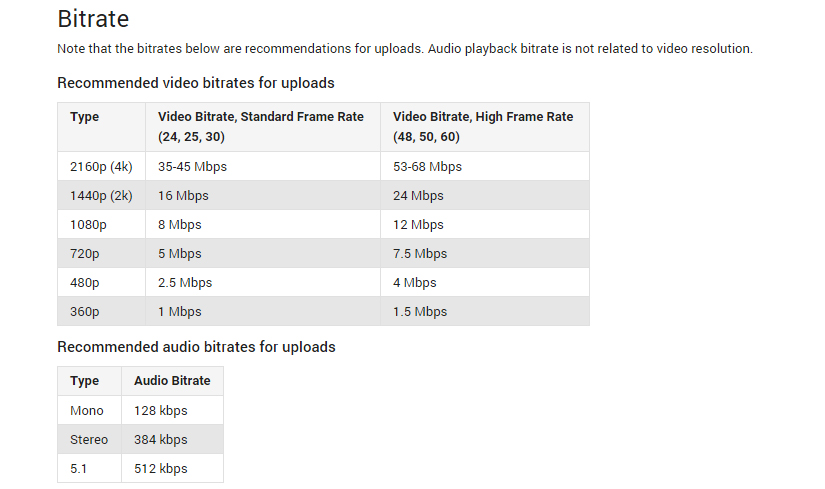
Considering that you are editing HD video, your Target Bitrate video should be set to 8 Mbps. Generally, the Target rate in Premiere Pro CC is the setting that determines the actual size of the rendered file; it’s not the Maximum Bitrate. You can alter the latter as much as you want; still it won’t affect your video’s file size significantly.
However, if there are parts of your footage containing some high-quality graphics or high motion video the Premiere Pro algorithms will compress these parts using the Maximum bitrate, thus sustaining the optimal quality throughout the whole video without affecting its files size.
It’s important to note that this method will work only if you choose either the 1 Pass or2 Pass Bitrate Encoding. As a rule of thumb, the 2 Pass Bitrate encoding is the better option as it provides the highest image quality. Keep in mind though that this option will extend the rendering time, but you will get the best possible quality out of your edit.
Audio codec settings
As for the audio choosing the AAC format and 320 bitrate will do the job just fine. At last but not least, don’t forget to check Use Maximum Render Quality before hitting Export.
Conclusion:
Ultimately, I usually will set my Target Bitrate to 8 Mbps and the Maximum Bitrate to16Mbps when I’m exporting 24p or 25p HD video using the 2 Pass Bitrate Encoding. If you are still not pleased with the final results, you may tweak the Maximum Bitrate further, but from my experience, the above settings will be more than enough in most of the time providing an optimal balance between the image quality and file size of your video.
Original source:
http://www.4kshooters.net/2015/07/28/best-video-export-settings-for-youtube-in-premiere-pro-cc/