So you’ve gone with a QNAP NAS unit and are thinking you’d like to run the Plex server to get a nicer interface? This page can help you with that.
QNAP has a great app system built in that will let you install all kinds of optional software packages to expand the usefulness of your system. Among those optional packages is Plex, a very popular video streaming platform.
One note of warning; if the QNAP you own is ARM-based rather than Intel-based, Plex is only available as a 3rd party experimental feature. This is because ARM processors aren’t quite up to the task of running Plex in all of its glory, so proceed with caution. They can run it in a slightly more limited capacity. If your QNAP is Intel-based, you should be good to go; please continue!
The first thing you’re going to want to do is head over to the App Center. There is a category list down the left hand side of the App Center; click into Entertainment, and Plex should be there.
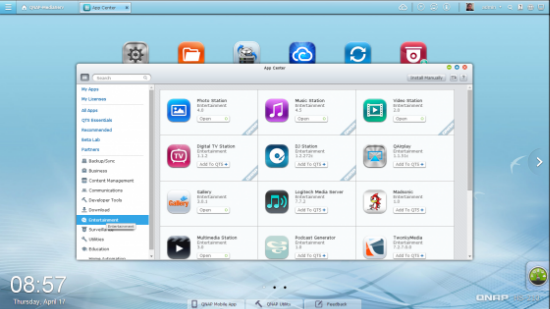
Once you’ve located Plex, click the “Add To QTS+” button and the Plex server will download and install to your device. You’re not quite done yet though. We’re going to have to take a brief trip into Plex configuration land. A full explanation of everything there is beyond the scope of this article, but I can get you up and running with the basics pretty easily. That will see you through your immediate needs, and if you want to learn the in-depth secrets of Plex administration, there’s a lot of great documentation from Plex themselves.
![]()
Once again on the left, go to My Apps. Plex should appear there. It should say On in green, but if by chance it says Off in red, click it to turn it on. Once it has gone green, click Open.

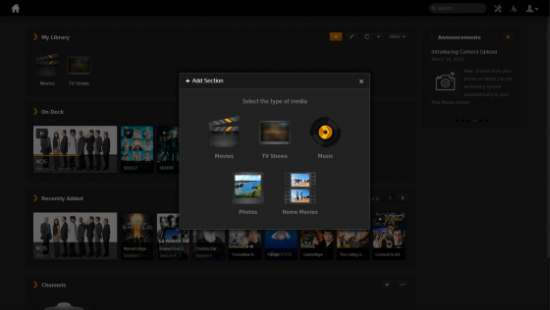
You should get a Plex server management page in a new browser tab or window. The first thing you’re going to want to look for is the My Library section. There’s a plus sign icon that’ll bring up an Add Section tooltip when hovered over. Click that.
You’ll be presented with five choices; Movies, TV Shows, Music, Photos, and Home Movies. Choose the one that’s appropriate to the type of content you’re trying to stream. “Movies” refers to theatrical films, while home movies ought to be fairly obvious.
Next you have to tell it where to find your media. You’ll be presented with a view of the QNAP’s directory structure. If you configured your media server the way I described in my last write-up, you’ll find your Multimedia directory here. You need to go inside Multimedia and get specific. My QNAP serves movies and TV, so if I were adding a Movies section, I’d point Movies to Multimedia/Movies, and TV Shows to Multimedia/TV.
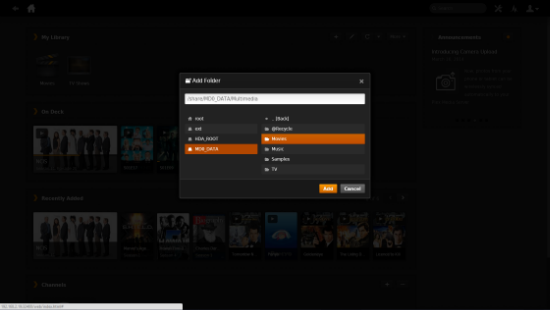
Repeat these steps for each section you’d like to include.
Once you’ve done that far, you’re all set! Your new Plex server will begin scanning your library and you’ll see shows and movies and other media begin to populate the database. You should be aware that the scan can take a while to complete, and that even after the scan is complete, it will still work for a while on downloading metadata for your library. Once the scan is done, you can immediately start streaming your Plex content to Plex players for your mobile devices, consoles, set-top boxes, computers; whatever you’ve got that can run one. The metadata retrieval doesn’t have to be finished for you to play back your content. If you stick around though, I can give you a couple more basic tips to make the experience even better.
Head to your Plex server settings; that’s the screwdriver and wrench icon in the upper right, next to the search field. We’re going to verify that your metadata agents are ordered correctly to give your media library the best information sources possible. For this purpose we’re really only concerned about TV Shows, Movies, and maybe Music. Photos and home videos won’t have data that can be scraped from the Internet, so you can skip this step if one or both of those are your only Plex sections.
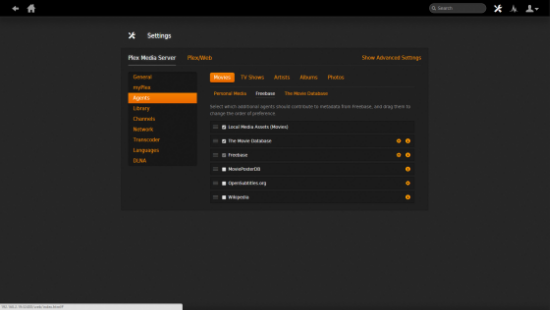
With settings open, click into Agents on the left. You’ll see each of the five possible sections listed across the top to the right; Movies, TV Shows, Artists, Albums, Photos. Each of those will have its own sub-sections. For movies, there’s Personal Media, Freebase, and The Movie Database. For TV Shows, it’s Personal Media Shows and TheTVDB. For Artists, Personal Media Artists and Last.fm, etc.
For each section that you’re using, go through all the sub-sections and make sure that Local Media Assets (section) is at the top of the list of agents. An agent is a piece of software that tells Plex where to grab information about your media; you always want local media to override anything found on the Internet. If local media is not at the top, the agents in the list can be reordered by dragging them by the hamburger icon. (That’s the three stacked horizontal lines, like a patty between two buns.)
For the Movies section, my personal preference is to have The Movie Database listed second. When Plex is downloading metadata for films, The Movie Database typically has good descriptions, covers, and cast & crew data, while Freebase has more gaps in its data and film descriptions read more like reviews and technical summaries than useful descriptions of what the film is about. Putting The Movie Database second will prioritize it over everything except for local media you store for a film yourself.
And that’s about that!
Further Reading:
Plex Media Server Supports Media Formats and How to Use It
Plex Problems I Came Across and Solutions I Did
Add Movies to Plex to Make Your Media Experience Easy and Enjoyable
Stream Your Personal Media to PS4 without DLNA