Dr.Fone for iOS(Mac) Online Help
iOS Data Recovery (Mac) allows you to directly scan your device to find lost or deleted data like contacts, messages, call history, Calendar, notes, Reminder, WhatsApp conversions, Camera Roll, Photo Stream, Voice memos, voicemails and more from your iPhone, iPad and iPod touch. Following are the supported devices and files list.
Device Model |
Supported File Types |
iPhone 4, iPhone 3GS, iPad 1, iPod touch 4 |
Camera Roll, Photo Library, Photo Stream, Contacts, Messages, Message Attachments, Calls History, Calendar, Notes, Reminders, Voice Memos, Voicemail, Safari Bookmarks, WhatsApp History, App Photos, App Videos, App Documents, WhatsApp Attachments |
iPhone 6 Plus, iPhone 6, iPhone 5S, iPhone 5C, iPad 2, The New iPad, iPod touch 5, iPad with Retina display, iPad min, iPad Air, iPad mini 2, iPad mini 3, iPad Air 2 |
Deleted files & Existing files: Contacts, Messages, Call History, Calendar, Notes, Reminders, Safari Bookmarks, WhatsApp History |
Existing files: Camera Roll, Photo Stream, Message Attachments, Voice Memos, WhatsApp Attachments, Voicemail, App Photos, App Videos, App Documents, WhatsApp Attachments |
Step 1. Run the program and connect your device to the computer
After downloading Wondershare Dr.Fone for iOS (Mac), install and run it on your computer. Then you can connect your device. After that, you can see the window of the program on the right.
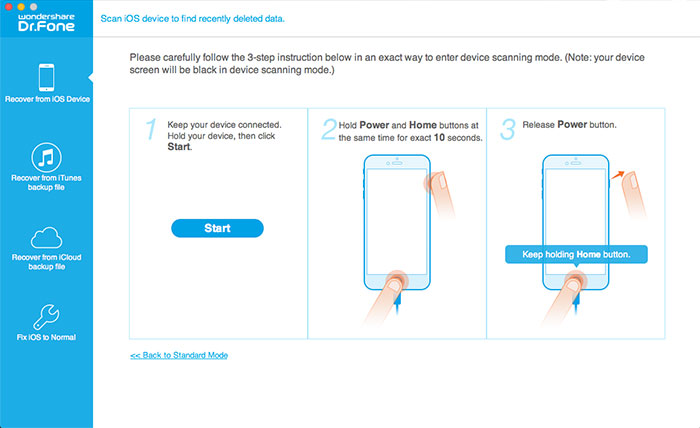
If you use an iPhone 4/3GS, iPad 1 or iPod touch 4, you can switch to the "Advanced Mode" through the button at the lower-right corner. For the "Advanced Mode", you can follow the description in the window to get your iPhone 4/3GS, iPad 1 and iPod touch 4 scanned deeply.
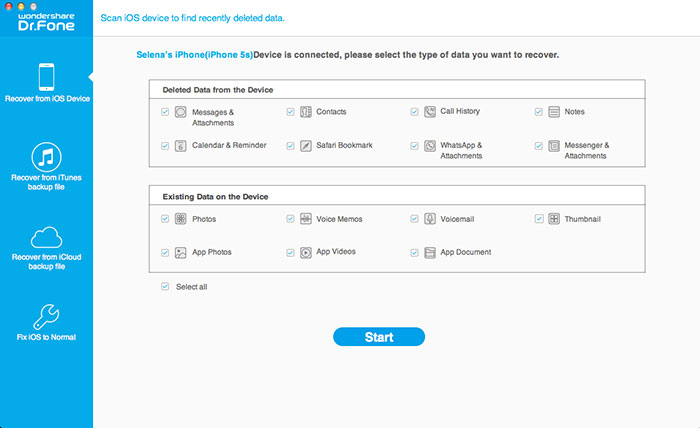
Step 2. Begin scanning your device.
You can directly click "Start Scan" on the window above to scan your device and find data on it.

Step 3. Preview and retrieve lost data to your Mac
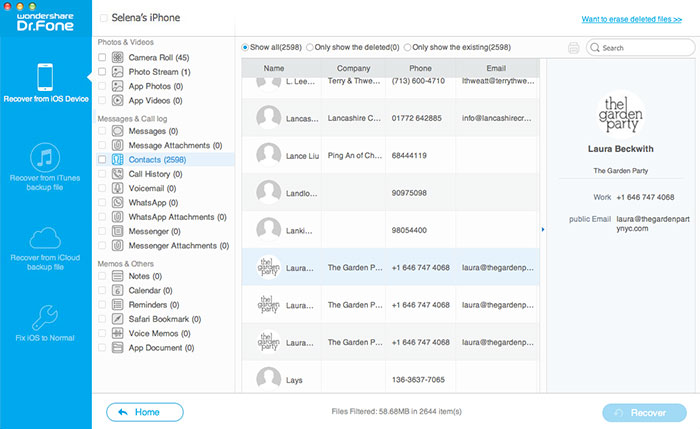
When the scan is finished, you can check all found data in the scan result generated by the program, such as photos, contacts, messages, notes, call log, whatsApp conversations, and more. Select what you want and click "Recover". If you're trying to recover text messages, iMessage, contacts, or notes, when you click "Recover", a pop-up will ask: "Recover to Computer" or "Recover to Device". If you want to put these messages back to your iOS device, click "Recover to Device".
When your device is not at hand, or you just only want to access your iTunes backup and get some data selectively, you can choose this recovery mode. It allows you to extract contacts, messages, call history, Calendar, notes, Reminder, WhatsApp conversions, Camera Roll, Photo Stream, Voice memos, Voicemails and more. Check out the supported devices and files.
Device Model |
Supported File Types |
iPhone 4, iPhone 3GS, iPad 1, iPod touch 4, iPhone 6 Plus, iPhone 6, iPhone 5S, iPhone 5C, iPad 2, The New iPad, iPod touch 5, iPad with Retina display, iPad min, iPad Air, iPad mini 2, iPad mini 3, iPad Air 2 |
Camera Roll, Photo Stream, Contacts, Messages, Message Attachments, Calls History, Calendar, Notes, Reminders, Voice Memos, Voicemail, Safari Bookmarks, WhatsApp History, App Photos, App Videos, App Documents, WhatsApp Attachments |
Step 1. Extract your iTunes backup
After running iOS Data Recovery (Mac) on your computer, click "Recover from iTunes Backup File" on the top of the main window, and then you'll see the window on the right.
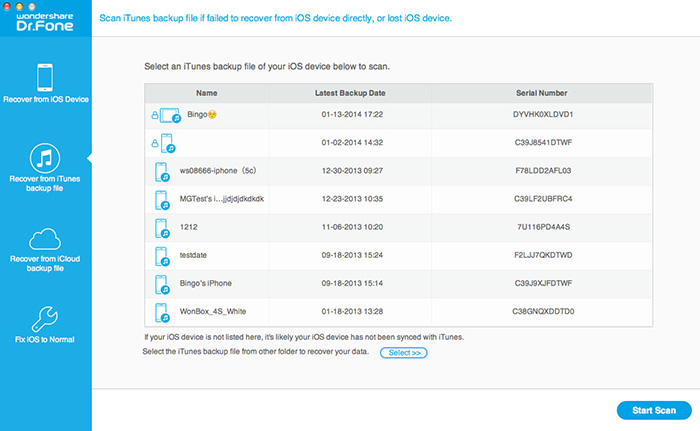
Here, all iTunes backup files on your computer will be immediately found and displayed on the window. Choose the one for your device and click "Start Scan" to extract the content out of it.
Note: If there are more than one iTunes backup files for your device, choose the one with the latest date. You can also extract all the iTunes backup files one by one when necessary.
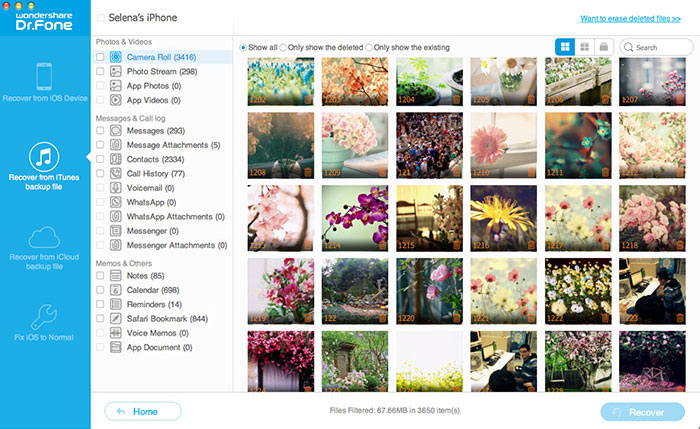
Step 2. Preview and save data from iTunes backup to your Mac
When the scan is completed, you can preview all the contents in detail by clicking the categories one after one. Mark those you want and click on the "Recover" button to save them on your Mac. Now contacts, notes and messages can be directly recovered to your iOS device if you keep your iPhone, iPad or iPod touch connected with your computer via a USB cable during the recovery process.
If you don't have an iTunes backup file, or just want to get an access to your iCloud backup content, this way is great for you. It allows you to preview your iCloud backup data one by one and selectively save them to your computer according to your need.
Device Model |
Supported File Types |
iPhone 4, iPhone 3GS, iPad 1, iPod touch 4, iPhone 6 Plus, iPhone 6, iPhone 5S, iPhone 5C, iPad 2, The New iPad, iPod touch 5, iPad with Retina display, iPad min, iPad Air, iPad mini 2, iPad mini 3, iPad Air 2 |
Camera Roll, Photo Stream, Contacts, Messages, Message Attachments, Calls History, Calendar, Notes, Reminders, Voice Memos, Voicemail, Safari Bookmarks, WhatsApp History, App Photos, App Videos, App Documents, WhatsApp Attachments |
Step 1. Download and scan your iCloud backup
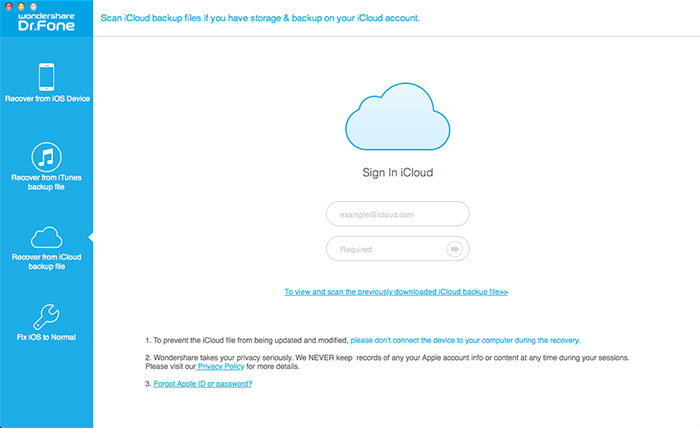
Choose the recovery mode of "Recover from iCloud Backup File" on the top of the program's window. Then you'll be asked to log in your Apple ID. The program won't remember anything of your privacy. Just do it and don't worry.
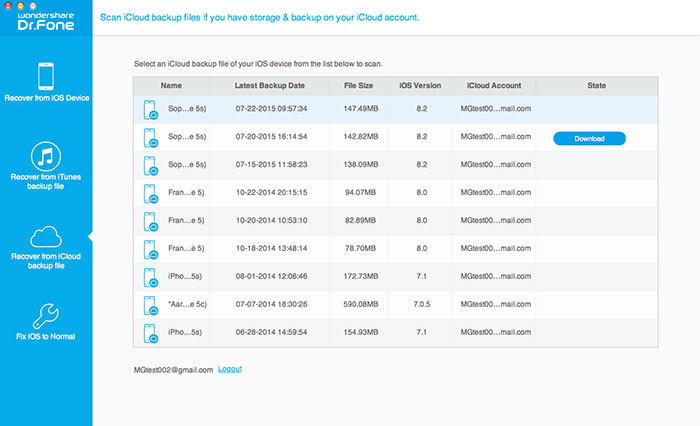
When you log in, you'll see the backup files are displayed as a list. Choose the one you need and click to download it.
Step 2. Select files types to download
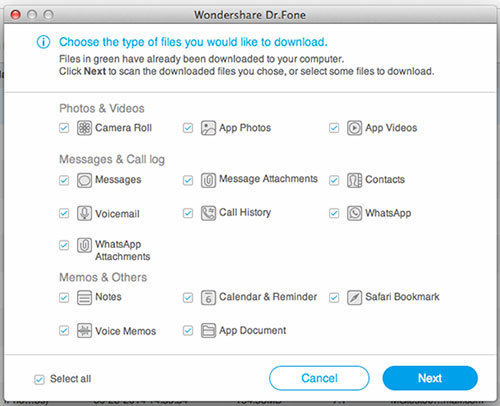
After step 1, a pop-up will appear, asking you to select file types from the iCloud backup file to download. You just need to check the file types you want to download. By doing this, it will take you less time to download the iCloud backup file.
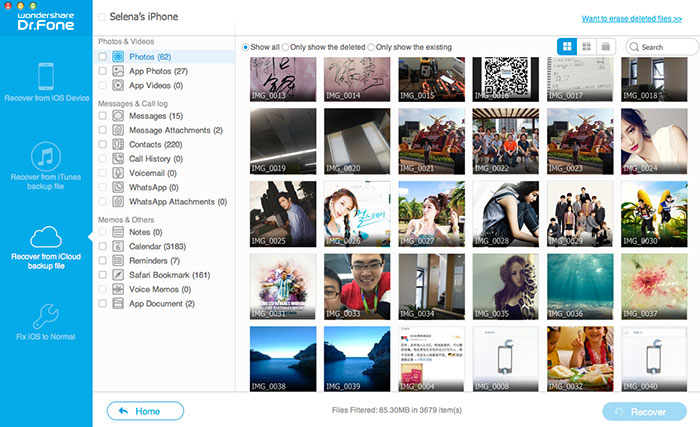
Step 3. Preview and recover the data you want
When the program stops scanning, you can begin previewing the data now. All found data are displayed in categories on the left side of the program. Click the one you want to check, and tick the item you want while previewing. At last, you can save them all on your Mac by clicking on the "Recover" button. Now contacts, notes and messages can be directly recovered to your iDevice if you keep your iDevice connected with your computer via a USB cable during the recovery process.
Related Product

Hot Articles
Join Pavtube Now!