How to import H.264 MP4 footage into FCP for editing? This article covers two ways to import your H.264 MP4 footage into FCP.
Part I. Put H.264 MP4 Footage to FCP with FCP Itself
Step 1. Copy entire contents in your card to your hard drive.
Step 2. Launch Final Cut Pro on your Mac and go to “File”>“New Project” to create a new project.
Step 3. Go to “File” >“Save Project As…” and save your new project.
Step 4. Go to “Final Cut Pro” >“System Settings” to set your scratch disk to the appropriate hard drive (either an external hard drive or an internal drive).
Step 5. In “System Settings” screen, click “Set” to navigate to your preferred drive. Click “OK” when it is done.
Step 6. Open “Compressor” and drag the MP4 files you want to edit in FCP from Mac Finder to the box in Compressor that reads “Drag a File to Create a Job.”
Step 7. Click “Edit” to choose “Select All.
Step 8. Go to “Window” >“Settings” to find the settings window.
Step 9. Then open the folders by following “Apple” > “Formats” >“QuickTime” and select “Apple ProRes 422 (HQ)” and then drag it to all the selected video files.
Step 10. Switch “Destination” tab and click the “+” button to choose the folder you want to save your files.
Step 11. Drag the destination you just created onto all your video files. Click “Submit.”
Step 12. Then select all of the files in Finder and drag them into a new bin in your FCP Project and drag your footage from the bin into the sequence.
Step 13. Get ready to edit your H.264 MP4 files.
Part II. Find It Easy to Import H.264 MP4 to Final Cut Pro for Editing
If the above method is too lengthy in steps, and seems too complicated for you, here is an alternative for you: easy, reliable as well as successful import and editing guarantee!
MP4 is not friendly to Final Cut Pro enough on Mac, and you can find many users are having the same or similar importing problem with MP4 files. So the easiest and most effective way to solve MP4 import issue with FCP is convert it to Apple ProRes, a native and perfect format for Final Cut Pro. Here is how the Mac MP4 to FCP converter Pavtube HD Video Converter for Mac works for you.
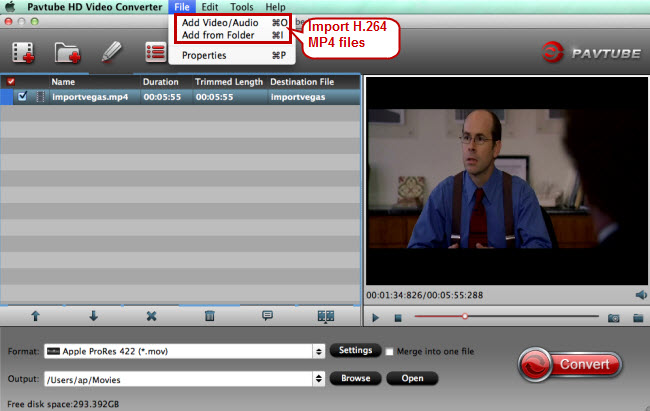
Step 1. Import MP4 to FCP video converter for Mac
Run the Mac video converter for FCP and click “File” to import H.264 MP4 files.
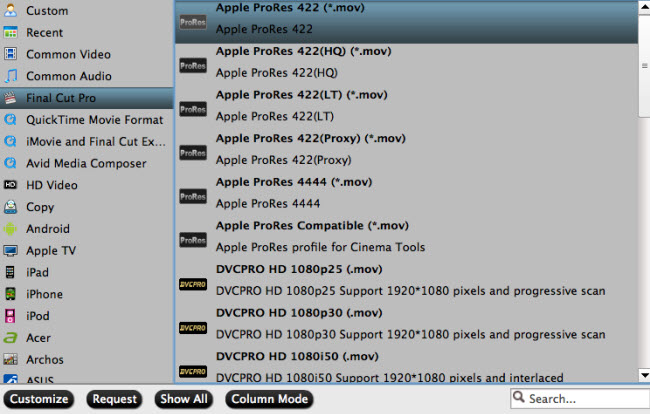
Step 2. Set Apple ProRes as output
In the format list, find “Final Cut Pro” and choose “Apple ProRes 422 (*.mov).”
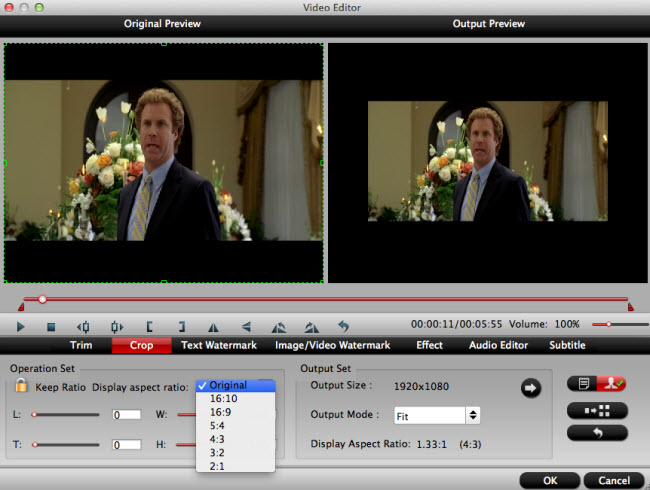
Step 3. Edit MP4 file
Go to the video editor window which will just pop up by clicking “Edit.” Try the editing functions like “Trim,” “Crop,” “Text Watermark,” “Image/Video Watermark” and “Effects” to make you MP4 files more complete.
Step 4. Convert MP4 to FCP
Hit “Convert” button to enable the conversion from H.264 MP4 to Apple ProRes 422 (MOV), and you’re gonna have no trouble importing and editing with FCP.
Want to create your own DVD with the H.264 MP4 or other video files? Now you’re going to get a free DVD Creator from Pavtube if you decide to buy Pavtube HD Video Converter for Mac. The Buy One Get One Free promotion is launched by Pavtube for you to celebrate Halloween with the best mood. For more Buy One Get One Free pairs and 50 % off discounts, just visit Pavtube Halloween celebration for more details.
The Buy One Get One Free promotion is not restricted to Mac; Windows users can also get the pairs of Windows version.


