Shooting the 4K videos with the DJI Phantom 4 and you wanna upload the Phantom 4 4K videos to YouTube/Vimeo/Facebook for sharing. However, terrible quality let you down.

As for DJI Phantom 4, stabilized 4K video capture (up to 4096×2160 24 / 25p, 60 Mbps, in MP4 / MOV container with MPEG-4 AVC / H.264 codec ), uploading those 4K files to YouTube/Vimeo/Facebook, it'll take an awful long time, and something even worse if you missing some settings or tips related to upload requirements.
YouTube/Vimeo/Facebook all have the capability to stream 4K video files, but make sure you meet the requirements below avoid uploading to YouTube/Vimeo/Facebook with terrible quality:
Length: less than 20 minutes
Size: no more than 1024MB
Frame Rate: a maximum frame rate of 30 frames per second
Some people think that Vimeo, Facebook and YouTube always recompress the uploaded video, so upload the best, highest resolution you can.
This is not necessarily true. Shoot at the highest resolution you can support. Edit and deliver in the resolution most people will watch in (i.e. 1080p). When you give YouTube/Vimeo/Facebook a 1080p file that closely matches their target output format and bitrate, they will do significantly less damage to it.
If you want to upload the DJI Phantom 4 4K video to YouTube/Vimeo/Facebook with with an ideal effects, divide Phantom 4 4K videos into shorter 20 min sections, no more than 1024 MB size, adjust the video bitrate, frame rate under 30 frames per second before putting to YouTube/Vimeo/Facebook.
Install Pavtube Video Converter - the best 4K Video Converter, it will meet your needs, using the Split function, you can split the selected video file into required video clips by specifying the clip quantity, duration time and file size. The most important is that, it allows you to modify the video bitrate, frame rate, video size, audio channel, etc for your original Phantom 4 4K videos for easier uploading to YouTube/Vimeo/Facebook. With the built-in video editor you can trim,crop or adjust the video to get the very part and effect of the video you want.
If your exiting PC/Mac or portable devices are unable to do a good job on playing Phantom 4 4K video, considering about converting the Phantom 4 4K video to 1080P for smooth playback and better viewing experience.
Split, Modify or Compress Phantom 4 4K video
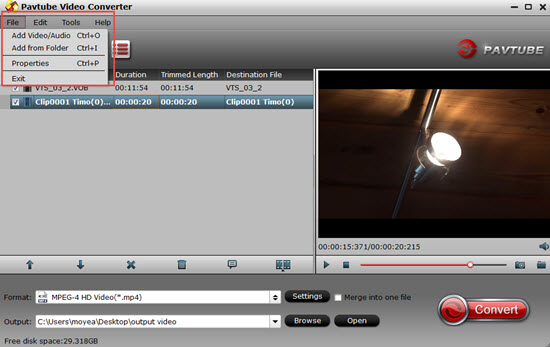
Step 1. Import DJI Phantom 4 4K files.
Copy the Phantom 4 4K files to your hard drive. Drag & drop Phantom 4 4K MP4/MOV videos to Pavtube Video Converter after launching it. Or click the Add video button to locate the Phantom 4 4K files you want to add.
Step 2. Split Phantom 4 4K files.
Under the file list there are control buttons to organize the conversion tasks.
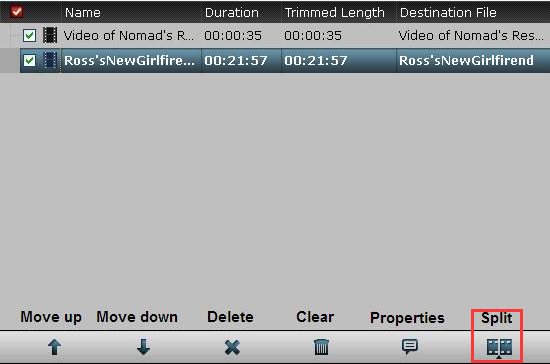
Move Up: Move the selected file one line up.
Move Down: Move the selected file one line down.
Delete: Remove selected file from the file list.
Clear: Remove all the files from the file list.
Properties: View properties of selected task.
Split: Split selected task.
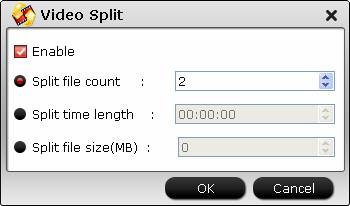
Using the Split function, you can split the selected Phantom 4 4K video file into required video clips by specifying the clip quantity, duration time and file size.
Step 3: Define output format.
Click "Format" bar, from its drop-down options, choose YouTube best compatible uploading format from "Common Video" > "H.264 High Profile Video(*.mp4)" or "H.264 HD Video(*.mp4)" under "HD Video" main category. It maintain the original MPEG-4 AVC / H.264 codec.

Step 4. Customize output profile parameters.
In need of compressing the Phantom 4 4K video to 1080P for smooth playback and better viewing experience, open "Profile Settings" window, click "Size(pix)" to select 1920*1080 as the final resolution for output video, here you can also adjust the output video codec, resolution, bit rate, frame rate and audio codec, bit rate, sample rate and channels to let them fit them YouTube/Facebook/Vimeo.
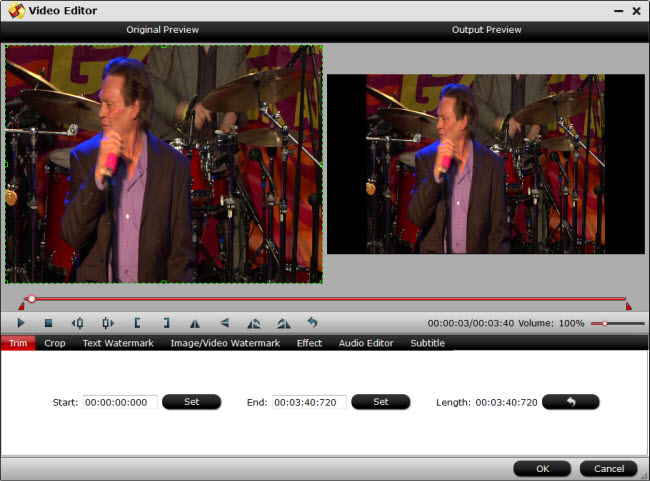
Step 5. (Optional)Edit your Phantom 4 4K video.
Click Edit button and you can trim, crop or adjust the video with the built-in video editor to get the very part and effect of the video you want.
Step 6: Start the conversion.
Finally, click Convert to start the Phantom 4 4K video to YouTube/Facebook/Vimeo conversion. When the conversion ends, you can tap the Open button to locate the converted files and then upload the 4K video to YouTube/Facebook/Vimeo simply.
Preferable video parameters for uploading to YouTube/Vimeo/Facebook
YouTube:
Container: MP4
Audio codec: AAC-LC
Audio channels: Stereo or Stereo + 5.1
Audio sample rate: 96khz or 48khz
Video codec: H.264 High Profile Video
Scan mode: Progressive scan not interlacing
Bit rate: variable bit rate, no bit rate limit required.
Chroma subsampling: 4:2:0
Frame rate: content should be encoded and uploaded in the same frame rate it was recorded. Common frame rates include: 24, 25, 30, 48, 50, 60 frames per second (other frames are also acceptable).
Resolution: 2160p(3840x2160), 1440p(2560x1440), 1080p(1920x1080)
Aspect Ratio: 16:9
Vimeo:
Size: a maximum of 500MB of uploading per week, and 5 GB for plus members
Facebook:
Length: less than 20 minutes
Aspect Ratio: 16x9 or 9x16
Codec:H.264 video with AAC audio in MP4 or MOV format
Size: no more than 1024MB
Frame Rate: a maximum frame rate of 30 frames per second
Audio Sample Rate: 22050hz or 44100hz
Make sure to add tags that people normally search for to your videos so that people can find your videos easier.


