Many users would like to share their home-made videos from iMovie on YouTube, Vimeo or Facebook, but they usually encounter many problems, such as very slow uploading speed, jerky playback performance, progress bar not moving, not compatible formats, etc. If you are facing those problems, you definitely need to check this article to learn how to upload iMovie videos to YouTube, Vimeo or Facebook easily and smoothly.

Export iMovie videos for sharing on YouTube, Vimeo, Facebook
After finish editing your raw videos in iMovie, you can choose directly stream your videos on those video sharing website.
Step 1. Click "Share" to choose YouTube, Vimeo or Facebook
Step 2. Fill in your account information, Size to publish, description and tags
Step3. Start to stream iMovie files to YouTube, Vimeo, Facebook
After uploading, there will be a dialog pop up, you can choose to tell a friend for sharing.
But not all streaming progress can be as smoothly as you expected. Some unknown problems usually happen. iMovie always output its project as MOV, which make the uploading step very difficult to continue. Of course, you can directly go to "Share" to finish this step, but unknown problems will prevent you from the successful uploading.
In order to avoid all unknown problems and make the uploading producer finish at one time. Here you need this Pavtube Video Converter for Mac to help you. Transcode MOV to H.264 can be the best solution. This codec is supported by all three video sharing websites. (See YouTube, Vimeo, Facebook supported format in detail).
Downscale bit rate to shrink file size to speed up the uploading speed can also be realized by this converter. You don't have to worry about the quality degradation or video and audio sync problem, thanks to the advanced sync technology in this program, sharp quality and sync can be achieved at the same time. You can follow these steps below and start your conversion.
How to upload iMovie files to YouTube, Vimeo, Facebook easily and smoothly?
Step 1. Download this converter on your Mac
Free download this converter on your Mac without any problem, the latest Yosemite can also be supported by this converter. Click "File">"Add Video/Audio" to load your files, if your files are on the desktop, you can directly drag them into the main UI.

Tips:
You can split your videos by clicking this "Split" icon.
Choose all the short files you want to join and then click "Merge into one file", it can help you combine all your files in a complete one.
Step 2. Choose proper format for uploading iMovie files to YouTube, Vimeo, Facebook
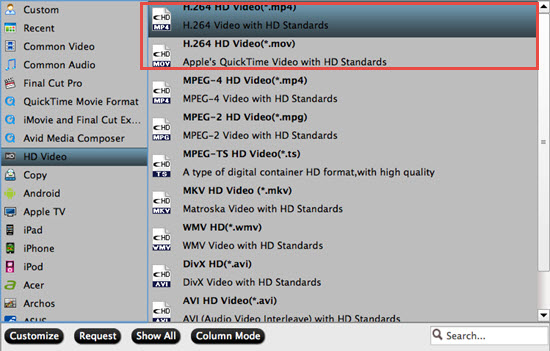
After checking the supported format that those video sharing websites, you can find that H.264 is the best codec to compatible with those three websites. Usually, iMovie will outpout your files in MOV, which can't be well accepted in those three website.
So just go to the Format bar and choose "HD Video">"H.264 HD Video (*.mp4)" to convert.
Step 3. Adjust parameters to speed up the progress of uploading iMoive to YouTube, Vimeo, Facebook
Why the uploading speed is very slow? This depends on many factors.
- The length of your files are too long that over 15min
- The file quality is too high, such as 1080p, 2K
- The codec doesn't friendly to video sharing websites
- Your Internet speed
In order to solve them all, you can cut down your files length by removing some unnecessary parts. Or turn to Pavtube Video Converter for Mac for help. Click this "Settings", lower your bit rate and frame rate, which will shrink your file size. If you have no clue about the generated files, just check the table below in this UI.
You may worry about the file quality after lowering the bit rate and frame rate. Thanks to the calculator in this program, it will help you keep the balance between the quality and the file size.

Step 4. Start to convert iMovie projects to YouTube, Vimeo, Facebook as H.264
After setting the file location, go back to the main UI and then click this "Convert" to start your conversion.
If you happen to forget to set the file location, click "Open output folder" to find them in default place.
After that, you will get the compatible and in proper file size videos for uploading.


