Pavtube ChewTune is an easy-to-use program, which just needs several clicks to produce DRM-free files. This part presents the details on how to load files, select output format, and start unlocking DRM files.
Choose Output Directory and Find the Output Folder
Start producing DRM-free files
Load/import DRM files
When you start up Pavtube ChewTune, the main interface pops up:
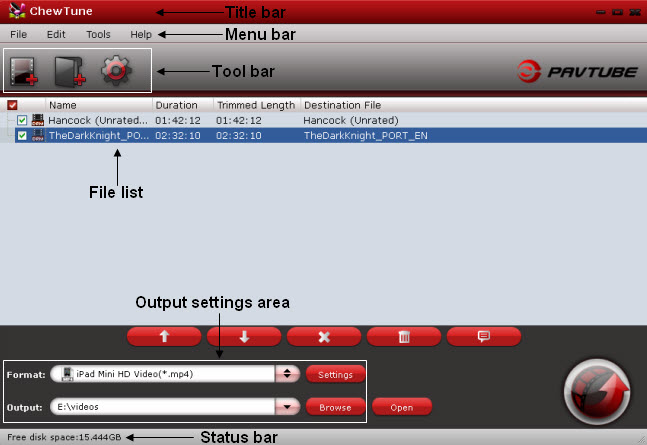
Load video files to the software using any of the three ways below:
A. Click “File” menu, and select "Add Video/Audio" or "Add from Folder" to import source files.

B. Click “Add Video” button or “Add from folder" button to import source files.

C. Open the folder that contains source files, and drag and drop DRM-protected files to the program.
Note:
1. Pavtube ChewTune legally bypasses DRM copy protection from your files downloaded from iTunes, Amazon Instant Video…, and records them to a format that you specified. If the files are not your authorized ones, we are afraid that Pavtube ChewTune will refuse to handle them.
2. To record/convert iTunes files, iTunes must be installed. To convert Windows Media files, Windows Media Player is required.
Set output format
Clicking the Format bar, you can choose output format from the format list or customize which formats to be shown on the list.
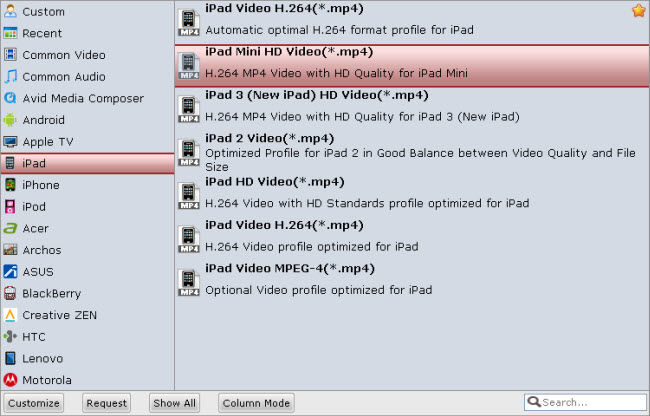
All formats here are set with optimized video/audio codecs, bitrates, frame rates, etc. But you can still specify as you like by clicking Settings button.
In the Profile Settings window, you can choose or specify exactly the parameters you like. And in the Task information section, you can compare the detailed information of the source video and the target video.
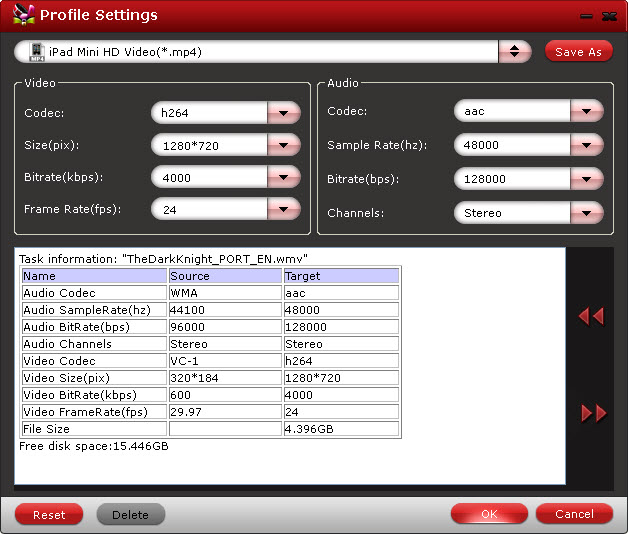
Video Codec is used to encode the digital video contents. Movies on the iTunes Store use the H.264 codec exclusively.
Video Size refers to the physical number of columns and rows of pixels creating the display (e.g., 1920×1080). Apple defined that iTunes Store video use 640×480 for SD and 1280×720 for HD contents. 1920×1080 is NOT recommended for recording, as this may lead to audio and video out of sync issues.
Video Bitrate refers to the number of bits that are conveyed per unit of time (data transfer rate). Set video bitrate up to improve video quality.
Video Frame rate is the rate at which sequential frames are presented. Frame rate varies according to the video standard in use. In North America and Japan, 30 frames per second is the broadcast standard, with 24fps now common in production for high-definition video.
Audio codec is used to encode the audio contents.
Audio Sample rate defines the number of samples per unit of time (usually seconds) taken from a continuous signal to make a discrete signal. In digital audio the most common sampling rates are 44.1 kHz, 48 kHz, and 96 kHz.
Audio Bitrate refers to the data transfer rate of audio contents.
Audio Channels refers to the passages for audio streams to pass-through. A stereo audio has two independent channels, one left and one right while mono has one channel only. A 5.1 system provides front left, center and right, surround left and right and subwoofer. When listen to music from earphone or handset, stereo audio is just fine.
Save As: click to save your settings as a new format. The next time you run ChewTune, you can
click the format bar and find the format in "Custom" group.
Reset: click to restore default settings.
Choose Output Directory and Find the Output Folder
By clicking Browse button on main interface, you can choose the directory where you’d like to put the output files.
By clicking Open button, you can popup the output folder.

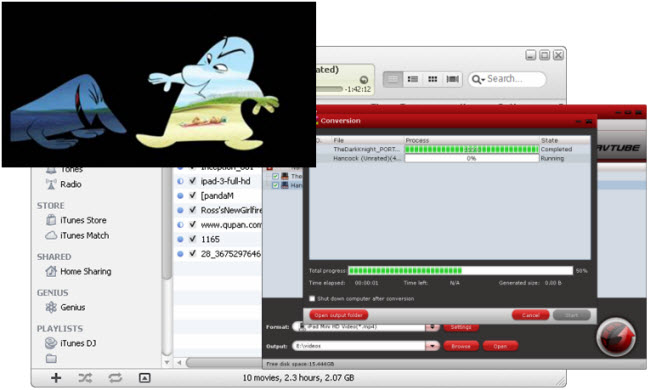
Start removing DRM and producing DRM-free files
Click the “Convert” button to start recording DRM files to selected output format.
 A pop-up window will appear instantly to tell you the important notices during the recording process:
1. Please don’t use iTunes during converting, or an error may occur.
The recording or converting requires assistance from iTunes, so you can not turn off iTunes until the task is completed. Also, don’t let your computer stand by, sleep or lock screen during conversion, otherwise a failure may occur.
When recording iTunes files, the playing window of iTunes stays on top at the upper left corner of your computer screen as the above image shows.
2. It’s highly recommended to use iTunes v10.5.0/10.5.1/10.4.1. The program may not support latest iTunes adequately. Click to download iTunes 10 from Apple official site.
3. This product cannot convert unplayable iTunes files (damaged, unauthorized, etc.)
4. The DRM removing process may mislead your anti-virus software to falsely report virus/worm. Please ignore the report to keep on ripping.
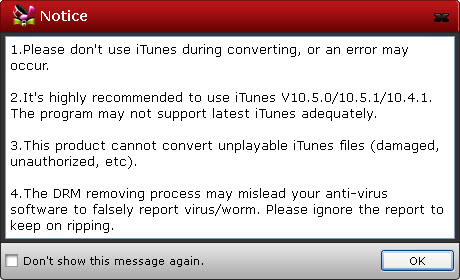
If you don’t want the notice information to appear next time you run the program, tick off the checkbox before Don’t show this message again. Then Click OK.
The Conversion window displays task list and progress information including Time elapsed, Time left, and Generated size.
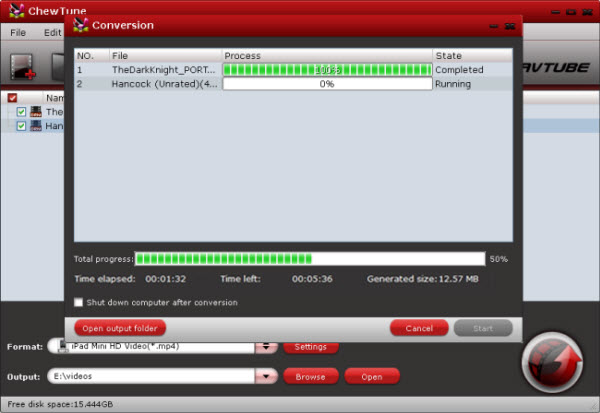
Ticking off Shut down computer after conversion option, you can leave the program running and do other things instead of waiting around in front of the computer for the entire recording process.
After the conversion, you can click Open output folder to popup output directory with the generated files.
Note: If you are using a trial version, there will be Pavtube logo watermark in the middle of output files. To get rid of the logo watermark and get better performance, please click Help > Register > Order to buy full version.


