Final Cut Pro X is the most popular editing program for Mac users. Compared with the previous version, FCP X is designed to support MXF video files from Canon, Sony and Panasonic as well as XAVC files from Sony F55/F5, which provides great convenience and flexibility in operation to users by importing videos to FCP X from camera without the process of Log and Transfer.
Part I. How to import video files to FCP X
Step 1. Run FCP X
Run FCP X on Mac and connect your camera to Mac with a USB cable and turn it on.
Step 2. Import video files from camera to FCP X
Click File on main UI to follow “Import” and “Media”. FCP X allows you to import iMovie project, iMovie Event Library and camera.
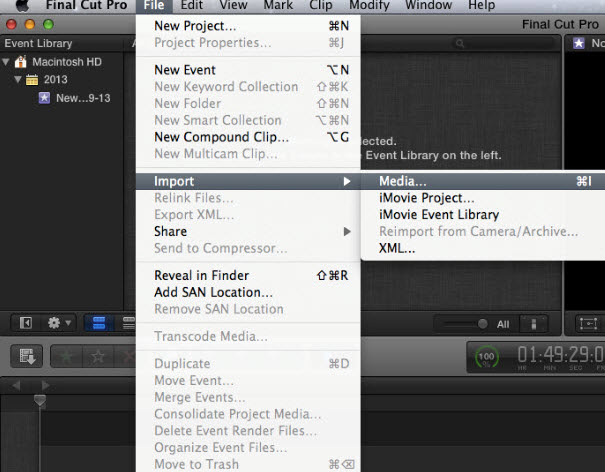
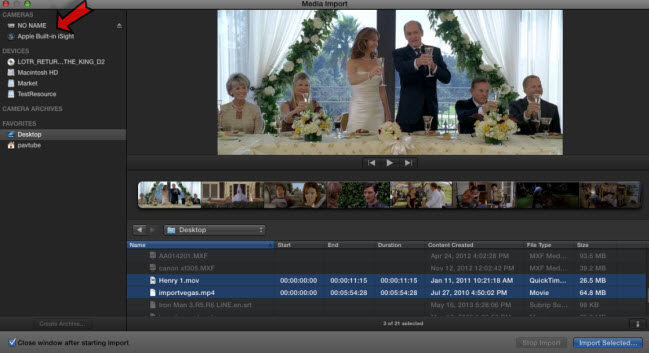
Find your camera on top-left sliding bar and click it to import the video clips you shoot to FCP X.
Step 3. Create new event or add to the existing event
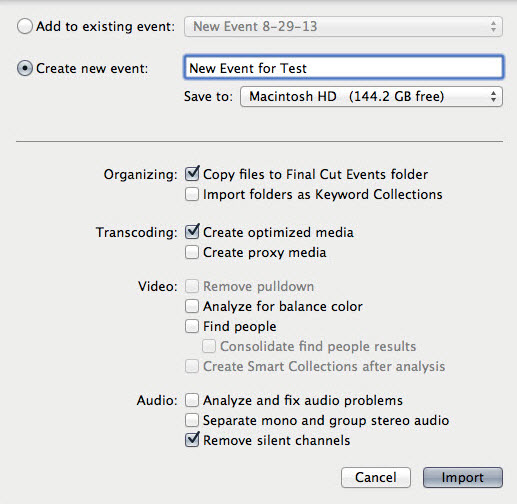
After checking the video files you want to import in your camera, click return to choose to create new event for this importing or just add the video files to the existing event.
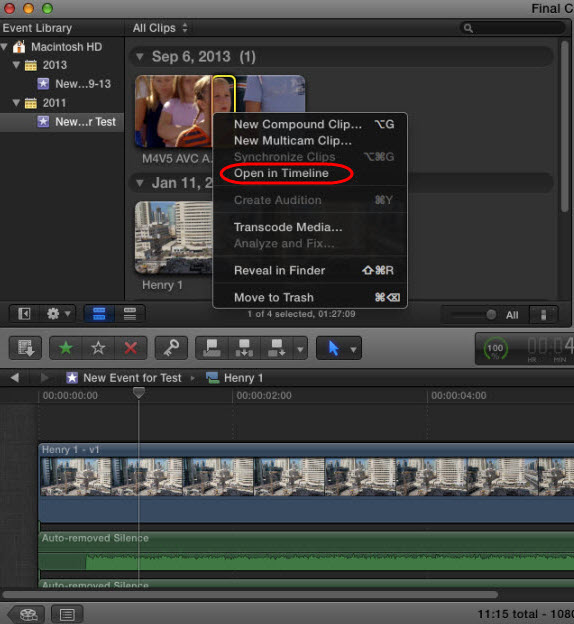
Step 4. Edit video files in FCP X timeline
After clicking the “Import” button in the third step mentioned above, you’ll find the imported video files under “All Clips” item, and right click to follow “Open in Timeline” and you can edit them freely.
Part II. Log & Transfer video files to FCP 6/7
When working with camera videos which are recorded into a memory card, you need to take the method called “Log and Transfer” to import the camera footage to FCP 6/7. Log and Transfer is an essential step for you to extract camera footage to the editable video format by FCP 6/7. Most camera recordings are in a compressed video format like AVCHD which is difficulty for FCP 6/7 to recognize and edit. The process of Log and Transfer will allow you to ingest camera footage to an editable format for FCP 6/7.
Step 1. Plug memory card
Plug the memory card to the memory card reader on your Mac.
Step 2. Log and Transfer
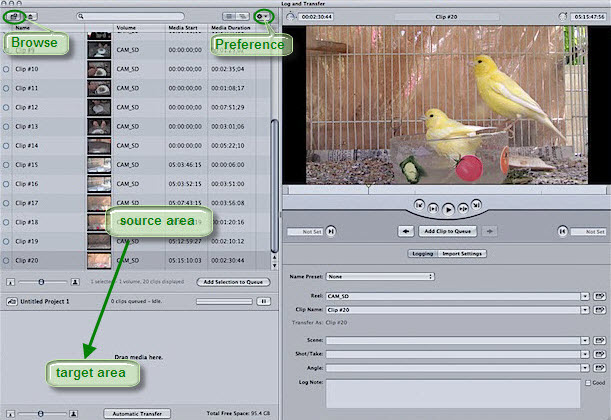
Launch FCP 6/7 on your Mac and click “File” to follow “Log and Transfer.” Then the “Log and Transfer” window will pop up with video files in your memory card. On the “Log and Transfer” window, there are several important areas: source area showing the video clips in your memory card; preview window for each video clip; the area where the video clip can be marked with in and out points; video clip description area; area where you can drag media to start logging.
Step 3. Logging footage
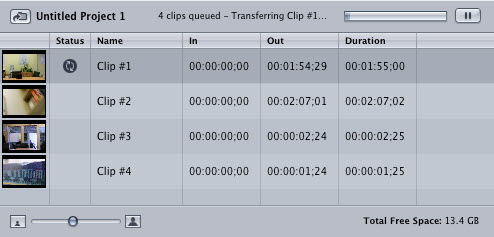
Once the video codec is changed, you can mark your camera footage with in and out points, and navigate to previous or next clips or add additional clips to the queue. The swirling sign in Status column indicates that the logging process is underway. You can also click the pause icon to stop logging. The transferred video clips will be added to your project automatically and then you can edit them in FCP 6/7 without any difficulty.
If FCP 6/7/X fails to recognize your camera or camcorder or the videos you want to edit in editing programs, you can turn to a FCP converter for help to transcode your videos to the format that is compatible with FCP 6/7/X.
If you got AVCHD video files shot by your camera or camcorder, an AVCHD to FCP converter will be a good policy.
4K MXF recordings shot by a Canon C500 (PL) and P2 MXF videos generated by a Panasonic camcorder can also find their easy and smooth path to FCP series.
If you think that Pavtube video converter series can only handle the above video sources, then you’re wrong. Discs like Blu-ray and DVD can also be imported to FCP X.