How to recover deleted photstream album?
"I accidentally deleted a shared photostream album on my iPhone 5. I can still see it on my iPad and others I shared it with can still see it. How do I get it back on my iPhone? I am the owner of the shared photostream."

How Photo Stream Works on your iOS devices?
In our previous article, we have talked about the difference between Camera Roll and Photo Stream. And we know that Photo Stream is part of Apple's iCloud free service. It helps to wirelessly syncs and backs up all the photos you take on your iPhone or iPad. After manually enabled Photo Stream on available iOS devices, you will be able to access your snapshots from any devices at any time. When you delete a photo from My Photo Stream, it will automatically erase from other devices connected to your iCloud account. If you had not backup your deleted photos in your Photo Stream to your iOS devices before, you won't be able to restore them back from the previous copies saved on your iOS devices.
Applications to restore iPhone/iPad Photo Stream deleted photos
When in that situation, you will need a special tool to assist you to directly recover photo stream deleted photos directly from your iPhone or iPad. There's a solution in hand called iOS Data Recovery (Top 5 Data Recovery for Windows 10), which enables you to recover photo stream deleted photos directly from iPhone or iPad. Just connect your iPhone or iPad to the data recover application, it will perform a through scan of your devices to find and list all the existed or non existed data on your device. You can use the filter function to choose only "deleted" files to recover.
The program has both Windows and Mac version, for Mac users, just download Mac iOS Data Recovery to get the job easily done.
How to Recover Photo Stream Deleted Photos on iPhone/iPad?
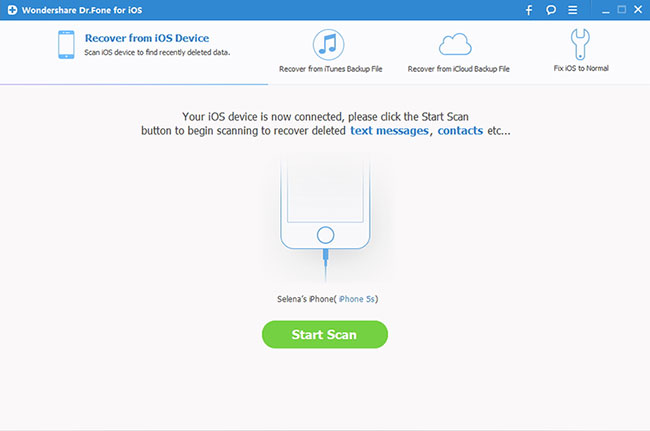
Step 1: Run the program, connect your iPhone or iPad to the computer.
Install and run iOS Data Recovery on your computer, then connect your iPhone or iPad to the computer through its equipped USB cable. The program will detect your device automatically and shows you the window for "Recover from iOS Device".
Tips: Before run the application, make sure you have downloaded the latest version of iTunes. To avoid automatically syncing, don't launch iTunes when running iOS Data Recovery. Here, you are advised to disable the automatically syncing in iTunes beforehand: Launch iTunes > Preference > Device, check "Prevent iPods, iPhones and iPads from syncing automatically".
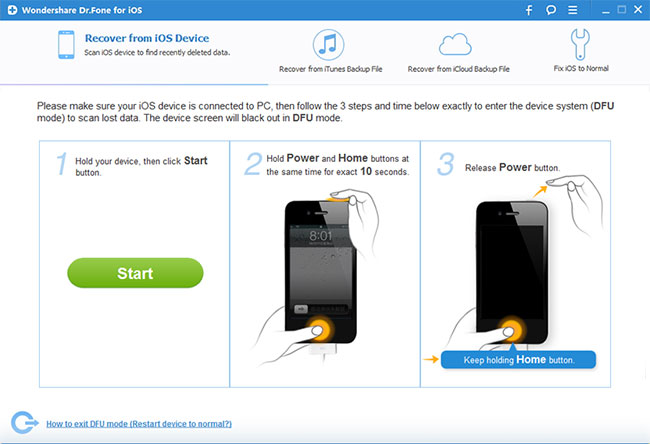
If your iOS device is iPhone 4, iPhone 3GS, iPad 1 or iPod touch 4, you can switch to the "Advanced Mode" through the button at the lower-right corner. After then follow the instruction in the window to enter device scanning mode: Hold your device, then click the Start button > Hold the Power and Home buttons at the same time for exactly 10 seconds > Release the Power button but keep the Home button pressed.
Step 2. Scan Your Device for Lost Data on it.
Tap the "Start Scan" button, the program will start to scan your iPhone or iPad to find for deleted or lost data. It will take a few minutes for the scanning process to be completed. During the scanning process, if you find the data you are looking for to recover, you can click the "Pause" button to stop the process.

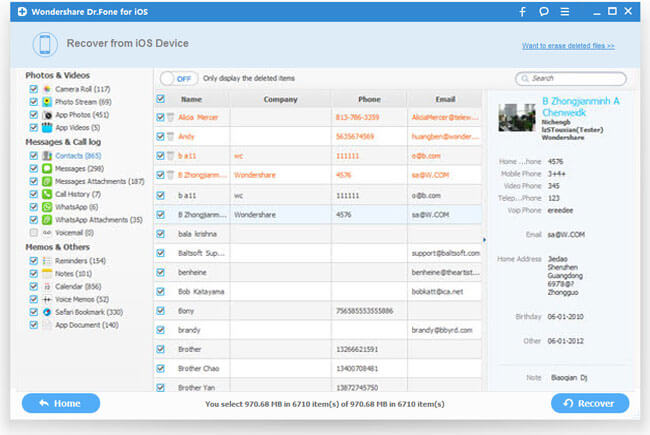
Step 3. Preview the Scanned Data
When the scanning process is over, a scan result with both lost and existing Data on your iPhone or iPad will be displayed in categories. To filter out the deleted data on your device, you can turn on the option "Only display the deleted items". You can preview the found data on its file type by clicking the file type in the left side. You can also search for a specific file by typing a keyword in the search box on the top right of the window.
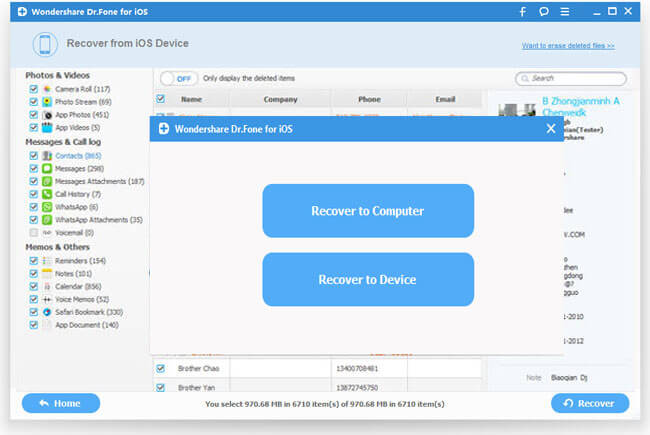
Step 4: Recover Data from your iPhone or iPad.
When you find the data you need, select them by putting a check mark in front of the box. After that, hit the "Recover" button at the bottom right of the window. And the recovered data will be saved to your computer by default.