YouTube has become the most popular website to share videos of all genres whether they are movie clips or DIY videos and it is also becoming an excellent platform for many tutors, makeup gurus and designers to share their professional skills for entertainment or product promotion. If you are one of these YouTubers, you must have noticed that sometimes you are trying to upload MP4 video files to YouTube, but failed. From YouTube Official Website, we know that MP4 is indeed one of the YouTube supported formats. So, why upload MP4 to YouTube failed? Is there anything wrong when uploading MP4 to YouTube? Don't worry. This post will introduce all-round solution to upload MP4 to YouTube failed issue.
Part 1: Why Upload MP4 to YouTube Failed?
Part 2: How to Upload MP4 Video to YouTube without Errors
Part 3: Start to upload MP4 to YouTube successfully
Part 1: Why Upload MP4 to YouTube Failed?
1. Can't upload MP4 to YouTube- Unsupported File Type
Although MP4 is among the list of YouTube supported format, some users still receive "invalid file format" error message when trying to upload MP4 to YouTube. That's because MP4 is a container format that can be encoded with many different types of codecs, such as Divx, H264, MPEG-4, H.263 and audio codecs AAC, MP4, AC-3, etc while YouTube is only compatible with MPEG-4/H.264 video and AAC audio. When MP4 video that you want to upload contains YouTube unsupported codecs, YouTube will reject your video file. (Read here to learn more about YouTube best supported formats and settings for uploading.)
Solution: You check out your MP4 file information with free program MediaInfo. If it's in the wrong codec, convert the MP4 video to YouTube compatible format with the help of MP4 video converter.
2. MP4 video file is too long to upload YouTube
By default, you can upload videos that are up to 15 minutes long. You can also upload longer videos by following the steps below to verify your account.
(1). Go to youtube.com/upload
(2). Click "Increase your limit" link at the bottom. You can also go directly to https://www.youtube.com/verify.
(3). Follow the instructions and click "Submit" to verify your account. Once you've verified your account, you can upload video that is longer than 15 minutes long.
Solution: If your MP4 video file is longer than the time limit of your YouTube, you may need to cut the unwanted or unnecessary parts of the MP4 video with the help of Video Editor to make your MP4 file shorter.
3. MP4 File Size is too big
YouTube supported video file size is limited to 2GB, but 20GB is allowed by using an up-to-date browser.
As we all know, the video size also has influence on the file uploading. If your MP4 file is too big, it will take a long time to upload to YouTube. During the uploading process, if your Internet is lost or weaker, you will fail to upload big MP4 to YouTube.
Solution: There are many Video compressor applications on the market, just choose one to compress MP4 file size for quickly uploading to YouTube.
4. MP4 file is broken when upload to YouTube
Broken or corrupted MP4 videos can't be successfully uploaded to YouTube. Just check out whether your MP4 video is broken or not by playing them with MP4 player. If the MP4 file is broken, follow this guide to see How to Repair Corrupt MP4 File using VLC and other Media Player.
Part 2: How to Upload MP4 Video to YouTube without Errors
After most reasons for upload MP4 to YouTube failed issue and solutions have been described in the above mentioned text, you may be confused about where to get a proper MP4 video converter, video editor or video compressor to fix common MP4 to YouTube upload problems like incompatible codecs, long MP4 video, big MP4 file size, etc. Pavtube Video Converter Ultimate is the just right one for you. This powerful software integrates MP4 video converter, video editor, and video compressor into one application. So, with this tool in hand, you can quickly and easily fix all upload MP4 to YouTube failed issues:
1. Convert MP4 to YouTube supported MP4 codecs H.264/AAC or other uploading formats, such as MOV, MPEG4, AVI, WMV, MPEGPS, FLV, 3GPP, WebM without losing quality in 30x faster speed than others.
2. Split/trim MP4 to make video file shorter for YouTube upload.
3. Compress MP4 video size or for much faster processing and uploading speed.
4. Easily edit MP4 video file with more editing options, such as cropping, adding watermark/subtitles, adjusting bit rate, frame rate, resolution and more.
For Mac users, just download Pavtube iMedia Converter for Mac to help you upload MP4 to YouTube. Now, please follow the next steps to see how to use this software to fix upload MP4 to YouTube failed issue.
Step by Step to fix upload MP4 to YouTube failed issue
Step 1: Import MP4 to this MP4 to YouTube converter
Launch the program on your computer, click "File" menu and select "Add Video/Audio" or "Add from folder" to import your MP4 videos to the application.

Step 2: Convert MP4 to YouTube format if your video is in wrong format
Click "Format" bar, from its drop-down options, choose YouTube best compatible uploading format from "Common VIdeo" > "H.264 High Profile Video(*.mp4)".

Step 3: Split/Trim MP4 Video if it is too long
There're lots of other useful video editing options inside the MP4 to YouTube converter, including: trim video length, crop video size, split large video into segments, add watermarks, adjust video effect, add external subtitles to MP4 video, merge MP4 files, etc.
If your MP4 video file is too long for YouTube uploading, just use the 'Trim" function to cut the unwanted or unnecessary parts of the video to reduce the video length for a successful uploading.
Click the "Edit" icon on the tool bar of main interface, the "Video Editor" window will pop up. To trim a video, please switch to "Trim" tab in “Video Editor” Interface and follow any of the methods below:
1. Drag the control sliders 
 to include the segment you want to remain.
2. Click the left square bracket  to set start point, and click the right square bracket
  to set end point when previewing the video.
3. Input specific values to “Start” and “End” box.

Trim frame by frame: Pavtube Video Converter Ultimate offers "Previous Frame" and "Next Frame" options for users to select frames and trim accurately.

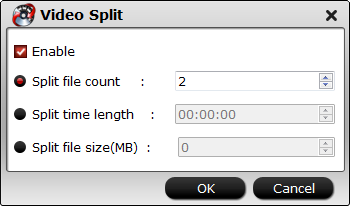
Split MP4 video file into several small pieces:
By clicking the “Split” button  on file list, you can launch the “Video Split” window. Checking “Enable” to enable it, and then you can split the file by file count, time length, or file size.
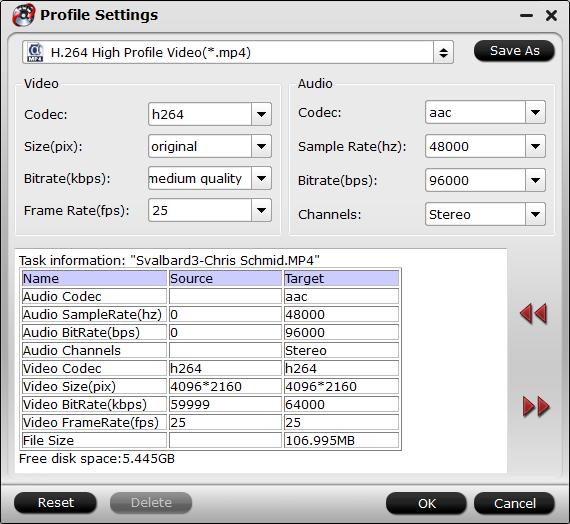
Step 4: Tweak encoding settings to compress MP4 file size for YouTube upload
After you split or trim MP4 videos, not only the video length becomes shorter, but also the video file size will be reduced. What's more, you can also compress MP4 file size for YouTube upload by customizing output profile parameters.
Click "Settings" to open the "Profile Settings" window, here you can adjust the output video codec, resolution, bit rate, frame rate and audio codec, bit rate, sample rate and channels. You can change output video resolution to 640 x 480, which will largely reduce MP4 video size. Or lower the bit rate 20-50% of the default to get small files.
Step 5: Start the MP4 to YouTube conversion
Start MP4 to YouTube best upload format and settings conversion by hitting the right bottom Convert button, when the conversion is over, you will have no limitation to upload and share any video on YouTube with fast speed and perfect quality.
Part 3: Start to upload MP4 to YouTube successfully
While uploading the converted MP4 video to YouTube, you have to follow these easy steps:
1. Open www.youtube.com
2. Log in your Account
3. From right top corner select “Upload” button
4. On next window, select the converted MP4 file using arrow (highlighted) button. You also can drag and drop MP4 file into that box.
5. Now your file is starting uploading on YouTube server
6. While uploading you file you can fill all relevant information about your file
7. Once your file is uploaded, then click on “Publish” button
8. Now after finishing the uploading, it will redirect you to the video manager, where your all video will store, and you can do anything.


