When I upload a video to YouTube, the quality gets really bad
"I record my video with Fraps and if you don't know Fraps, it records the video with highest possible quality and puts out really huge file when it's done. Because the length of my videos are each 15-18 seconds, it end up being within 1GB and that is fine with me as long as I get the highest quality from the recording. Then I use Sony Vegas 13 Pro to render my video.I found that after rendering .avi puts out the best quality but it's just not making any difference on YouTube."

If you are looking for a simple and convenient way to share your videos with friends, family and perfect strangers, uploading video to YouTube is absolutely your excellent choice. Although the whole video uploading process can be easily and quickly completed with just a few clicks, however, if you are not using the best YouTube uploading formats and settings, you will probably encounter the same issue listed above. To assist you get around this problem, the following article will show you YouTube best supported formats and settings for uploading.
YouTube supported uploading formats
Not sure which format to save your video? Receiving an "invalid file format error message when you're uploading"? Make sure that you're using one of the following uploading formats:
.MOV, .MPEG4, .MP4, .AVI, .WMV, .MPEGPS, .FLV, .3GPP. .WebM
A proper video format will not ensure you a smooth uploading process and a splendid video quality, you will still need to adjust your video format to YouTube best uploading encoding settings as below:
Container: MP4
Audio codec: AAC-LC
Channels: Stereo or Stereo + 5.1
Sample rate 96khz or 48khz
Video codec: H.264
Progressive scan not interlacing
High Profile
2 consecutive B frames
Closed GOP. GOP of half the frame rate.
CABAC
Variable bitrate, no bit rate limit required, though we offer recommended bit rates below for reference,
Chroma subsampling: 4:2:0
Frame rate
Content should be encoded and uploaded in the same frame rate it was recorded.
Common frame rates include: 24, 25, 30, 48, 50, 60 frames per second (other frame rates are also acceptable).
Interlaced content should be deinterlaced before uploading. For example, 1080i60 content should be deinterlaced to 1080p30, going from 60 interlaced fields per second to 30 progressive frames per second.
Bitrate
The bitrates below are recommendations for uploads. Audio playback bitrate is not related to video resolution.
Recommended video bit rate for upload
| Type | Video Bitrate, Standard Frame Rate (24, 25, 30) |
Video Bitrate, High Frame Rate (48, 50, 60) |
| 2160p (4k) | 35-45 Mbps | 53-68 Mbps |
| 1440p (2k) | 16 Mbps | 24 Mbps |
| 1080p | 8 Mbps | 12 Mbps |
| 720p | 5 Mbps | 7.5 Mbps |
| 480p | 2.5 Mbps | 4 Mbps |
| 360p | 1 Mbps | 1.5 Mbps |
Recommended audio bit rate for upload
| Type | Audio Bitrate |
| Mono | 128 kbps |
| Stereo | 384 kbps |
| 5.1 | 512 kbps |
YouTube uses 16:9 aspect ratio players. If you're uploading a non-16:9 file, it will be processed and displayed correctly as well, with pillar boxes (black bars on the left and right) or letter boxes (black bars at the top and bottom) provided by the player.
Time and file size limitations for YouTube video upload
Size: Up to 2GB
Length: By default, you can upload videos that are up to 15 minutes long, but you can upload longer videos by following the steps below to verify your account.
1. go to the upload page at youtube.com/upload.
2. At the bottom of the page, click Increase your limit. You can also go directly to https://www.youtube.com/verify.
3. Follow the steps to verify your account. You can choose to receive a verification code through a text message on a mobile phone or an automated voice call.
4. Once you've verified your account, you can upload videos that are longer than 15 minutes long.
Best Video Converter for YouTube video uploading
To upload video with incompatible formats and settings to YouTube, you will need a professional YouTube video converter to do some format conversion and profile setting adjustment before performing the video uploading process. Here, Pavtube Video Converter Ultimate for Windows/Mac(reivew) is recommended to complete the task for you. The program not only helps to convert various different media types including Blu-ray/DVD disc or 4K/2K/HD/SD with the format of H.265/HEVC, XAVC S, MXF, AVCHD MTS/M2TS, etc video to YouTube compatible formats listed above, but also enables you to get the best YouTube uploading settings by flexibly tweaking the output video codec, resolution, bit rate, frame rate or audio codec, sample rate, bit rate or channels in its built-in profile settings window.
Customize and edit your video before YouTube uploading
Want to polish your video before sharing with large audience on YouTube? With the program's full package video editing and customization function, you can get the exactly video you want. You can flip the video horizontally or vertically, rotate the video clockwise or counterclockwise to make the video displayed in a right angel, trim or cut a length video to leave only your favorite parts, crop the video to remove the unwanted black borders or area, personalize or protect your video with image/video/transparent text watermark, change video effect like brightness, contrast, saturation or apply special rendering effect, add external srt/ass/ssa subtitle to mp4 video to make it more interesting. Split large video into equal small parts by file size, count or length or merge separate video clips into one file.
How to Encode Video to YouTube with Best Uploading Formats and Setting?
Step 1: Input source video to the program.
Launch the program on your computer, click "File" menu and select "Add Video/Audio" or "Add from folder" to import source videos to the application.

Step 2: Output Youtube best uploading format for 4K video.
Click "Format" bar, from its drop-down options, choose YouTube best compatible uploading format from "Common VIdeo" > "H.264 High Profile Video(*.mp4)".

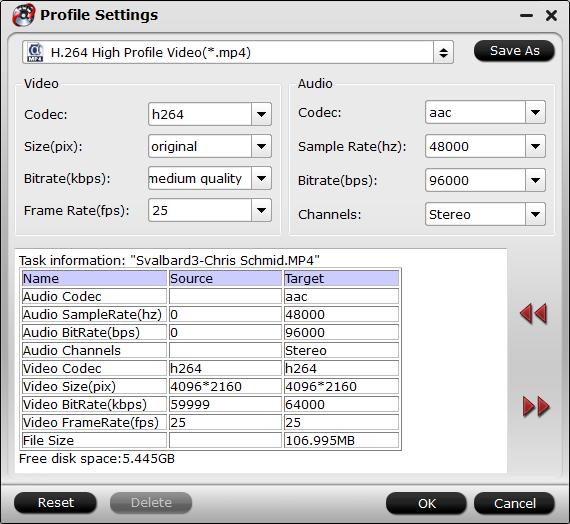
Step 3: Tweak encoding settings for YouTube upload.
Click "Hit "Settings" to open the "Profile Settings" window, here you can adjust the output video codec, resolution, bit rate, frame rate and audio codec, bit rate, sample rate and channels to let them fit them YouTube.
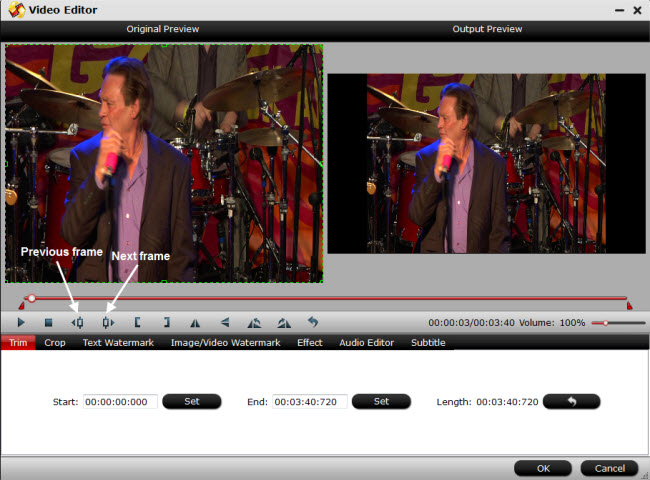
Step 4: Edit video file (optional).
Select an item on the main interface to activate the "Video Editor" function, in the opened video editor window, you can trim video file length, crop video file size, add watermark, apply special rendering effect, remove/replace audio in video or add external subtitles to video, etc.
Step 5: Start the conversion.
Start video to YouTube best upload format and settings conversion by hitting the right bottom convert button, when the conversion is over, you will have no limitation to upload and share any video on YouTube with fast speed and perfect quality.


