Good quality videos, lots of customisation and a strong social element make Vimeo a great choice for sharing videos online. To make your video files upload successfully and look beautiful on Vimeo, make sure that your videos are compatible with the best uploading compression settings for vimeo displayed below:
Best compression settings for Vimeo uploading
Video compression settings
Codec: H.264
A codec is the format in which your video will be encoded. Vimeo accepts most major video codecs, but for best results we recommend using H.264. If you' re uploading High Definition (HD) video, choose the High Profile H.264 setting instead of Main Profile.
Frame rate
When preparing your video for upload, it's best to maintain the video's native frame rate when compressing your video. If your footage exceeds 60 FPS, Vimeo will automatically reduce the frame rate. If there is an option for keyframes, choose the same value you used for frame rate. Important: Always choose "constant" frame rate instead of "variable" frame rate.
Bit rate
Bit rate (also known as data rate) controls the visual quality of the video and its file size. If your video editing software gives you the option, choose a "variable" bit rate and select a value from the ranges below. You can experiment with different rates if your file is too large or you're not happy with the quality of your source file.
Resolution
Video come in all shapes and sizes but there are some of the most common formats.
Audio compression settings
Codec: AAC-LC(Advanced Audio Codec)
For best results, you are recommend using AAC-LC(low complexity) for the audio codec
Data rate: 320 kbit/s
For best results, encode your audio at constant rate of 320 kbit/s.
Sample rate: 48 kHz
For best results, set your audio sample rate to 48 kHz. If your working setting is already less than or equal to 48 kHz, leave it as is.
Upload Unsupported file formats to Vimeo
If the file format that you are going to upload to Vimeo does not comly with the Vimeo compression settings listed above, you can download a third-party video conversion tool to perform a conversion for you. After much online searching and comparison, you will find that Pavtube Video Converter Ultimate for Windows/Mac (best video converter ultimate review) can do that job best for you. Besides converting any Vimeo unsupported file formats such as H.265/HEVC, GoPro Hero 4, AVCHD, MXF, etc for you, the program also offers beneficial output profile customization tool for you to flexibly adjust output video codec, bit rate, frame rate, resolution, audio codec, sample rate, bit rate, channels, etc to Vimeo best compression settings listed above.
How to Get Best Compression Settings for Vimeo Uploading from Any Video?
Step 1: Load unsupported files into the program.
Launch the program on your computer, click "File" menu and select "Add Video/Audio" or "Add from folder" to import unsupported videos to the application.

Step 2: Define output format.
Click "Format" bar, select Vimeo best uploading H.264 formats from its drop-down options, for uploading HD videos, it is idea for you to choose "H.264 High Profile Video(*.mp4)" from "Common Video" main category menu.

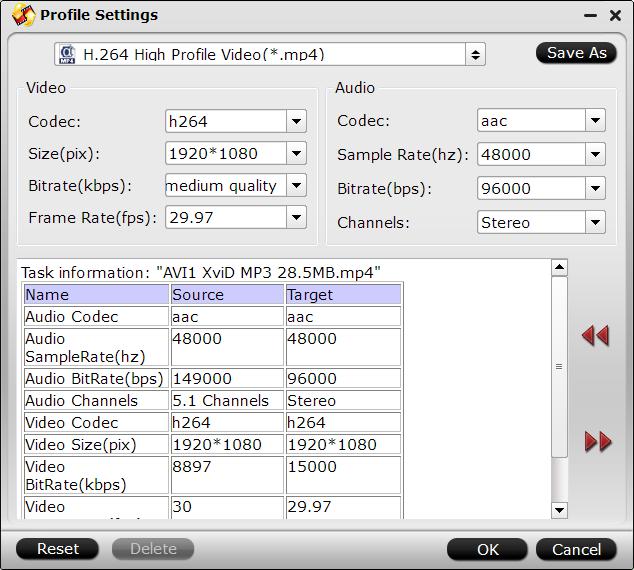
Step 3: Customize output profile parameters.
Click "Hit "Settings" to open the "Profile Settings" window, here you can adjust the output video codec, resolution, bit rate, frame rate and audio codec, bit rate, sample rate and channels to achieve the Vimeo uploading compression settings.
Step 5: Start the conversion.
Start video to vimeo best uploading settings conversion by hitting the right bottom convert button, when the conversion is over, you will have no limitation to upload and share videos on Vimeo.


