What is Pavtube ByteCopy for Mac?
Install, Register & Uninstall Pavtube ByteCopy for Mac
User Interface
What is Pavtube ByteCopy for Mac?
Pavtube ByteCopy for Mac software provides perfect backup solution for Blu-ray and DVD movie collectors - fast speed, full backup, lossless quality, multiple subtitles and audio streams, and easy of use. It can do all things that a general Blu-ray DVD Ripper does. By using this program, you can convert Blu-ray and DVD movies to any other formats to fit for your Apple devices, Android devices, media players, and video editing apps like FCP, iMovie, FCE, Avid Media Composer, and more.However, ByteCopy for Mac is far more than a general Blu-ray/DVD ripping tool. It is able to convert the video clips from proprietary disc (Blu-ray Disc/DVD) into a set of MKV files, preserving most information like chapter markers, multiple audio tracks and subtitle streams but not changing it in any way.
Besides lossless/encoded Multi-track MKV format, the latest version of ByteCopy for Mac now provides users with more multi-track output formats to choose from, including Multi-track MP4, Multi-track MOV, Multi-track Apple ProRes 422 (*.mov), Multi-track Apple ProRes 422 (*.mov), Multi-track Apple ProRes 422 (HQ) (*.mov), Multi-track Apple ProRes 422 (LT) (*.mov), Multi-track Apple ProRes 422 (Proxy) (*.mov), and Multi-track Apple ProRes 4444 (*.mov).
Key features:
- Keep multiple audio tracks and subtitles in MKV container
- Preserve wanted audio tracks in MOV and MP4 format
- Support all output formats that Pavtube BDMagic for Mac supports
- Direct copy titles from Blu-ray and DVD movies
- Keep the chapter structure in a movie title in MKV container
- Provide best video settings for iOS/Android/Windows Tablets/Phones
- Provide optimized multi-track Apple ProRes format for editing use
- Support adding *.srt, *.ass/*.ssa external subtitles as hard subs
- Output Side-by-Side, Top-Bottom, or Anaglyph 3D movie in in MKV/MP4/MOV/WMV/AVI format
- Edit movie by trimming, cropping, merging, etc.
- Shut down computer after conversion
- Support latest Blu-ray and DVD movies
Kindly Note: Currently you can't edit videos by merging, splitting, trimming, cropping, adding .srt, .ass subtitle files, etc. if choosing multi-track output formats.
Install, Register, & Uninstall Pavtube ByteCopy
System Requirements- 1G Hz or above Intel processor
- Snow Leopard (10.6), Lion (10.7), Mountain Lion (10.8), Mavericks (10.9)
- 1GB physical RAM (memory) or above.
- 1024*768 or higher resolution display.
- Optical Drive: DVD drive (BD drive is required for ripping Blu-ray disc)
Install& Uninstall
To install Pavtube ByteCopy for Mac, please
1. Download Pavtube ByteCopy for Mac setup or install file.
2. Double click on the setup file to begin installation.
3. Follow the instructions to install Pavtube ByteCopy on your Mac computer.
To remove Pavtube ByteCopy from your Mac computer, simply drag it to trash
Registration
Please note that you can’t directly register the software from trial version. You need to purchase the retail version, activate Pavtube Member Zone account, and login to get the download link and registration code for retail version. If you didn’t get the activation email, please contact our technical support via dvdmacsupport@pavtube.com for help.
User Interface
Pavtube ByteCopy for Mac is a very easy-to-use converter tool. You can get what you want within just a few clicks on the interface.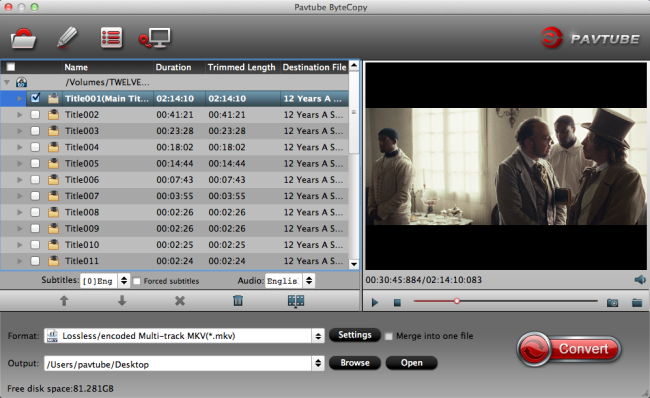
Menu bar
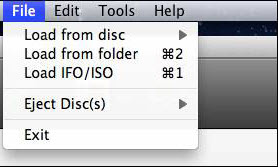
There are four menus in menu bar, namely “File”, “Edit”, “Tools” and “Help”.

File menu: Contain operations like load from disc, load from folder, load IFO/ISO, and Eject Disc(s).
Edit menu: Edit selected task.
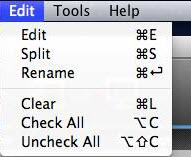
Edit: You can launch Editor by choosing this option. The Editor can also be launched by clicking the Editing button
 on main interface.
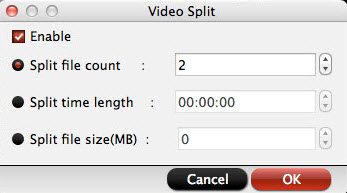
Split: Click to launch Split Window. This helps split the selected file by number, size, or duration. It can also be launched by clicking Split button
 .
.
Rename: Click to rename the output file for the selected file.
Tools menu: On this menu, you can change language and skin, customize format list, or launch Options window.
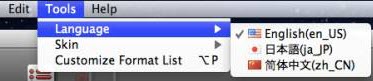
Language: You can choose from English, Japanese, and Simple Chinese.
Skin: Currently, there’s only one skin.
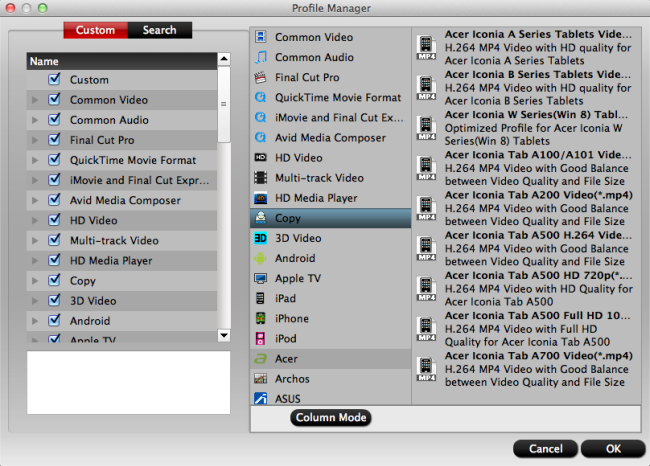
Customize Format List: You can launch Profile Manager and choose which output format to show in your format list. By default, all output formats will show in format list. This manager can also be launched by clicking Customize button
 at the bottom of Format list.
As shown in image below, by checking specific categories on the left column, you can choose which categories or output formats to show on format list.
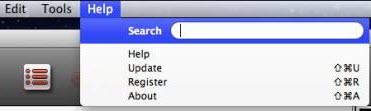
Help Menu: On this menu, you can find the online user manual, check update, and launch register window with purchase link (if you are using a trial version).
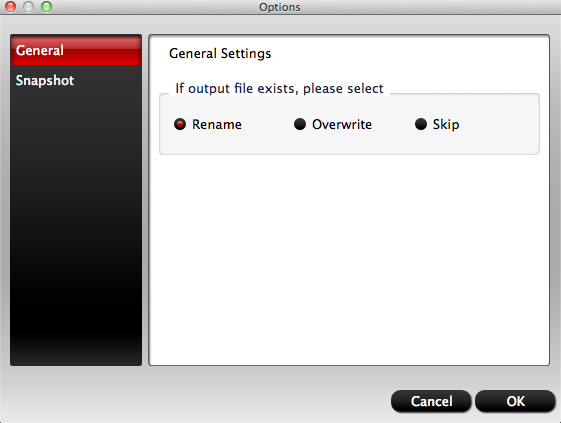
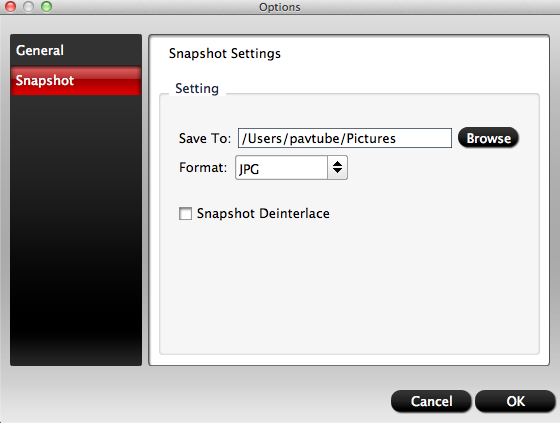
Options: Click Options button
 , the Options window will pop up.
 In General tab, you can choose what to do if the output file name already exists.
In Snapshot tab, you can set the output folder to save the pictures and the format of the pictures. You can choose from JPG, PNG, TIFF, and BMP. And you can deinterlace the snapshot as well.
Copy the entire disc
By using Copy the entire disc
 feature, you can preserve the Blu-ray/DVD’s original file structure without changing anything.


