The initial set up of the 2015 Apple TV isn’t difficult, and can be done pretty quickly, but there are a few further tweaks you might want to do to personalise your experience…
Tip 1 of 19: Complete guide to setting up the Apple TV
The initial set up of an Apple TV isn’t difficult, and can be done pretty quickly – especially if you have an iPhone or iPad to hand. But there are some further tweaks that you might want to do to completely personalise the interface and make it suit your needs. We’ll look at how to get your new Apple TV working just the way you want it in this article.
Step 2 of 19: The ports on the Apple TV
There’s an HDMI port for connecting to your TV. The HDMI cable doesn’t come in the box so you will either need to use an old one you have lying around (if you have an old Apple TV you’ll have one handy). Apple sells an HDMI-to-HDMI cable (here) for £15, alternatively you can buy an HDMI cable on Amazon for less than £5.
The Apple TV will connect to your home WiFi network, however it has an ethernet port which could be useful if your home WiFi network is a bit flakey.
There’s a USB C port but this is just for servicing though. You can’t attach a hard drive to it for extra storage, unfortunately.
There is no optical-out jack – something the Apple TV’s predecessor had. This could be used to send audio to an older stereo that didn’t have HDMI. However most modern receivers have HDMI these days, and with the option of using Bluetooth to connect speakers or headphones you may have no need for optical out.
Step 3 of 19: How to set up your new Apple TV
1: Plug in the power and HDMI cable into your Apple TV.
2: Turn on your TV and switch to the HDMI input your Apple TV is connected to. (If your TV supports the HDMI-CSC standard you may not even have to switch to the HDMI channel in the future, it may switch automatically).
3: Press the Menu button on the Siri Remote. If this doesn’t make the Apple TV come to life, connect the Siri Remote by holding down Menu and +.
4: Select your language and country using the remote.
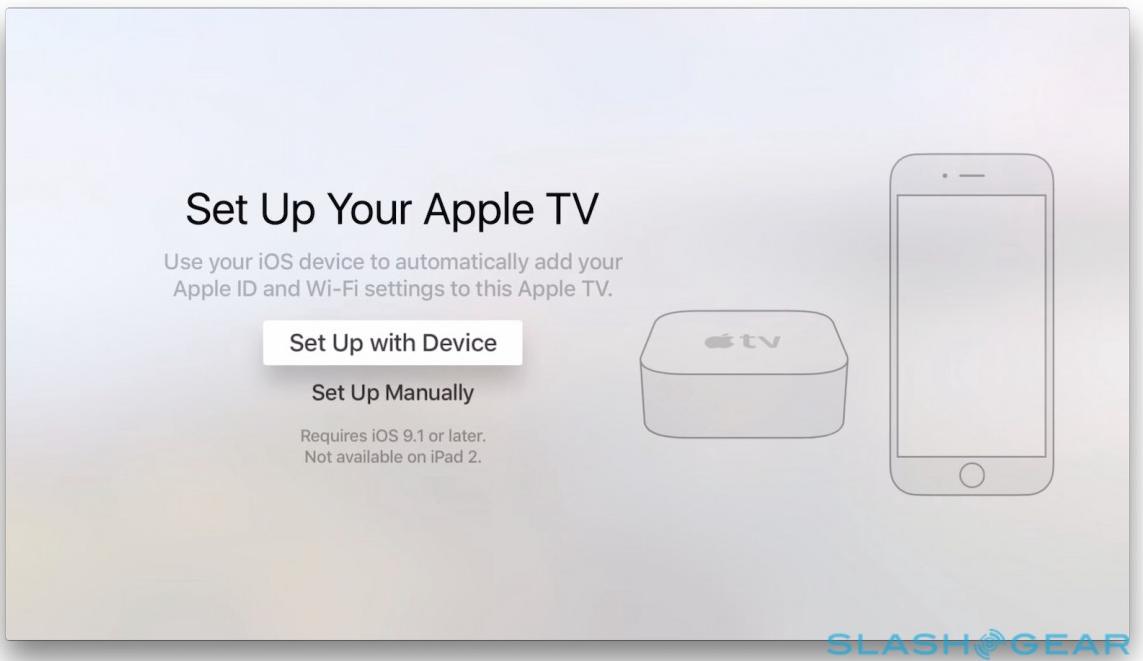
5: Here’s where your iPad or iPhone can come in useful. If you have a device running iOS 9.1 or later you can use it to set up your network. If you place your iOS device close to or on top of the Apple TV it will beam the network set up information over (including your complicated router password). You will need to make sure Bluetooth is switched on on your iOS device. The Apple TV quickly “saw” my iPhone over Bluetooth and attempted to connect to the same Wi-Fi network my iPhone uses.
(You’ll be glad of this when you realise that adding passwords is now a nightmare because the Apple TV remote app on your iPhone/iPad no longer works and the on screen keyboard is even more tortuous than previously, but we’ll get onto that on the next slide).
Step 4 of 19: Get frustrated when you realise you have to enter a password…
Entering your Apple ID and password are the next step and this is likely to be a frustrating experience as you are confronted by a onscreen keyboard where the alphabet is laid out in one line (rather than in a grid structure as is the case on the older Apple TV).
This means you are scooting from one side of the screen to the other, and inevitably skimming over the letter you wish to choose because you aren’t familiar with the intricacies of the track pad at the top of the Siri Remote.
If you already have an Apple TV you might be thinking that you’ll switch to using the Apple Remote app on the iPhone to add you Apple ID information, but initially users of the Apple TV were disappointed to find that the app didn’t work with the Apple TV (!)
Luckily tvOS 9.1 is now available for Apple TV and the update brings support for the Remote app on the iPhone so you can use that to enter characters rather than enter passwords and search terms using Apple TV’s annoying onscreen keyboard. Thanks to the update you can also use Apple Watch’s built-in Remote app to control the Apple TV.
Step 5 of 19: Enable Location Services, Siri, Screensavers, etc on the Apple TV
The next steps in the process of setting up your Apple TV are as follows:
1: Choose whether to enable Location Services.
You might be wondering why this would be necessary on a static machine, but it’s worth doing if you want Apple’s new aerial screensavers to change based on what time of day it is.
2: Opt into Siri on the Apple TV
Next you need to opt into Siri (assuming it’s supported in your country – you might assume that because you have Siri on your iPhone Siri will be available on Apple TV, but this isn’t the case, yet). Say yes to Siri to take advantage of the built-in mic on the Siri Remote and the new commands that you will be able to use with your Apple TV.
3: Opt in to Aerial screensavers
Speaking of those Aerial screensaver, mentioned earlier, this is also an opt-in and you will be asked during set up if you want them. If you have a limited broadband deal you might want to be cautious here because Apple warns that enabling screensavers will result in about 600MB of downloads per month.
4: Agree to send diagnostic data
The final screen asks if Apple can get diagnostic data from your Apple TV, including your location. It’s totally up to you if you sign up to this, I guess you can’t complain if the Apple TV doesn’t improve in the way you want it to if you don’t allow it to send diagnostic information to Apple.
Step 6 of 19: Get to know the Home Screen of the Apple TV
Once you have set things up you will see the new Home Screen for the Apple TV.
You will notice it’s a little different to the Home Screen of the older Apple TV. There is no longer a page full of ‘channels’ of content that you would never watch, for example. However, there is no Netflix either, which may have you worried for a minute – but there’s no reason to be concerned, it’s available in the App Store. So now is the time to have a look around the App Store for some apps to populate your Home Screen with.
Step 7 of 19: Change the screensavers on the Apple TV, use your own photos as a screensaver
There are even more ways to personalise your Apple TV. You might love Apple’s slow-moving aerial shots of various locations around the world, like London or the great wall of China but what if you fancy looking at something else?
If you are bored with the aerial screenshots you are seeing you can get new ones more frequently. The new aerial screensaver settings are accessed via Settings > General > Screensaver. The default is download new videos monthly, but you can change it to weekly or daily. Beware: each batch of new videos weighs in at about 600MB.
This will give you more variety, but unfortunately you can’t choose which views you see – so there’s no way to choose your favourite city and just watch that, which is a shame.
If you are completely bored of the aerial screensavers, you can choose to use your own photos as screensaver. You can use photos in your photo library, Photo Stream or iCloud Photo Library. Open the Photos app on the Apple TV and select the album you want to be the screensaver carousel. Tap screensaver to set that album as screensaver. To finesse your settings even more, go to Settings > General > Screensaver > Screensaver Type.
Apple also provides Animals, Flowers, and Nature photos as screensaver options. You can even use the photos from the Shot on iPhone 6 campaign as screensaver on your Apple TV. In order to use the Shot on iPhone 6 photos, go to Settings > General > Screensaver > Type > Apple Photos and choose Shot on iPhone 6.
You can also use album artwork from the music app if you want to.
Once you have selected your photos you can choose the transition type from a variety of options including Ken Burns, and additional options within that, such as Fade Through Black. You can also choose how long a slide shows for.
Step 8 of 19: How to put your Apple TV to sleep
The Apple TV will automatically go to sleep after an hour, but you can put it to sleep yourself if you wish to. Some might say that there is no value in putting modern electronics to sleep as leaving them awake doesn’t use up a lot of energy, but if you have the Apple TV in a bedroom you are likely to want to stop the light showing when you turn in for the night.
To put your Apple TV to sleep hold the home button for a few seconds until you see a prompt giving you the choice to Sleep or Cancel.
Press the home button when you wish to turn the Apple TV on again.
Step 9 of 19: How to stop your Apple TV from going to sleep
Perhaps rather than wanting to send your Apple TV to sleep you’d prefer to leave it on. The Apple TV will go to sleep by default after an hour, but maybe you like to leave the aerial screensaver playing in the background.
To change the default go to Settings > General > Sleep After, and then change this from 1 hour. The options are Never, 15 minutes, 30 minutes, 1 hour, 5 hours, 10 hours, so there is bound to be one that suits you.
Step 10 of 19: How to restart your Apple TV
If something odd happens with your Apple TV the best solution might be the tried and tested “turn it off and on again”. It is possible to restart your Apple TV by tapping Settings > System > Restart.
Alternatively press and hold down the menu and home button on the Siri remote at the same time and let go when the light on the front of your Apple TV starts flashing.
If your Siri Remote isn’t handy, you can also restart the Apple TV via Settings > System > Restart.
Step 11 of 19: How to activate VoiceOver on the Apple TV
Apple has included a number of accessibility options with the Apple TV, and VoiceOver is one of them.
You can ask Siri to turn VoiceOver on, or navigate to Settings > General > Accessibility > VoiceOver.
Once VoiceOver is activated when you highlight text with the Siri Remote VoiceOver will read the text out loud.
You can pause VoiceOver by tapping the touchpad once with two fingers. Tap twice with two fingers to resume VoiceOver.
Step 12 of 19: How to zoom in on your TV screen using the Apple TV
Another accessibility feature is the ability to magnify the screen of the Apple TV.
To turn on the Zoom feature go to Settings > General > Accessibility > Zoom.
Once activated you can use the touchpad on the Siri Remote to magnify images on the Apple TV, zoom in on a particular section of the screen, pan around an image, or change the screen magnification.
Step 13 of 19: How to turn on Closed Captions & Subtitles on the Apple TV
You can also turn on Closed Captions – which are essentially onscreen textual description of non-speech elements in what you are watching. Triple-click the Home button to open the accessibility options that include VoiceOver, Zoom, Closed Captions, and Audio Descriptions.
Subtitles can be turned on if you swipe down on the remote touchscreen.
If you want to choose a default, go to Settings > General > Accessibility > Accessibility Shortcut and choose your default.
Step 14 of 19: How to take a screenshot on the Apple TV
It is actually possible to take a screenshot on the Apple TV, but it’s not simple. Here’s how.
1: Download Apple Xcode development environment from the Mac App Store on your Mac.
2: Install Xcode on your Mac.
3: Connect your Apple TV to your Mac using a USB-C or USB cable.
4: Open Xcode. Select Window > Devices and choose the Apple TV.
5: Click on Take Screenshot.
Step 15 of 19: How to record video from the Apple TV display
You can also record video from your Apple TV.
1: Connect your Apple TV to your Mac using a USB-C or USB cable.
2: Open QuickTIme on your Mac. Select File > New Movie Recording.
3: Click on the arrow beside the record button and select Apple TV from the Camera and Microphone options.
4: Click the Record button.
Step 16 of 19: How to surf the web on the Apple TV
This is one of those things that everyone wants to do but is only really possible with a workaround.
There is an open source project that should allow you to view web content on your Apple TV, according to 9to5Mac. Users can scroll around the web using the glass trackpad on the Siri Remote. However, it’s unlikely that the web browser will launch on the App Store though because it requires a private API to function.
The alternative is to use AirPlay to stream a webpage from your Mac, iPad or iPhone to your TV via the Apple TV. This way you will be able to see the webpage on the larger screen, but note that any navigation will need to be done via the device you are sharing from – so scrolling will need to be done on your Mac, for example.
On the next slide we will cover how to share your Mac screen to your TV.
Step 17 of 19: How to share your Mac, iPad or iPhone screen to your TV
You can see and (usually) hear anything running on your Mac, iPad or iPhone on your TV if you use AirPlay to stream between the two devices via the Apple TV.
Currently this is one way that UK users are watching On Demand TV via their Apple TVs while awaiting Apple TV apps for those channels (BBC iPlayer is coming soon, see next slide).
To use AirPlay on your Mac click on the AirPlay icon in the menu bar of your screen and choose Apple TV. You can choose to mirror the screen or use the TV as a separate screen to view content.
To use AirPlay on your iPhone or iPad swipe up from the bottom of the screen and switch on AirPlay. As with the Mac version of AirPlay, you will have the choice of mirroring your screen or sending pages to your TV screen. The only issue with using AirPlay on your iPad or iPhone is you will be unable to use the device while it is streaming content to the TV and things like phone calls will interrupt your viewing.
Step 18 of 19: Make sure your Apple TV software is up to date
From time to time Apple will release a software update for the Apple TV. To check whether there is an update go to Settings > System > Software Updates > Update Software. If there is an update you will be able to download and install it here. (You will find Software Updates in Settings > General > Update Software on the oder Apple TV models).
There has already been one software update released for the Apple TV. There are no release notes though so it’s not clear what it brings other than bug fixes.
There’s another Apple TV update coming in the new year which will allow you to search Apple Music with Siri, currently that is beyond Siri’s capabilities.
Be wary of Apple TV updates though, there have been reports in the past of updates causing problems for some people. We recommend waiting a few days before updating just in case.
What if you can get hold of a beta of tvOS? Should you install it? It would be a bad idea if you device isn’t registered with the Apple Developer Developer Program – Apple says that if you try and install it on a unregistered device it may stop the device from working.
Step 19 of 19: How to fix problems with the Apple TV
It’s hard to know if this was an issue with the Apple TV or our home network but we saw a lot of white screens when we started using it.
Given that we had a lot of trouble with our older Apple TV disconnecting from the network, we imaging this issue is connected to that. Luckily, when the network is down that shouldn’t stop you from playing the games on your Apple TV. Fix more Apple TV related issues such as Wi-Fi, AirPlay, Remote, video & audio playback.
Original source: http://www.macworld.co.uk/how-to/apple/how-set-up-2015-apple-tv-3630520/
Further Reading:
Play Netflix Movies and TV Shows on Apple TV 4/3/2/1
Tips and Guide for HD Video Streaming with Apple TV
Keep My iTunes Rentals Forever on Apple TV
Stream Music, Video and Movies from iTunes library to Apple TV 4
Choose between the New Apple TV and Google’s New
Chromecast
Watch Media on New Apple TV: iTunes Home Sharing VS Plex
Fix Apple TV Wi-Fi, AirPlay, Remote, Video, Audio Playback Issues