Problems when importing OP-Atom MXF into Premiere Pro CC
Hi, I'm using a canon MXF camera and latest version of PP CC on a Mac Pro.
I would like to know the best workflow so I can get footage from the camera, into premiere so I can start editing.
My attempts so far:
1. Importing the MXF file directly into premiere
Result: When dropping the clip onto the timeline, only the audio appears
2. Using XCam Transfer to import the footage and convert to .mov
Result: The audio and video appear on the time line, but the audio is shorter than the video and skips and jumps
Your advice and patience is greatly appreciated.
Properly import OP-Atom MXF into Premiere Pro CC
From above listed descriptions, we can see that the MXF Premiere Pro CC importing problem is caused due to some format incompatible issues. To fix this issue, the only workable solution is to transcode OP-Atom MXF to PP CC best compatible editing format.

After Internet search for best MXF Converter, you may find there are many program can do the work for you. However, you may finally settle on Pavtube MXF Multimixer/iMixMXF (support Mac OS X El Capitan), the program not facilitates you to transcode MXF files to Premiere Pro CC preset profile format for directly post editing, but also beneficially to helps you preserve and output MXF with multiple audio tracks or mix all the tracks into one.
Edit MXF files
Much more than a MXF video converter, the program can also perform editing functions such as trimming, cropping, subtitle insertion, audio replacement/removal, adding watermarks, etc.
The program has both Windows and Mac version, the following article will perform the conversion process on Mac computer, for Windows users, please take a reference at: How to convert MXF files with Pavtube MXF MultiMixer?
How to Transcode and Import OP-Atom MXF Files to Premiere Pro CC?
Step 1: Load MXF files with the program.
Launch the application on your computer, from "File" drop-down list, click "Add Video" or "Add Folder" option to load OP-Atom MXF files to the program.
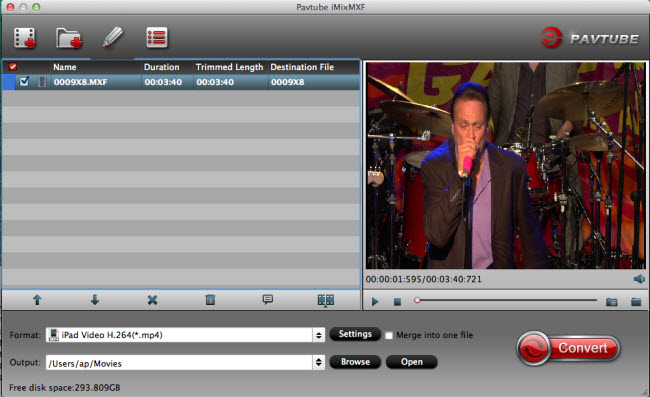
Step 2: Select Adobe Premiere Pro CC optimized output file format.
Click "Format" drop-down bar, from its extended list, select "Adobe Premiere/Son..." > "MPEG-2 (*.mpg)" as the output file format, you can also select to output Adobe Premiere Pro WMV or MOV file format according to your own preference.

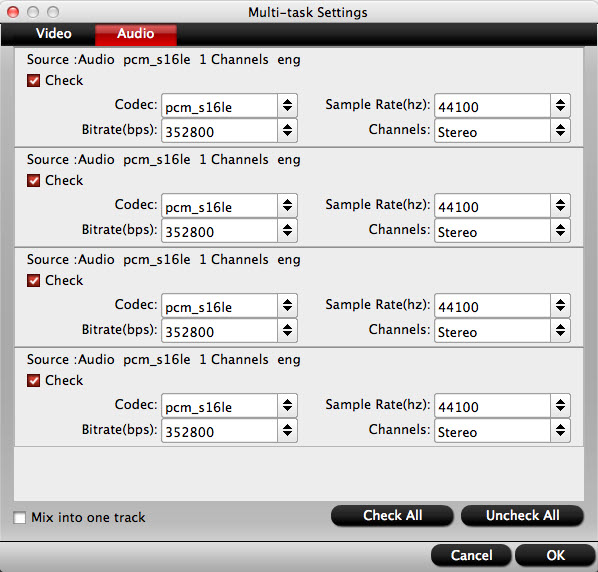
Tips: If you want to preserve the multiple audio tracks in original MXF files, you can choose to output "Multi-track Video" > "Multi-track MOV(*.mov)" for editing with Premiere Pro CC.
Adjust multi-track settings: After you choose to output "Multi-track Video" from "Format" drop-down list, click "Settings" button to open "Multi-task Settings" window, click "Audio" tab, check the audio track you want to output and specify the codec you'd like to encode with.
Step 3: Edit MXF files.
Select an item to activate the "Edit" menu, then click the "Edit" icon to open the "Video Editor" window, in the pop out window, you can play and preview the original video and output effects. Also you can flip video, trim, crop, add watermark, apply special effect, reset, and adjust volume, etc.
Tips: the "Video Editor" functions" are disabled if you choose to output Multi-track Video format.
Step 4: Start conversion.
After you have completed all the settings, go back to the main interface and press the "Convert" button to start the conversion process.
When the conversion is done, import video to Premiere Pro CC for further fast and fluid editing with multiple audio channels well preserved.


