Is it possible for me to have all my iTunes library on my Synology DS213 NAS, and have my computer and my wife's computer both use that library? The main purpose is that I want to move the iTunes videos to my NAS from my PC hard drive as it is full and my NAS is half empty.
iTunes to NAS
Why would you want to offload iTunes onto NAS?
1. Never work best except with Apple products
iTunes is something a whole lot of folks tolerate. It's never been the best at any particular thing (except perhaps activating and syncing your iPhone or iPad, where it's the only official game in town), but it certainly does a lot of stuff. Sometimes slow, sometimes get crash, and perpetually gaining features, it's the app we use every day but rarely with any joy.
2. Lack of officially supported server component
One of its more frustrating aspects is its lack of an officially supported server component-Apple seems stubbornly unwilling to provide a real iTunes server, and so folks who would otherwise happily centrally locate a media library on a perfectly suitable NAS are stuck with islands of media content.
3. Not enough space for the iTunes videos
I have the similar experience with the questioner in the beginning. The reason that pushed me down this path is solid state disks. As iTunes libraries go, mine's middle of the road-about 50GB, made up of a mixture of music, audiobooks, and apps but lacking movies, TV, and podcasts. Still, that's 50GB of SSD space that would be taken up by files which, frankly, don't particularly benefit from being on an SSD. I could relocate them to an external drive, but I don't have any spare external drives with enough capacity. What I do have, though, is a Synology NAS with plenty of space on it.
4. DRM makes restriction in many aspects
DRM is not strange for iTunes users, right? And there are some reasons why people want to remove DRM from iTunes, such as device playback restriction and media player playback restriction, all the reasons make NAS the best iTunes library replacement.
How to offload iTunes library to move iTunes videos onto NAS?
Here, we're focusing on taking your iTunes videos and relocating it out of your PC and onto a NAS for playing or sharing iTunes videos with your family in PC, all kinds of media devices (such as PS4, Roku 3, Xbox 360) or media players (such as Apple TV, WD TV Live, Sumvision Cyclone Micro). To do so, we have to remove iTunes movie DRM and convert iTunes M4V to NAS (take DS213 as an example) supported formats first. Then we can transfer iTunes videos onto your NAS. So there are two big steps.
Step 1. Remove iTunes DRM to convert iTunes to NAS
Before DRM removal and converting iTunes to NAS, you'd better to know your DS213 Synology NAS supported formats:
Audio: AAC, FLAC, M4A, Ogg Vorbis, PCM, WAV, WMA, WMA VBR, WMA PRO
Video: 3GP, 3G2, ASF, AVI, DAT, Divx, DVR-MS, ISO, M2T, M2TS, M4V, MKV, MP4, MPEG1, MPEG2, MPEG4, MTS, MOV, QT, SWF, TP, TRP, TS, VOB, WMV, XviD
To remove iTunes DRM then convert and move iTunes to NAS, we need a professional DRM removal tool. Pavtube ChewTune(Top 10 DRM Removal Review) is the best choice for you.

 (Click here for Mac OS X 10.5)
It is the best DRM iTunes M4V Video Converter for both Windows and Mac users, which can directly get rid of DRM protection from iTunes purchased and rented videos and convert iTunes M4V to NAS compatible formats without quality loss. Let's start to operate this program.
1. Add iTunes video to this iTunes to NAS converter. Drag and drop your videos to it directly, or you can click "File" to load videos as showed blow.

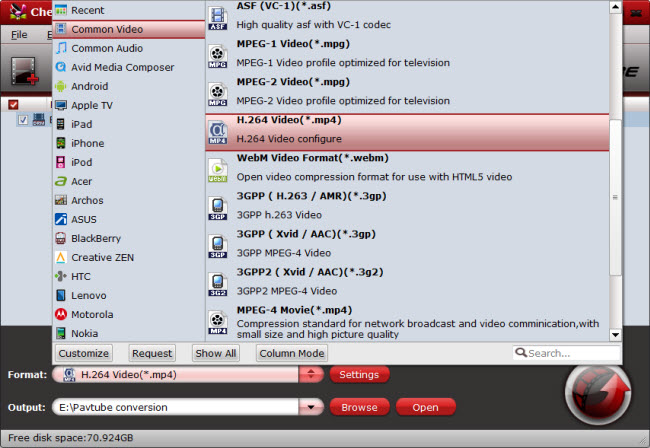
2. Click "Format" bar to choose, for example, MP4 as the output format showing as below. Because MP4 is the most popular video format that can be playable in most media devices and media players.
>
3. Click the big round icon "Convert" in the bottom right corner on the software's interface to start the iTunes to NAS conversion.
Step 2. Transfer iTunes videos onto NAS
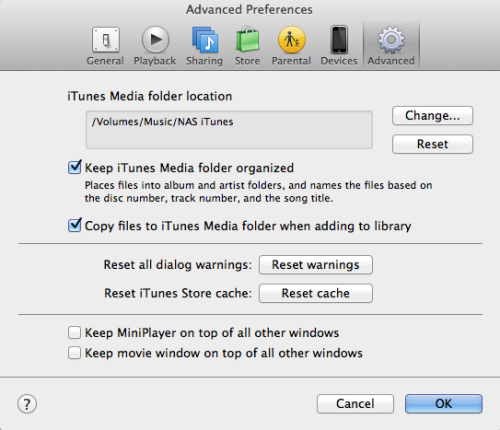
One thing that you do need to have turned on is iTunes' library management function. This option has gone by many names in past versions of iTunes, but as of the lastest version, 12, it's in the "Advanced" tab of the iTunes preference pane. It reads "Keep iTunes Media folder organized."
Getting started
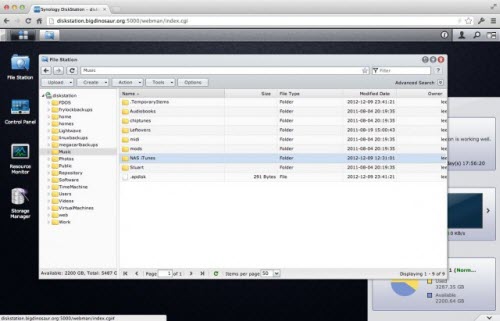
To start, make sure the network share you want to use is mounted, and that you've got the correct permissions on it. Create a target directory inside the share, so that you have a specific folder to point iTunes at.
Next, pop into iTunes, open the application preferences pane, and click the "Advanced" tab. The very first thing in the window is the "iTunes Media folder location" box. Click the "Change" button next to the box. You'll get a file picker dialog box, which you should point at the network folder you've previously created.
When you click "OK" to close the Preferences pane, iTunes will ask you if you want to move and rename files in the new location to match the "Keep iTunes Media folder organized" preference- say yes.
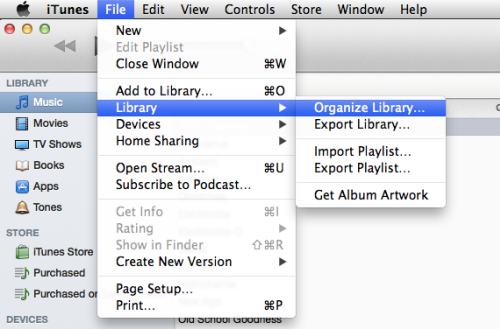
Now to actually move the files. Select "File" > "Library" > "Organize Library." This will start what could be a very long file copy, and if the copy completes successfully, you're probably done!
Conclusion
To offload iTunes to move iTunes to NAS for playback in different devices and sharing with your family at home, just do the easy two steps above. Enjoy!


