The Chromebooks are great little machines that starts in seconds and offers thousands of apps. For movie lovers who have just switched from a Mac or Windows computer to Chromebook, you can care much about the media compatibility of the Chromebook. Unfortunately, it would be much difficult for the Chrome OS on Chromebook to flawlessplay play any video you throw at them. You will often suffer video playing with no sound, video playback patchy or with artefacts issues when playing video with the built-in video player app on Chromebook.
Why video not play properly on Chromebooks?
1. Chrome OS (the operating system on Chromebooks) lacks support for the video codec and/or audio codec inside your video file.
2. Interlaced video is not supported on some Chromebook models.
3. Subtitle streams inside your video file are of an unrecognised format
4. An update to Chrome or Chrome OS introduced a bug that causes video playback issues
Ways to fix Chromebook video playback issues
Before Chrome OS adds support for more types of video and audio codecs, you can try the following ways to get video playback on Chromebook.
1. Upload your video files to online cloud drive.
If you have internet access, you can first upload your video files to online file storage service with video playback capabilities and then access the video directly on Chromebook with your cloud drive account.
2. Install VLC for the Chromebook.
VLC, one of the best free programs for local media playback, now runs on Chromebooks, you can download it from the Chrome Web Store to play various video and audio file formats including AVI, WMV, MP4, MKV and even H.265, DVD ISO files. The VLC player also support subtitles, playlists and hardware accelerated decoding, you will have an immersive video playback experience with VLC on Chromebook.
3. Convert video to Chromebook supported video format
If none of the above methods work, then the most efficient solution is transcoding unsuppoted video to Chromebook playble file formats listed below:
Media: 3gp, .avi, .mov, .mp4, .m4v, .m4a, .mp3, .mkv, .ogv, .ogm, .ogg, .oga, .webm, .wav
Codec:
| Container | Video codec | Audio codec |
| ogv | Theora | - |
| webm | VP8 | Opus |
| VP9 | Vorbis | |
| mp4 | H264 | - |
| MPEG4 | - | |
| mov | MPEG4 | - |
| H264 | - | |
| avi | MPEG4 | MP3 |
| DIVX | MP3 | |
| XVID | MP3 | |
| 3gp | H264 | AAC |
| MPEG4 | AMR-NB |
To get any files played on Chromebook, you will need a powerful media conversion tool. Here, we highly recommend Pavtube Video Converter Ultimate (best video converter review), this cross-platform has both Windows and Mac version(Pavtube iMedia Converter for Mac), you can comprehensive rip commercial 2D/3D/4K Blu-ray disc, DVD disc and also convert various digital file formats (including H.265/HEVC, AVCHD, MXF, XAVC/XAVC S) with the resolution of 4K/2K/HD/SD to Chromebook playable formats listed above.
Customize output video playback settings for Chromebook
To get the best playback settings, you can adjust output video codec, bit rate, frame rate, resolution, audio codec, bit rate, sample rate and channels to make them fit with the video player app on Chromebook.
Remove subtitle and deinterlace video
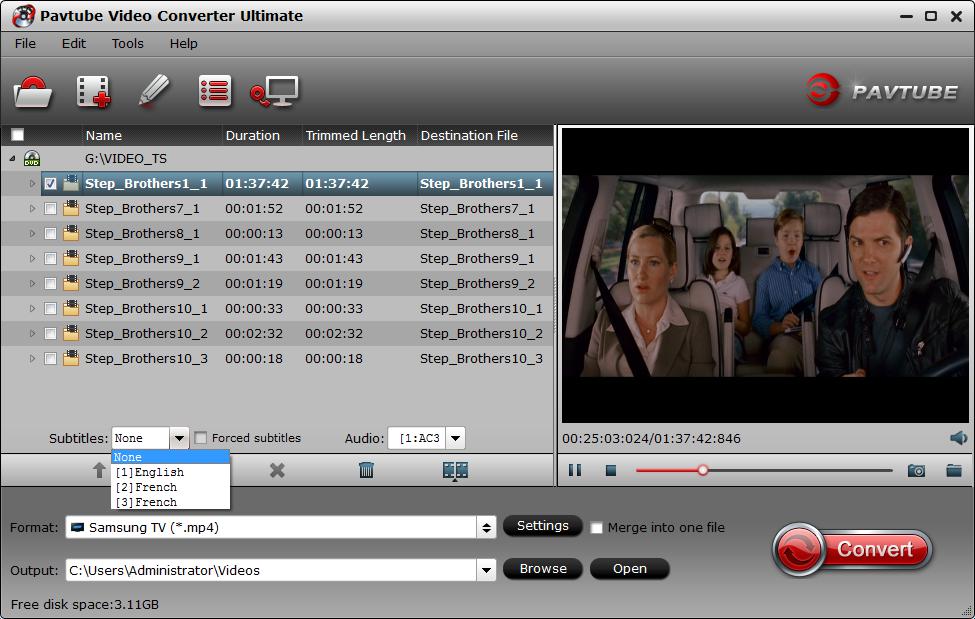
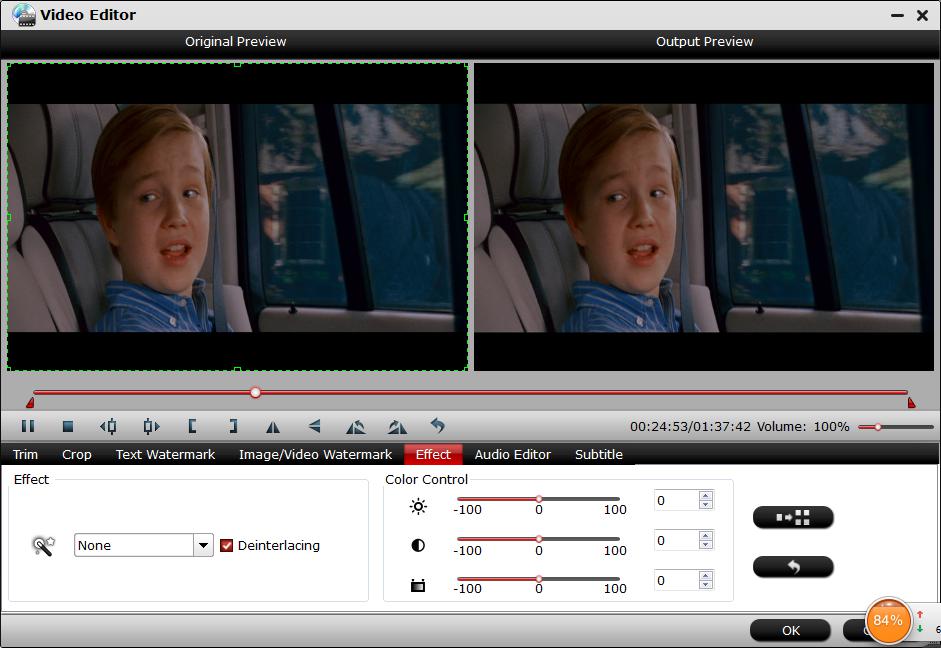
As Chromebook can't play video with subtitle, when ripping Blu-ray/DVD or MKV files with subtitles using the program, you can select the "none" option under "Subtitle" drop-down list. In the video editing window, you can also tick off the "Deinterlacing" option to deinterlace interlaced video to get better output video quality.
How to Convert Unsupported Video for Chromebook Playback?
Step 1: Load Blu-ray/DVD/video into the program.
Launch the program, click the "Folder" or "Video" icon to load source video files from your local computer to the program. For loading Blu-ray or DVD disc, insert your Blu-ray or DVD disc into an internal or external drive, , click "File" > "Load from disc".

Step 2: Set output file format.
Tap on the "Format" bar, select one of Chromebook playable file formats such as "H.264 HD Video(*.mp4)" under "HD Video" main category.

Step 3: Adjust output playback settings for Chromebook.
Click "Settings" to open "Profile" settings window, here you can flexibly tweak the output video codec, bit rate, frame rate, resolution, audio codec, bit rate, sample rate and channels according to your own needs.

Step 4: Remove subtitles from media.
If you try to rip Blu-ray/DVD or MKV files with the program for playing on Chromebook, you will need to remove the subtitles from the media for proper playback. You can achieve this by selecting the "None" option from "Subtitle" drop-down list on the main interface.
Step 5: Deinteralce video.
Select an item to open "Video Editor" window, under the "Effect" tab, select "Deinterlacing"to convert interlaced video into a progressive form so that you can enjoy a better and clear video effect.
Step 6: Begin the conversion process.
After all setting is compelted, press the "Convert" button in the right-bottom and the video to Chromebook conversion process will start automatically.
When the conversion is over, click "Open output folder" to pop out the converted files, you will then have no problem to play any video on Chromebook.


