Lost contacts after iOS 9 update
"i have lost some contacts after iOS 9 update please help!"
"I've also I lost over a hundred contacts...they seem to be the more recent ones, maybe from within the last year or two. Very frustrating! Does anyone know of any fixes? I've tried older ones, pre ios 9 but they did not work. Thanks!"

Great improvements at the foundation of the new iOS 9 operating system helps extremely enhance your iPhone's performance, battery life, and security. However, after iOS 9 update, most users complain that some of their recent contacts are lost and they are eager to find a safe and reliable way to get them back. As a matter of fact, the contacts lost from your iPhone after iOS update are still on the device, you still have the chance to retrieve them back with a iPhone data recovery software. Make sure stop using your iPhone any more, or the lost contacts will be overwritten by new inputting files.
Then you can perform iPhone lost contacts recovery process with the top notch iPhone data recovery software called iOS Data Recovery for Windows (Top 5 iPhone Data Recovery for Windows 10)/Mac, which gives you the chance to recover iPhone 6/Plus/6/5s/5c/5/4S/4/3GS lost contacts after iOS 9 or iOS 8 update. Besides contacts, the program also enables to recover other text data such as Contacts, Message, Notes, Reminder, Call History, Calendar, Whatsapp History, Safari Bookmark, FB Messenger or media data like Camera Roll, Photo Stream, Voicemail, Voice Memo, Photo Library, App photos, App Videos, App Documents.
The program allows you to restore iPhone lost contacts after iOS 9 update in there different ways: recover directly from iPhone, restore from iTunes backup file, retrieve from iCloud backup file. The guide below will mainly show you how to recover directly from iPhone.
Step by step to get iPhone Lost Contacts back after iOS 9 Upgrade
Step 1: Run the program, connect your iOS device to the computer.
Install and run iOS Data Recovery on your computer, then connect your device to the computer through its equipped USB cable. The program will detect your iOS devices automatically and shows you the window for "Recover from iOS Device".
Tips: Before run the application, make sure you have downloaded the latest version of iTunes. To avoid automatically syncing, don't launch iTunes when running iOS Data Recovery. Here, you are advised to disable the automatically syncing in iTunes beforehand: Launch iTunes > Preference > Device, check "Prevent iPods, iPhones and iPads from syncing automatically".
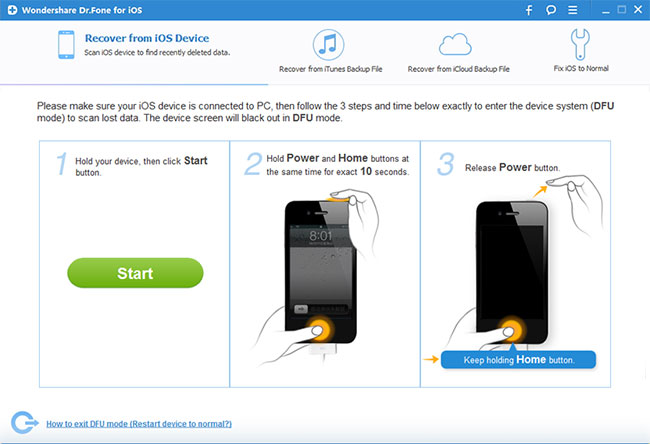
If your iOS device is iPhone 4, iPhone 3GS, iPad 1 or iPod touch 4, you can switch to the "Advanced Mode" through the button at the lower-right corner. After then follow the instruction in the window to enter device scanning mode: Hold your device, then click the Start button > Hold the Power and Home buttons at the same time for exactly 10 seconds > Release the Power button but keep the Home button pressed.
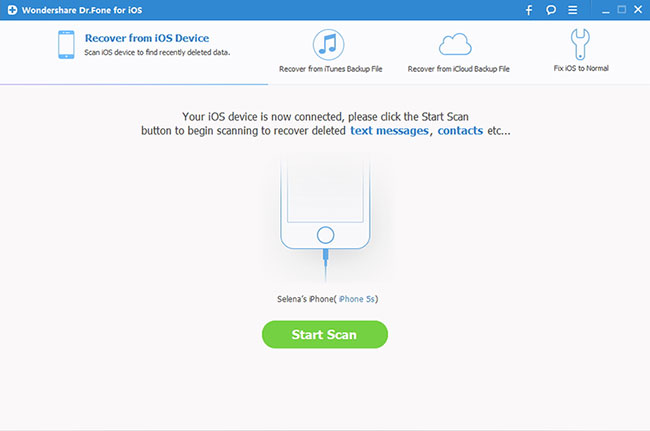
Step 2. Scan Your Device for Lost Data on it.
Tap the "Start Scan" button, the program will start to scan your iPhone, iPad or iPod touch to find for deleted or lost data. It will take a few minutes for the scanning process to be completed. During the scanning process, if you find the data you are looking for to recover, you can click the "Pause" button to stop the process.

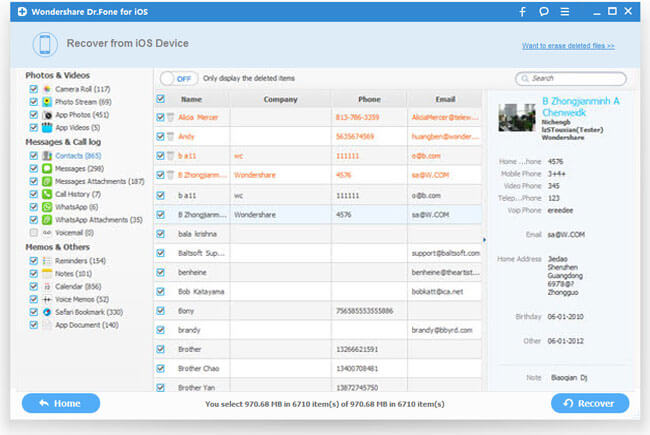
Step 3. Preview the Scanned Data
When the scanning process is over, a scan result with both lost and existing Data on your device will be displayed in categories. To filter out the deleted data on your iOS device, you can turn on the option "Only display the deleted items". You can preview the found data on its file type by clicking the file type in the left side. You can also search for a specific file by typing a keyword in the search box on the top right of the window.
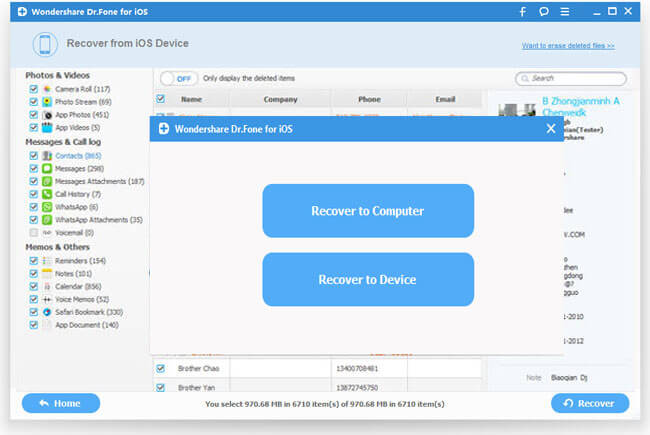
Step 4: Recover Data from your iPhone/iPad/iPod touch.
When you find the data you need, select them by putting a check mark in front of the box. After that, hit the "Recover" button at the bottom right of the window. And the recovered data will be saved to your computer by default. As for text messages, iMessage, contacts, or notes, when you click Recover, a window will pop-up to ask you to "Recover to Computer" or "Recover to Device". If you want to put these messages back to your iOS device, click "Recover to Device".