There are many reasons that you need to resize videos. You edited a video in Davinci Resolve on Mac and wanted to upload it to YouTube but found that it is too big. You shot a video with iPhone and would like to share it on Instagram but Instagram only accepts a video no more than 50M. Therefore, you need to resize video productions from iMovie, FCP, Premiere Pro on Mac or reduce the iPhone shotting video files size.
You need to know what would affect the video size then you have the directions to go. Normally, video format has an influence on video size while video resolution and bitrate affects video size more. Of course, if you trim a video, you also can resize the video. You can choose any method to resize video on Mac (macOS Sierra Included) according to your need below.
Three Ways to Resize Video on Mac (macOS Sierra Included)
Method 1: Change Video Format to Resize Video
Method 2: Lower the Resolution and Bitrate to Resize Video
Method 3: Trim and Split Video to Resize Video
Method 1: Change Video Format to Resize Video
Videos that encoded with different formats will have different size. Usually, if you rip DVD to a digital file, the size will be smaller to rip DVD to H.264/H.265 MP4 and WMV than converting DVD to MPG, AVI. Below is a test. I ripped a DVD to different formats in HD resolution and then sizes were different.
Task information: "LOTR_RETURN_OF_THE_KING_D28_1"
Duration: 00:51:54
| Name | Source DVD |
Target MP4 | Target MP4 | Target MP4 | Target MPG | Target MKV | Target WMV |
Target AVI |
Audio Codec |
AC3 |
aac |
aac |
aac |
mp2 |
aac |
wmav3 |
mp3 |
Audio SampleRate(hz) |
48000 |
48000 |
48000 |
48000 |
48000 |
48000 |
48000 |
48000 |
Audio BitRate(bps) |
0 |
320000 |
320000 |
320000 |
320000 |
320000 |
256000 |
192000 |
Audio Channels |
Stereo |
5.1 Channels |
5.1 Channels |
5.1 Channels |
Stereo |
5.1 Channels |
5.1 Channels |
Stereo |
Video Codec |
MPEG-2 |
h264 |
h265 |
xvid |
mpeg2video |
h264 |
wmv3 |
xvid |
Video Size(pix) |
720*576 |
1920*1080 |
1920*1080 |
1920*1080 |
1920*1080 |
1920*1080 |
1920*1080 |
1920*1080 |
Video BitRate(kbps) |
0 |
15000 |
7200 |
18000 |
24000 |
15000 |
15000 |
18000 |
Video FrameRate(fps) |
25 |
30 |
30 |
30 |
30 |
30 |
30 |
30 |
File Size |
5.548GB |
2.734GB |
6.634GB |
8.807GB |
5.548GB |
5.525GB |
6.587GB |
So if you want to resize video, you can convert it to WMV or MP4 formats. Pavtube iMedia Converter for Mac will be an excellent assistant to help you change video files. It can resize video on macOS Sierra, Mac OS X 10.11 El Capitan, Mac OS X 10.10 Yosemite, 10.9 Mavericks, 10.8 Mountain Lion, 10.7 Lion, 10.6 Snow Leopard .
Step 1: Download the Mac Video Resizer
Step 2: Directly drag and drop the video file into the software. This video resizer supports batch conversion. So you can add multiple video files to resize video by batch. You also can resize Blu-ray and DVD only if you insert the disc to optical drive and load the media files then you can shrink Blu-ray and DVD.

Step 3: You can choose MP4 or WMV format in "HD Video" and "Common Video". If your media player or devices support HEVC codec, converting video to H.265 MP4 will compress video size more.
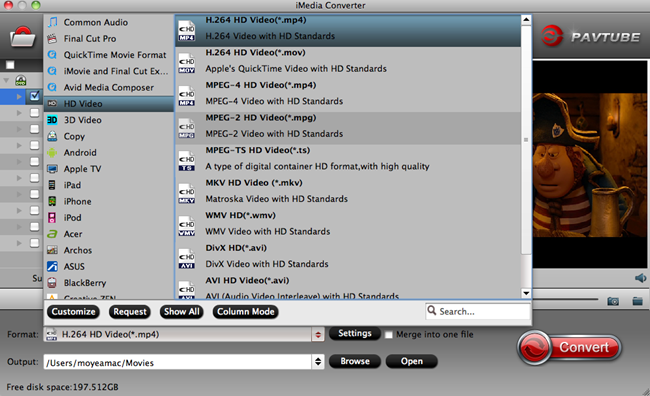
Step 4: Finally, click "Convert" button to start to change video size by convert video to another video format.
Method 2: Lower the Resolution and Bitrate to Resize Video
Comparing to video format, video resolution and bitrate affects video size more. In general, a higher bitrate and resolution will accommodate higher image quality and video size in the video output, therefore, you can resize video by changing video resolution and bitrate. Pavtube iMedia Converter for Mac also can help you change video bitrate and resolution to resize video files on Mac including macOS Sierre. You can load video files following the step 1 in the method one introduced. Then, you need to choose output video format.
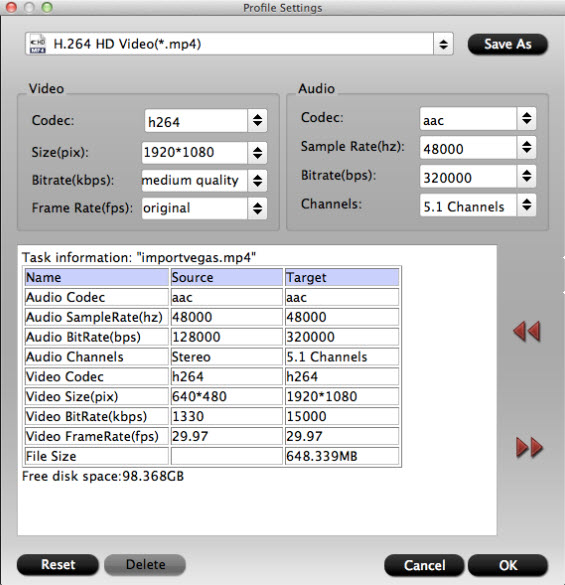
After you selected video format, you should press on "Settings" to open the profile settings window. You can lower the video resolution and bitrate to compress video size. For example, you can compress 4K to 1080p to reduce the video size. You also can upscale 1080p to 4K resolution to increase a video size. Adjusting video bitrate is also an effective way to resize video. Just have a try.
Method 3: Trim and Split Video to Resize Video
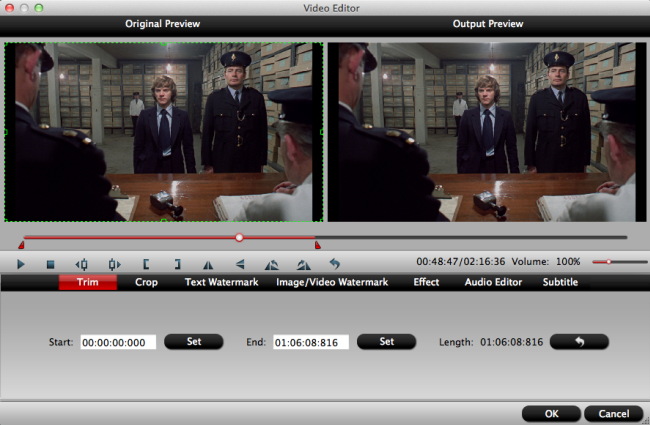
Hit on "Edit" button on the top menu. There are two options allow you to resize video file: Split and Trim.
Trim to resize video:
"Trim" feature allows users to decide where to start and where to end when converting the selected clip, so that unwanted segments will be cut out after conversion.
To trim a video, please switch to "Trim" tab in “Video Editor” Interface and follow any of the methods below:
1. Drag the control sliders 
 to include the segment you want to remain.
2. Click the left square bracket  to set start point, and click the right square bracket
  to set end point when previewing the video.
3. Input specific values to “Start” and “End” box.
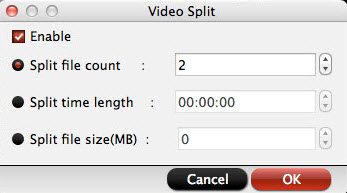
Split Video to Resize File
On the main interface, by clicking the “Split” button  on file list, or from “Edit” menu, you can launch the “Video Split” window. Checking “Enable” to enable it, and then you can split the file by file size.
Apart from Pavtube iMedia Converter for mac, there are some other software that help you resize video. Although they only offer one method, they are free.
Free Method 1 to Resize Video on Mac: Resize Video Using VLC
VLC media player is free and open source software which is widely used for playing videos of almost any format. You also can use it to resize video by adjusting resolution video width and hength.
Just follow these simple steps and you can resize video in VLC media player
1. Open VLC media player
2. In the menu car, click on Media
3. Then click on “convert/save” or you can directly open it by “ctrl + R”
4. Load the video who’s format you want to convert, by clicking “Add” button
5. Now a dialog box “convert” will pop up, click on browse to select the where you want to save the converted video
6. You just have to click on the “settings” under profile section which is present at right side of type of video
Now click on “video codec” tab to enter the desired height and width of video that you need, it resizes the video exactly in the same size if the aspect ratio is maintained (so keep in mind, while entering the height and width ratio must be maintained) or else output video might not be of same size that you have specified.
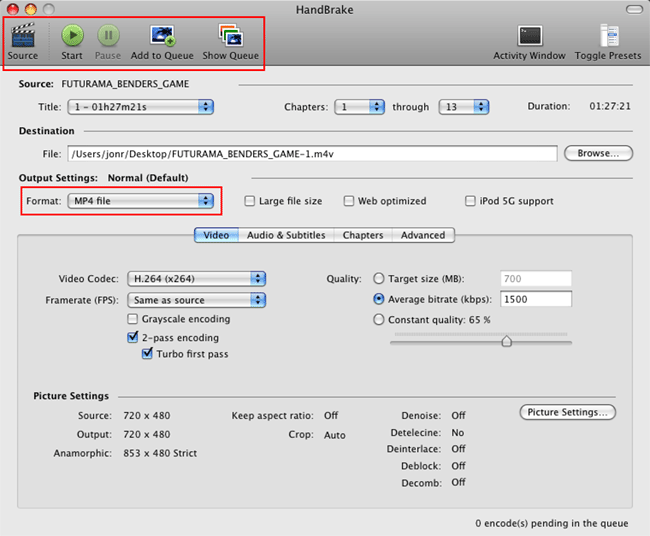
Free Method 2 to Resize Video on Mac: Shrink Video With Handbrake
HandBrake is a free and open-source video converter program intended to both rip and convert video files to work on a number of supported devices. You also can use Handbrake to resize video files.
1. Download HandBrake from this site: http://handbrake.fr/
2. Open up HandBrake and open up the video you want to resize by clicking on the Source button. You can either go to Open Folder to select all videos in a particular folder, or Open File to open just one video.
3. In the dropdown menu beside Title, select the video you want to resize. (The name of the video will appear above the dropdown menu.)
4.. Under Destination, click on Browse to navigate to where you want to save your video.
5. Under Output Settings and beside Container, you should select mp4 and Web Optimized.
6. From the Picture tab, change the width to the desired size (it will adjust the height automatically).
7. When you finish with your settings, click on Start.
Now you know about the ways to resize video files on Mac and can choose the one that’s right for you. Resizing video is really easy – download the program now and try it yourself!


