"On my son's movie making summer camp, he had made some HD DVD video. I would like to convert those video to MP4 format so that I can post them on YouTube to share with my family members far away."

It won't be difficult for you to find a tool to convert HD DVD to YouTube supported MP4 format, however, after the conversion, you may still suffer video uploading problems such as videos stuck during uploading or processing, movie format not supported, etc. To achieve a smooth YouTube video uploading process, make sure that your video comply with the following standards:
Container: MP4
Audio codec: AAC-LC
Audio channels: Stereo or Stereo + 5.1
Audio sample rate: 96khz or 48khz
Video codec: H.264 High Profile Video
Scan mode: Progressive scan not interlacing
Bit rate: variable bit rate, no bit rate limit required.
Chroma subsampling: 4:2:0
Frame rate: content should be encoded and uploaded in the same frame rate it was recorded. Common frame rates include: 24, 25, 30, 48, 50, 60 frames per second (other frames are also acceptable).
Resolution: 2160p(3840x2160), 1440p(2560x1440), 1080p(1920x1080)
Aspect Ratio: 16:9
To output HD DVD to a file format that's meets all the standards listed above, you will need to specialist program. There's a solution in hand called Pavtube Video Converter Ultimate for Windows/Mac (Best Video Converter Ultimate for Windows/Mac), which can fulfill all you great demands to rip HD DVD (commercial ones) to YouTube best preferable format H.264 High Profile format.
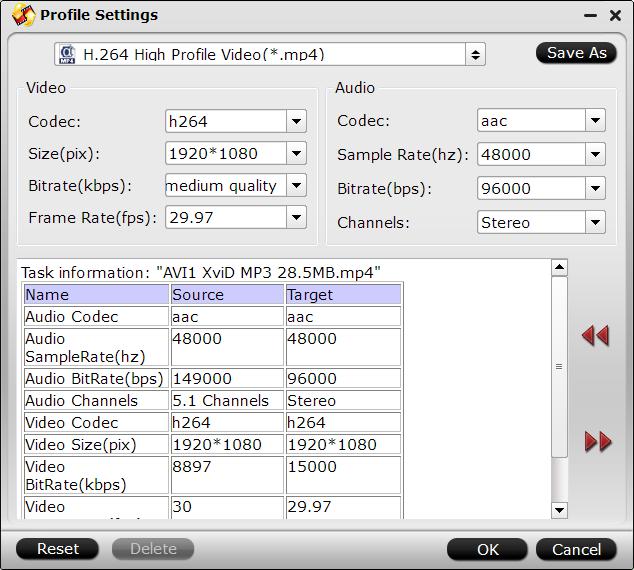
To make the output video satisfy all the parameters displayed above, just click "Settings" to open "Profile Settings" window, you will get the chance to tweak the output video codec, bit rate, resolution, frame rate and audio codec, channels, sample rate, bit rate, etc to the values listed above.
Before uploading your video to YouTube, you can protect your video with transparent text watermark, or compress your video file size losslessly with the video trimming function to remove unwanted segments or clips from the video.
How to upload and share HD DVD on YouTube fluently and smoothly?
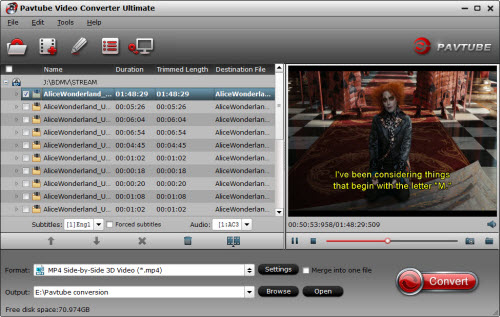
Step 1: Load HD DVD to the program.
Launch the program on your computer, click "File" > "Load from disc" bar to import your HD DVD to the program.
Step 2: Define output format.
Click "Format" bar, from its drop-down options, choose YouTube best compatible uploading format from "Common Video" > "H.264 High Profile Video(*.mp4)".

Step 3: Customize output profile parameters.
Hit "Settings" to open the "Profile Settings" window, here you can adjust the output video codec, resolution, bit rate, frame rate and audio codec, bit rate, sample rate and channels to let them fit with YouTube uploading standards.
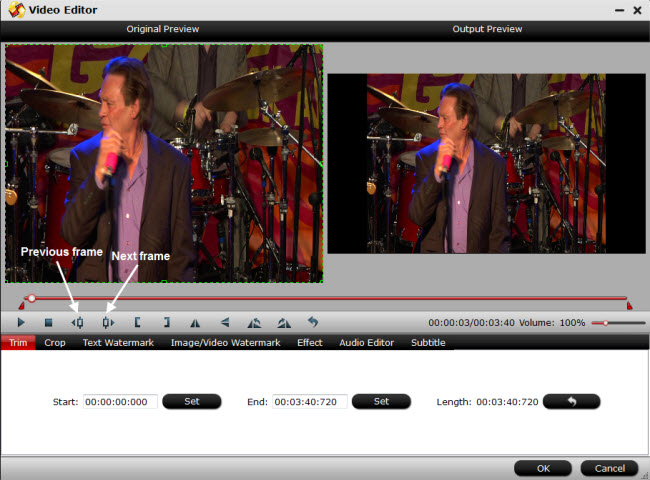
Step 4: Trim video file.
To reduce file size with no quality loss, you can trim video length in the "Video Editor" window by setting the start time and ending time to cut out unwanted clips from the video.
Step 5: Start the conversion.
Start HD DVD to YouTube best compatible format conversion by hitting the right bottom convert button, when the conversion is over, you will have no limitation to upload and share HD DVD on YouTube.


