For Handbrake users, you may find that it is pretty difficult to select the right title for you during the DVD scanning process just as the following condition:
I'm use Handbrake occasionally to rip DVDs from my collection for viewing on my Apple TVs, iPads, etc. I notice that every time I choose a DVD to rip, HB has to scan through 20-40 different "titles" and guess which one contains the actual movie in the correct order vs the "dummy" titles or the out-of-order titles, etc. I know these titles are inserted into the directory structure in an attempt to fool ripping software such as HB.

Why Handbrake select the wrong title?
If your Handbrake always fail to select the right DVD title when scanning DVD disc, the first thing you are recommended to do is checking whether the DVD movies is copy protected or badly mastered. It is well known Handbrake can only rip non-protected DVD disc, DVD folder and ISO image file. If your DVD movies is stored purchased commercial ones with region code and copy protection, Handbrake will fail to scan those titles for you. In addition, if your DVD movies are equipped with one of the most strict encryptions - 99 title copy protection which is widely adopted by Disney, Warner Brothers, Paramount, etc, not to say Handbrake but even some commercial DVD Ripper software will rip 99 title DVD with errors.
Related Topic: Handbrake VLC 2.0 DVD Ripper Issue | Handbrake No Valid Source Found | Fix Handbrake Not Reading File Error
Fix Handbrake select the wrong title
To fix this problem, you can either try to use the "Title Specific Scan" with Handbrake or open DVD with VLC to play and find which DVD title is the main movie title, and then, you can choose this title manually.
If above listed two ways still can't help to fix this issue or you wish to look for a hassle free way to get this trouble. It woule be much ideal for you to find a Hanbdrake alternative - Pavtube DVDAid for Windows/Mac (best DVD Ripper for Windows/Mac), the program can access DVD movies with all copy and region code protection including Region Code, RCE, key2Audio, UOP, CSS, Macrovision, Disney X-project DRM (99 titles DVD encryption included), FluxDVD, Protect, ARccOS, AACS, BD+, ROM Mark, BD-Live, etc. The biggest merits of this program is that it can automatically select the main DVD title (usually the one with longest duartion and largest file size) for you, so that you can directly get the main DVD title copied or ripped without wasting your time and energy on those wrong and fragmentary titles. Apart from those important functions, the program also benefit you a lot in the following aspects:
- 1:1 full disc copy of original DVD structure
- Main movie copy of DVD movies without unwanted comments, ads, trailers, etc.
- Rip DVD to various popular digital file formats or device preset profile formats
- Set DVD subtitles by selecting desired subtitles from internal DVD movies, enabling forced subtitles or add external subtitles to DVD movies.
- Adjust output profile parameter settings to get better quality video and audio.
- Edit DVD movies by trimming, cropping, splitting, merging, deinterlacing, adding watermark, applying special effect, etc.
How to Fix Handbrake Select Wrong Title with Handbrake Alternative?
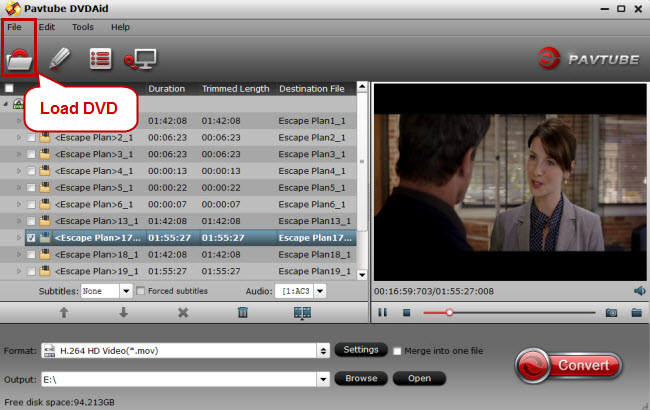
Step 1: Load DVD disc into the program.
Insert your DVD into the optical drive on your computer, start the program, on the main interface, click "File" > "Load from disc" to load DVD disc into the program, you can also add Video_TS folder or IFO/Image file into the program.
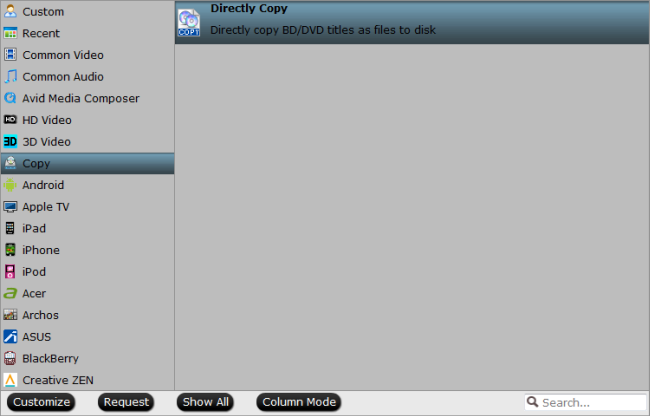
Step 2: Choose output file format.
Full disc copy
Make a full disc copy by hitting the  icon on the top tool bar of the main interface.
Main movie copy
From "Format" bar, select "Copy" > "Direct Copy" to copy the main movie of the DVD disc.
Output digital file formats or device preset profile formats
From "Format" bar drop-down list, select one of your desired file formats or device preset profile formats according to your own needs.

Tips: Click "Settings" on the main interface to open "Profile Settings" window, here you can flexiblyu adjust the output profile settings according to your own needs.
Step 4: Edit DVD movies.
Select a movie title or chapter on the main interface to active the "Editor" function, then click the Edit icon on the tool bar of main interface to open the Editor Window, you can play and preview the original DVD movies and output effects. Also you can flip DVD, trim, crop, add effect, reset, and adjust volume.

Step 5: Begin the DVD copying or ripping process.
After finishing all the settings, go back to the main interface, press the right-bottom "Convert" button to start DVD to your desired digital file format conversion process.
When the conversion is completed, click "Open output folder", a window will pop out with all your converted files. You will then be able to copy the converted DVD files to external hard drive or transfer and view on different portable devices.


