When it comes to the simplest way to combine clips to create a movie with titles, background music, transitions, and effects, Windows Movie Maker has been a top choice of video editors. Now, more and more people like to create a WMV video in Windows Movie Maker. Theoretically speaking, WMV in high quality gives more clarity, more bits to show the image, and more bits means a bigger file size. That is to say, WMV can simply be interpreted as big file size. So there come some conflicts, for example:
"I have created a WMV file that looks pretty good but it's about 7 meg which is too big to email. When I save it in email format, the video and audio go to ^$*&. Is there any way to compress WMV file for emailing and uploading to websites, or what do I need to do?"
As we all know, large WMV files are slow to upload and download. To make WMV uploading and downloading process quickly completed, the best solution is to compress video file size. So is there any free ways to compress WMV file to smaller size? Yes, of course there is. Just follow the tutorial below to learn how to compress WMV file with free way.
Top Methods to Compress WMV File
Method 1: Compress WMV File to small sized MP4
Generally, we can compress WMV file to FLV to achieve smaller video size, especially when you need to upload WMV video to YouTube. What's more, you can also compress WMV to MP4 because MP4 takes up less space than WMV when provides same video quality. MP4 also makes good compatibiity with most devices and video sharing websites.
Method 2: Change WMV profile parameters
The video file size largely depends on these profile parameters listed below. You can also shrink WMV file size by adjusting video profile parameters.
Video resolution: The higher the resolution, the clearer the picture. However, the higher the resolution, the larger the file size will be. Changing the original video to a smaller resolution will lead to a smaller file size. For WMV video with a file resolution of 1920×1080, it's recommended to reduce to 640×480, 640×360, and more resolutions.
Bit rate: As for the bit rate, lowering the bit rate will bring about the decrease of the video file size. But please keep in mind the image quality will be bad in case you make the bit rate too low.
Frame rate: The frame rate has a significant impact on the file size. Lowering the frame rate of your video to 15 or 10 fps can reduce the file size by as much as 1/2 or 2/3. However, reducing the frame rate may affect the smoothness of the playback. Acceptable frame rates vary depending on the specific video clip. You may have to experiment to find the lowest acceptable value.
Method 3: Trim/Crop WMV files to remove unwanted parts or areas
Trimming or cropping WMV files is another simple but effective way to compress WMV files without quality loss. Trim your unwanted segments from the WMV video to leave only your desired parts. Crop the black bars around the WMV video frame to play the video with full screen.
Here the best WMV compressor can help you get these work done!
Get the Best WMV Compressor to Reduce WMV File Size
A perfect WMV compressor Pavtube Video Converter Ultimate allows you to compress WMV file to smaller-sized MP4, FLV, etc. for emailing or sharing on YouTube, Facebook, Vimeo, etc. Best of all, it can compress WMV into high-quality video at 30X faster speed compared with other normal video compressor software, by taking advantage of the NVIDIA CUDA technology and AMD Accelerated Parallel Processing (APP) with H.264 and H.265 codec.
Futhermore, it has a built-in video editor to trim WMV to get parts you want to retain, cut off the file to delete the black bars, etc. Meanwhile, it's at your fingerclicks to lower the resolution, bit rate and frame rate of WMV file to get smaller video size. You won't spend much time studying the user guide, it is very easy to reduce large WMV file size with its intuitive interface.
Pavtube Video Converter Ultimate is available on Windows 2003/XP/Vista/Windows 7/Windows 8/Windows 8.1/Windows 10, it is also accompanied by a Mac version, Pavtube iMedia Converter for Mac for compress WMV files on macOS 10.13, macOS Sierra, Mac OS X 10.11 El Capitan, Mac OS X 10.10 Yosemite, etc.
Now, free download the best WMV compressor, and follow steps to compress WMV video files!
How to Compress WMV File without Losing Quality?
Step 1: Load WMV videos to this WMV compressor
Click "File" drop-down option, then select "Add Video/Audio" or "Add from folder" to select the WMV file you want to compress. If you have several WMV files to compress, this compressor also supports batch compression.
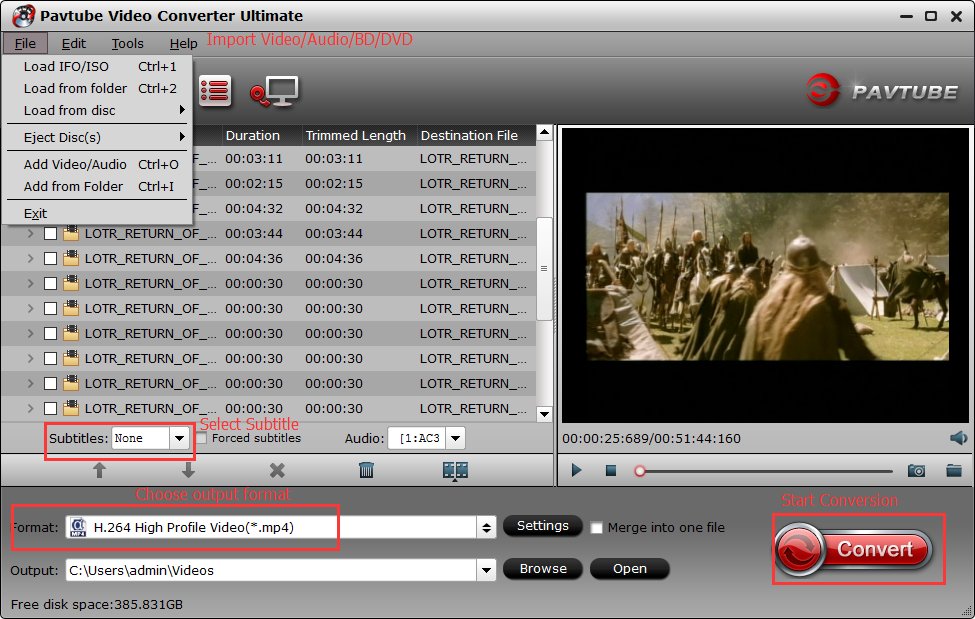
Step 2: Define output file format
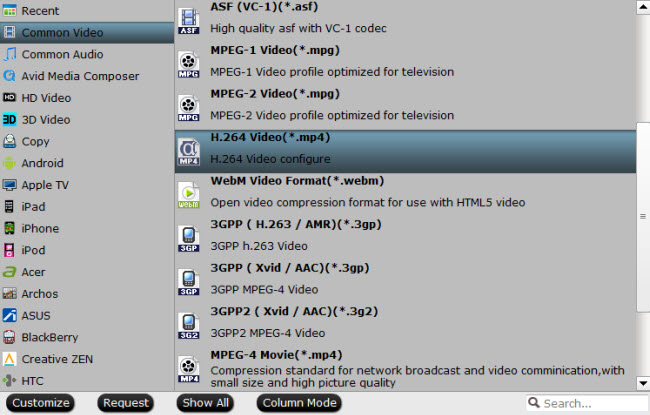
To make the WMV video size smaller, choose one of the formats with smaller size. To upload to web like YouTube, you're suggested to convert WMV to FLV. To send the video via email or play on Android iOS devices, choosing MP4 as output format will be better. Take MP4 as an example. just click on "Format" bar, go to "Common Video", then select "H.264 Video(*.mp4).
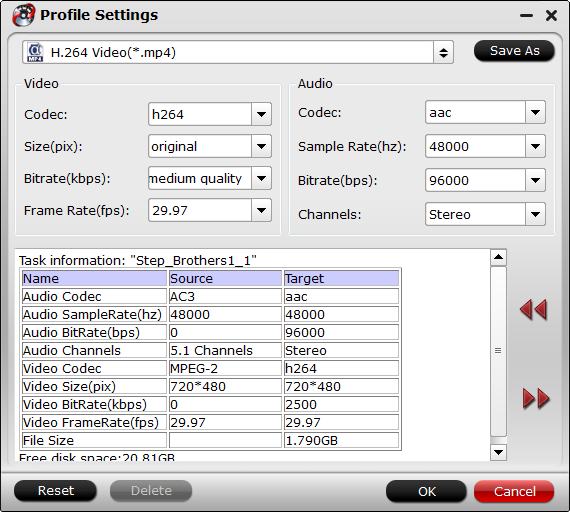
Step 3: Lower WMV Resolution, Frame Rate, Bit Rate
Click "Settings" button behind Format bar, to open "Profile Settings" window. Here, you are allowed to adjust various parameters like Resolution, Frame Rate, Bit Rate, etc. You can change output video resolution to 640 x 480, which will largely reduce WMV video size. Or lower the bit rate 20-50% of the default to get small files. However, the lower parameters value will reduce video size. Please note that a proper value is needed to keep good balance between file size and video quality.
Step 4: Trim / Crop / Split WMV Video File
Click the "Edit" icon on the UI to open "Video Editor" window.
Under the "Video Editor" window, switch to "Trim" tab, you can cut off the unwanted parts from a long WMV video to short ones. Just drag the slider bars to include the segment you want to remain, click the left square bracket to set start point, and click the right square bracket to set end point when previewing the video or directly input specific values to "Start" and "End" box. Finally, click "OK".

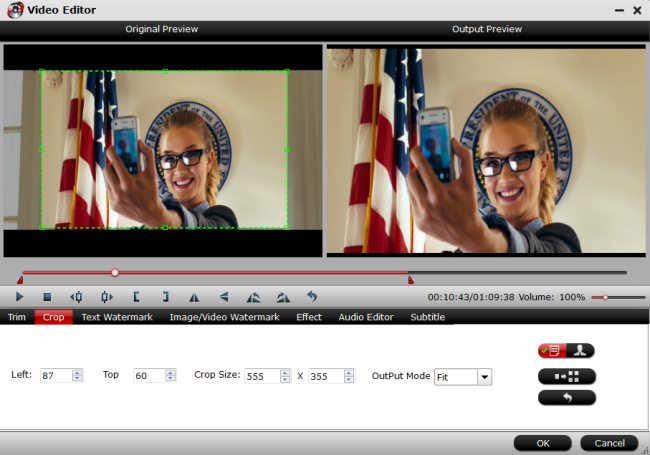
2. Crop WMV to shrink WMV size
To eliminate black bars and unwanted area of image, under the "Video Editor" window, switch to the "Crop" bar, and follow the below methods to crop selected WMV video:
A. Crop WMV video by dragging and dropping the crop frame. Simply move your mouse cursor to drag and adjust the green frame to desired position.
B. Crop WMV video by setting values. There are "Simple Mode" and "Advanced Mode" under Crop feature.
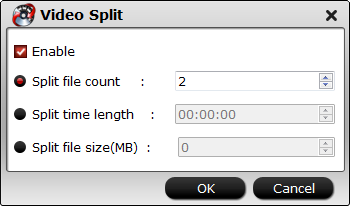
3. Split WMV file into smaller ones
By clicking the "Split" button under the file displaying list, checking "Enable" to enable it, and then you can split WMV file by file count, time length, or file size according to your own needs.
Step 5: Start WMV Compression Process
When everything is OK, click the "Convert" button and the rest will be finished automatically by this WMV compressor. After a while, you'll get your WMV video files in smaller size on your computer. Then you can quickly share your WMV videos with your friends by emailing or uploading to YouTube, Facebook, Vimeo, etc. With this best WMV compressor, you can also compress big MKV files or other digital formats.


