Article Index:
What is H.265 and main advantages of H.265?
Hardware and software for H.265 playback
How to encode H.265 files?

What is H.265 and main advantages of H.265?
The standard of H.265 is called HEVC or High Efficiency Video Codec, and it first appeared in 2013 as a true successor to H.264. For this reason, HEVC is also known as H.265, or MPEG-H Part 2. HEVC's main advantage over H.264 is that it offers roughly double the compression ratio for the same quality. This means that a video file encoded with HEVC can occupy half the space of its H.264 equivalent with no noticeable change in quality, or the same amount of space with improved quality.
Hardware and software for H.265 playback
As HEVC is relatively new, it's not as compatible with existing playback devices as H.264. Software playback of H.265 is still available on a wide variety of hardware, and some hardware decoding solutions exist - but something that can play H.264 is not necessarily HEVC-compatible.
Hardware playback support for H.265
Following is a quick rundown of well-known hardware that includes dedicated HEVC decoding blcoks, which definitely support efficient HEVC playback
- Intel 6th-generation ‘Skylake' Core processors or newer
- AMD 6th-generation ‘Carizzo' APUs or newer
- AMD ‘Fiji' GPUs (Radeon R9 Fury/Fury X/Nano) or newer
- Nvidia GM206 GPUs (GeForce GTX 960/950) or newer
- Other Nvidia GeForce GTX 900 series GPUs have partial HEVC hardware decoding support
- Qualcomm Snapdragon 805/615/410/208 SoCs or newer. Support ranges from 720p decoding on low-end parts to 4K playback on high-end parts.
- Nvidia Tegra X1 SoCs or newer
- Samsung Exynos 5 Octa 5430 SoCs or newer
- Apple A8 SoCs or newer
- Some MediaTek SoCs from mid-2014 onwards
From above lists, we can see that most desktop hardware released in 2015, and most mobile hardware from late 2014 onwards, supports dedicated HEVC playback.
Streaming boxes and game console support
Below is a quick list of popular media playing devices that don't support HEVC:
- Google's Chromecast (first and second generations)
- Apple TV (although some reports suggest 1080p HEVC playback is possible by running VLC on a 4th-gen model)
- Roku (third-gen models and earlier)
- Amazon Fire TV (2014) and Fire TV Stick
- Any Western Digital WD TV products
- All PlayStation consoles (including PS4 Pro)
- Xbox 360
And here are the media players that do support HEVC:
- Roku 4
- Amazon Fire TV (2015) and 2nd-gen Fire TV Stick
- Xbox One
Related Topic: Play H.265 on PS4 | Play H.265 on Xbox One | Play H.265 on WD TV Player
Software to playback H.265
As for software that can playback HEVC-enabled files, there are many options out there. For Windows users, you can natively play HEVC videos on Windows 10 with Windows Media Player. Alternatively, you can use VLC or MPC-HC for playback, which support older operating systems, or popular media center apps like Kodi (version 14 onwards) and Plex Media Player.
If you're running macOS or iOS, VLC is your best bet. On Android devices, you'll be able to play back HEVC files using MX Player through software decoding if your device is fast enough, or if it is, both MX Player and the Plex app supports native HEVC playback. Note that some devices have HEVC decoding blocks in their SoCs but don't support native playback at this time.
How to encode H.265 files?
The benfits of H.265 encoding are clear, you will get a video with the best quality but the smallest file size, the following part will show you how to encode H.265 files with either Handbrake settings or Nvidia GPU hardware acceleration.
Encode H.265/HEVC with Handbrake Settings
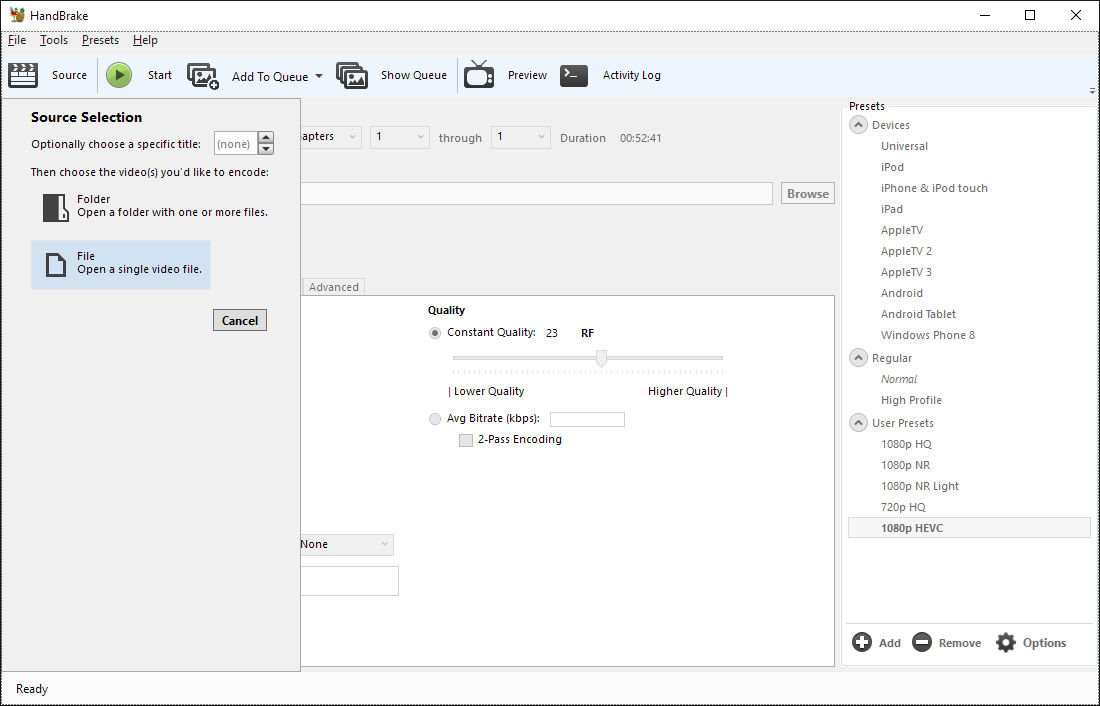
Step 1: Input source file.
Lauch Handbrake on your computer, Input the file you want to be transcoded by clicking the large Source button and then File (clicking Folder allows you to easily set up batch encodes). Then set a destination by browsing to whatever folder you desire.
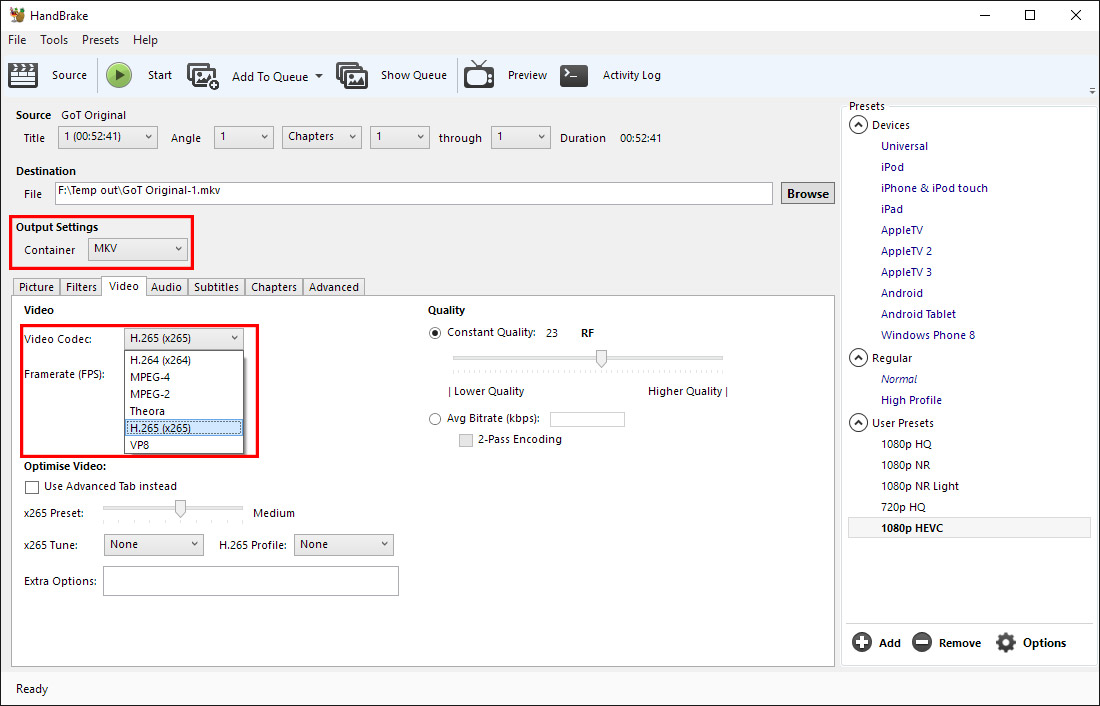
Step 2: Choose output file container format and codec.
Click the "Video" tab, change the video codec from H.264 to H.265 (x265). Also make sure to change the container from MP4 to MKV so that you can embed subtitles if you want to.
Step 3: Adjust picture settings.
Head to the Picture tab, and set Anamorphic mode to strict. Also check to make sure the automatic cropping feature has detected the correct settings. Sometimes it will erroneously crop out a few pixels on any side, but you can address this by switching to custom with 0 set in every location box. If, however, you have a 21:9 video encoded in 16:9, the cropping feature will automatically crop out the black bars at the top and bottom.
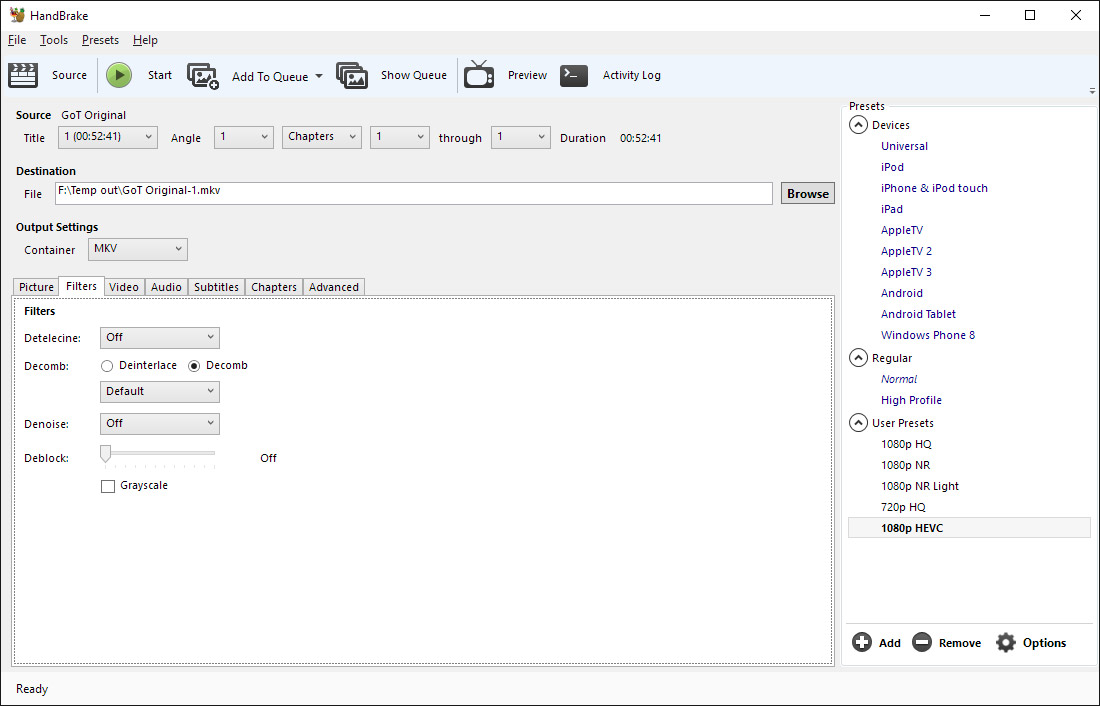
Step 4: Tweak filters settings.
In the Filters tab, you'll only want to modify these settings where necessary, leaving everything else ‘off'. If a TV show is interlaced, for example, it's a good idea to set Decomb to Fast as this will only deinterlace frames that are visibly interlaced. If you want to remove noise or grain from a source, setting Denoise to hqdn3d with a custom preset of 1:1:4:4 is a solid choice.

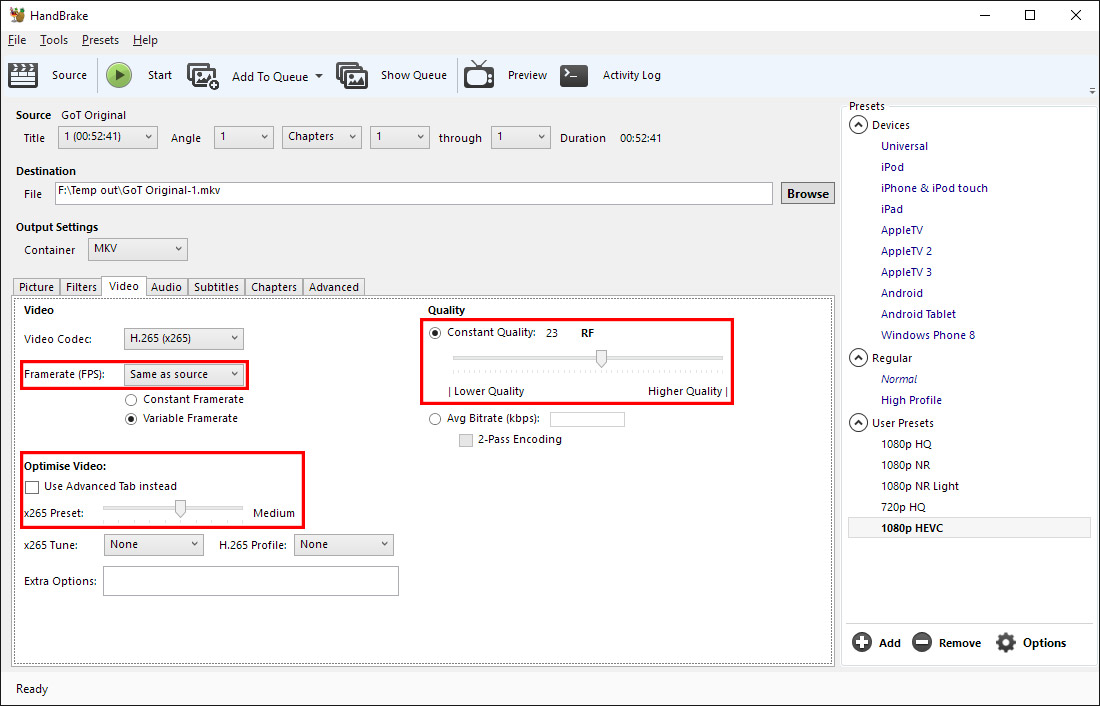
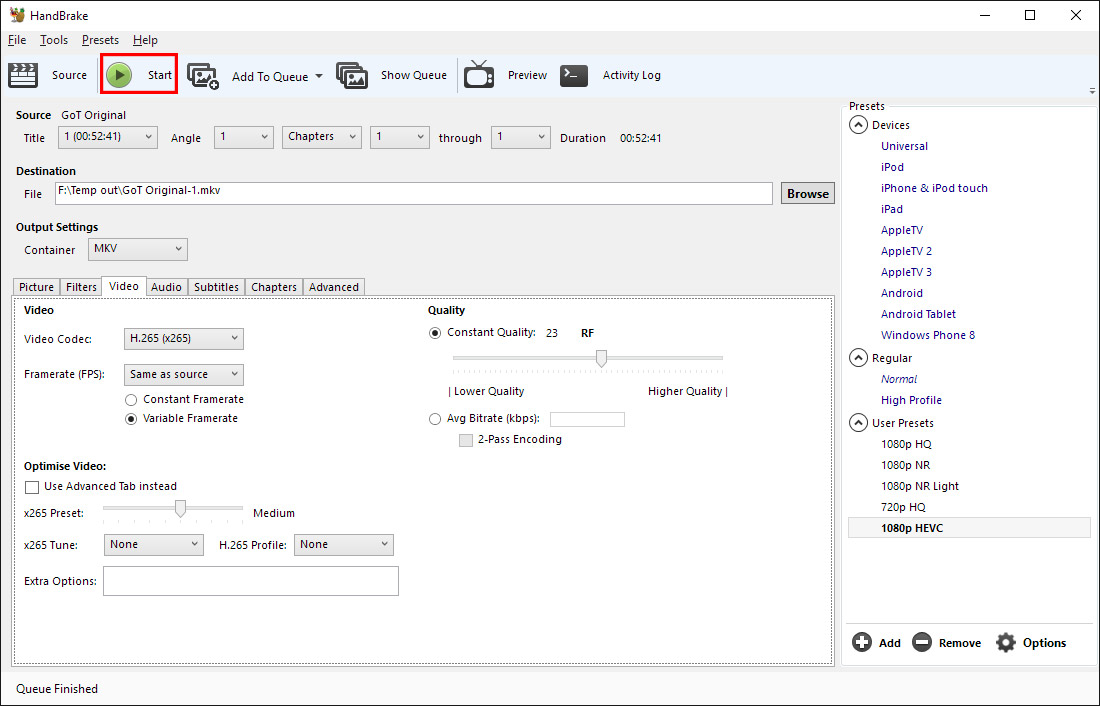
Step 5: Optimize output H.265 video preset.
In the Video tab you'll want to select some specific settings. Make sure framerate is set to ‘same as source' and that the ‘Use advanced video tab instead' box is unchecked.
Then, select an x265 preset of Medium by adjusting the slider down from the default Ultrafast setting. On the next page I'll explore how the x265 preset determines encode times, file sizes and quality, but basically you want to leave it on Medium for the best balance of encode time and file size. Setting it higher will result in a larger file and faster encodes, and setting lower will reduce the file size at the expense of significant longer encode times.
As for quality, set this to Constant Quality with a value of 23 for 1080p videos, and slightly higher (22) for 720p videos. This is the slider you'll want to experiment with the most: adjusting it closer to 0 gives better quality and higher bitrates, while moving it the other way has a negative effect on quality and delivers smaller files. I find 23 to be a great balance between quality and file size, although if you're willing to put up with more compression artefacts, experimenting with 25 or lower is a good idea. However, I wouldn't go any lower than 30 or any higher than 15 for the best results.
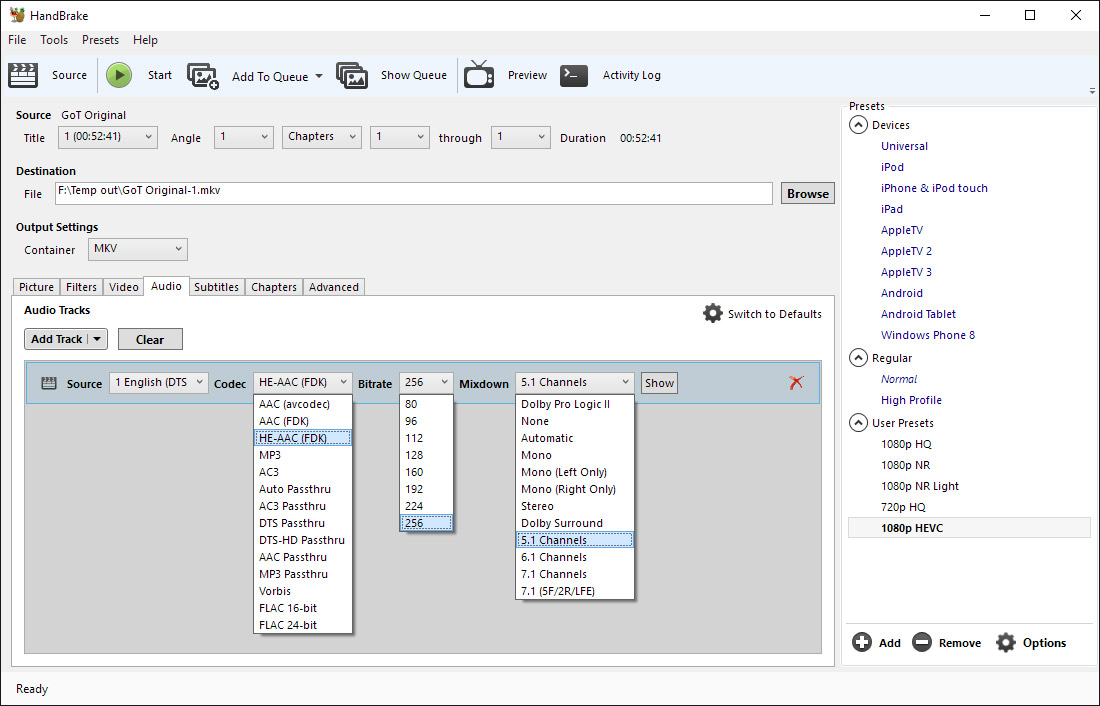
Step 6: Optimize output H.265 audio preset.
In the Audio tab you can change the codec to HE-AAC (FDK), the bitrate to 256, and the mixdown to 5.1 channels. If your source has only 2.0 channel audio, leaving the setting on 5.1 will still encode only 2.0 audio; in other words, it won't transform a stereo source into surround sound using any filters or magic. Here you might want to play with bitrates to whatever you desire, although I think 256 delivers great quality for TV show audio.
Optional: Pass through any subtitles from your source by heading to the Subtitle tab, clicking Add Track, then selecting Add All Remaining Tracks. From here you can also "burn in" subtitles, which codes the text into the video stream so you can see the subtitles on video players that don't support in-file subtitles (though you can't turn off the subtitles). Setting subtitles to "forced only" tells a video player to display subtitles even when the audio track matches your set language: this is useful for displaying a subtitles when dialogue isn't in English; for example, during alien conversations in a sci-fi film.
Optional: Save these settings as a preset so you can revisit them easily in the future.
Step 7: Start H.265 encoding process.
Click Start and let the encode happen, which may take a considerable amount of time depending on your hardware. After the encode is done, text saying‘finished' will appear in the bottom left corner.
Original source:
http://www.techspot.com/article/1131-hevc-h256-enconding-playback/
Encode H.265 with Nvidia GPU hardware acceleration
If you happen to have a Maxwell (GM206) or Pascal based Navidia Graphics card running on your PC computer, you can then take full advantage of your GPU'S dedicated HEVC encoding block to transcode videos into HEVC significantly faster by using Handbrake. To encode H.265 videos, you are highly recommended to download Pavtube Video Converter Ultimate, which has recently upgraded with perfect support for H.265 encoding acceleration on a PC with Nvidia Maxwell (GM2016) or Pascal GPU graphics enabled. With the program, you can comprehensively encode virtually any digital video file formats and also commercial Blu-ray/DVD disc into H.265 MP4/MKV format. The encoding speed can be accelerated about 30X faster than before.
How to Fastly Encode Video/Blu-ray/DVD to H.265/HEVC with Pavtube Video Converter Ultimate?
Step 1: Import video or load Blu-ray/DVD disc into the program.
Start the program on your computer, click "File" > "Add Video/Audio" to import digital file formats into the program, for load Blu-ray or DVD disc, insert your DVD disc into your computer's optical drive and your Blu-ray disc into an external Blu-ray drive, click "File" > "Load from Disc" to load Blu-ray/DVD disc into the program.

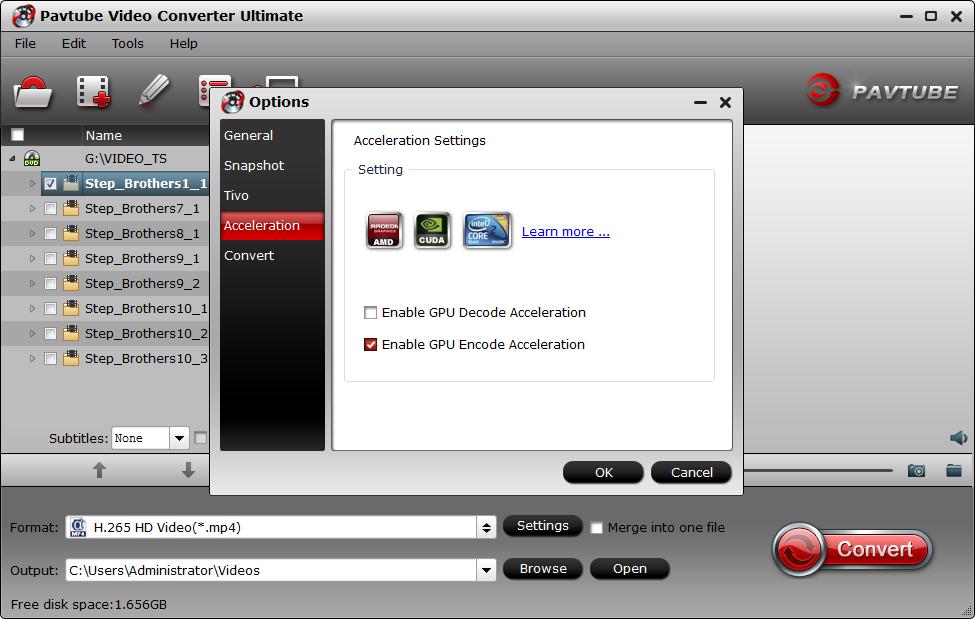
Step 2: Enable GPU Encode Acceleration.
Click "Tools" > "Options", in the opened "Options" window, click "Acceleration" menu, then check "Enable GPU Encode Acceleration" otpion so that the program will accelerate converion speed when encoding video/Blu-ray/DVD to H.265/HEVC codec.
Step 3: Output H.265 MP4 or MKV format.
Click "Format" drop-down bar, scroll down to select "Common Video" > "H.265 Video(*.MP4)" as the output file format.

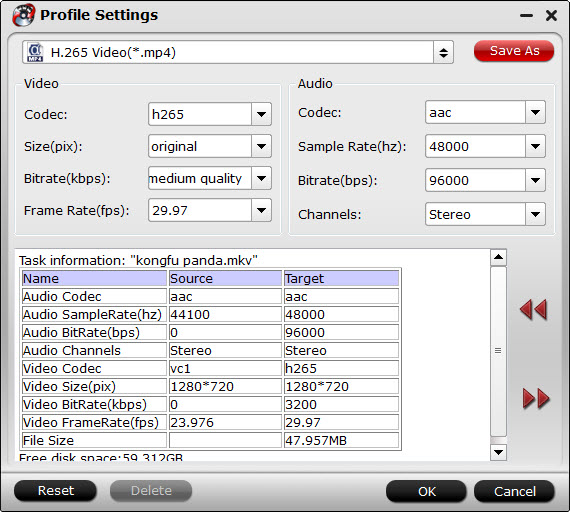
For outputting H.265 MKV format, select "HD Video" > "MKV HD Video(*.mp4)" to output, then hit "Settings" on the main interface to open "Profile Settings" window, under Video settings panel, click "Codec" drop-down selection, choose "H.265" as your final output file codec.
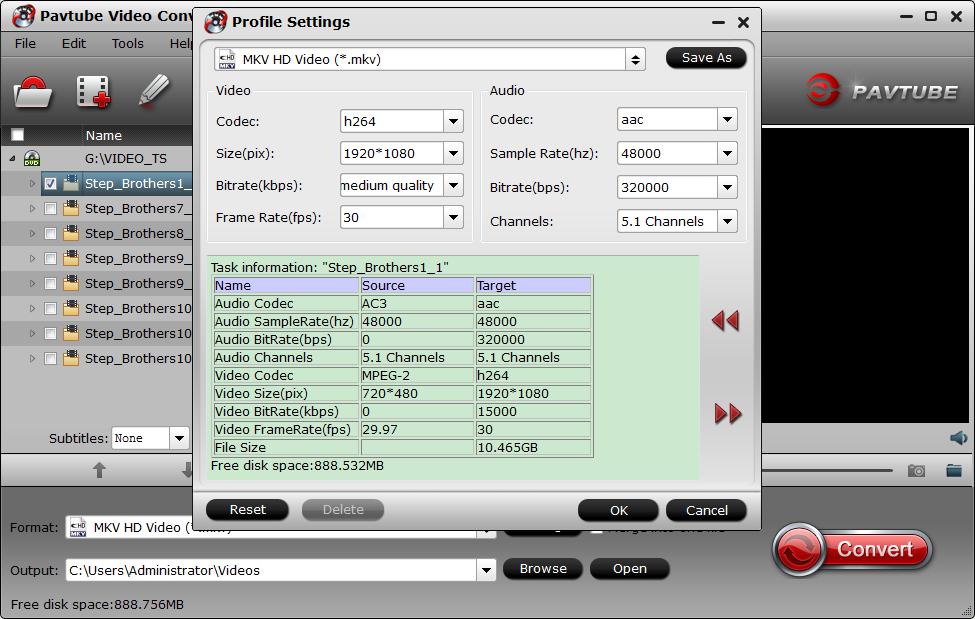
Step 4. Adjust output file parameters (Optional)
You are allowed to adjust video and audio parameters if you are not satisfied with the default settings. Presets like size, bitrate, frame rate, audio channels, etc. can be customized in your own way.
Step 5: Begin the H.265/HECV codec encoding process.
After all settings is completed, hit right-bottom "Convert" button to begin the conversion from video/Blu-ray/DVD to H.265/HEVC encoding process.
When the conversion is completed, you will get a perfect quality H.265/HEVC file with smaller file size for smoothly viewing and streaming on different devices.


