It's likely that you have recorded some high definition videos with Sony, Canon or Panasonic camcorder, to get thousands of views every day, the best way is uploading them to popular video sharing sites like YouTube, Vimeo, Facebook, etc. This article below will show you how to upload AVCHD mts/m2ts video to YouTube with the best format and optimal settings.
Convert AVCHD to YouTube best uploading format
Although YouTube has slowly upgraded and expanded on the possibility of formats it accepts, however, it is a pity that YouTube still does not support AVCHD mts, m2ts files recorded from Sony, Canon, Panasonic, JVC, etc high definition camcorder. After searching on the Internet for YouTube best uploading format, we get the lists as below:
Container: MP4
Audio codec: AAC-LC
Audio channels: Stereo or Stereo + 5.1
Audio sample rate: 96khz or 48khz
Video codec: H.264 High Profile Video
Scan mode: Progressive scan not interlacing
Bit rate: variable bit rate, no bit rate limit required. The typical bit rate of HD video should be set to 8Mbps
Chroma subsampling: 4:2:0
Frame rate: content should be encoded and uploaded in the same frame rate it was recorded. Common frame rates include: 24, 25, 30, 48, 50, 60 frames per second (other frames are also acceptable).
Resolution: 2160p(3840x2160), 1440p(2560x1440), 1080p(1920x1080)
Aspect Ratio: 16:9
Duration: YouTube limits the length of a video file to 15 minutes. It means that a user can only upload a video of 15 minutes at most.
File Size: Only a 2GB video file can be uploaded, but 20 GB is allowed when an up--to-date browser is used.
Related article: Best Export Settings for YouTube in Premiere Pro CC
To facilitate you to convert AVCHD video to YouTube with all the settings listed above, we would like to recommend you a simple solution called Pavtube Video Converter for Windows/Mac (support Mac OS X El Capitan), the program will do the following beneficial tasks for you:
For output format:
Transcode AVCHD video to YouTube best compatible MP4 format
For output profile settings:
Adjust output video codec as H.264, audio codec as AAC, video bit rate as 8Mbps, frame rate as original, audio channel as Stereo or Stereo + 5.1 , audio sample rate as 96khz or 48khz
For output aspect ratio:
Adjust the output aspect ratio as 16:9
For output scan mode:
Change interlacing video to progressive video by checking the "Deinterlacing" option.
Compress AVCHD video in 3 different ways:
As AVCHD video files are usually large in file size, to achieve a fat and smooth AVCHD to YouTube uploading process, you can reduce its file size with the following 3 different ways:
Trim unwanted parts or segments from the video with no quality loss
Reduce the output video bit rate 20-50% of the default
Change video resolution to a suitable file size. 640 x 480 is more preferable by YouTube.
How to convert AVCHD MTS/M2TS to YouTube with Best Uploading Settings?
Step 1: Load AVCHD mts/m2ts video to the program.
Start the program on your computer, click "File" menu and select "Add Video/Audio" or "Add from folder" to import AVCHD mts/m2ts videos to the application.

Step 2: Choose YouTube best uploading output format.
Click "Format" bar, from its drop-down options, choose YouTube best compatible uploading format from "Common Video" > "H.264 High Profile Video(*.mp4)".

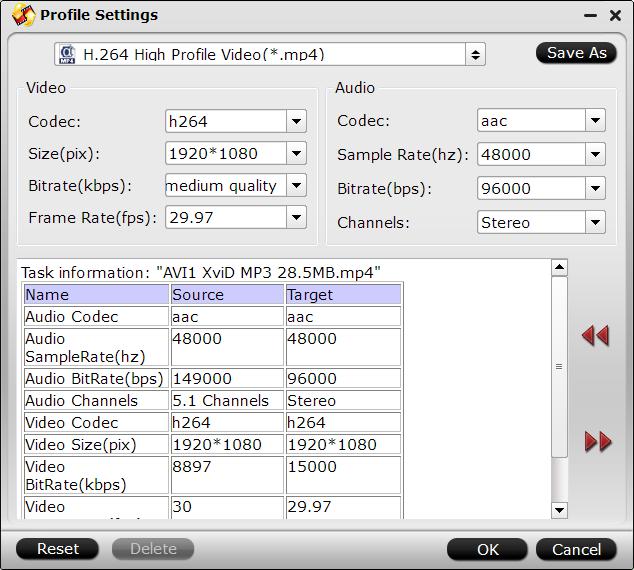
Step 3: Customize output profile parameters.
Click "Hit "Settings" to open the "Profile Settings" window, here you can adjust the output video codec, resolution, bit rate, frame rate and audio codec, bit rate, sample rate and channels as the optimal settings for YouTube uploading.
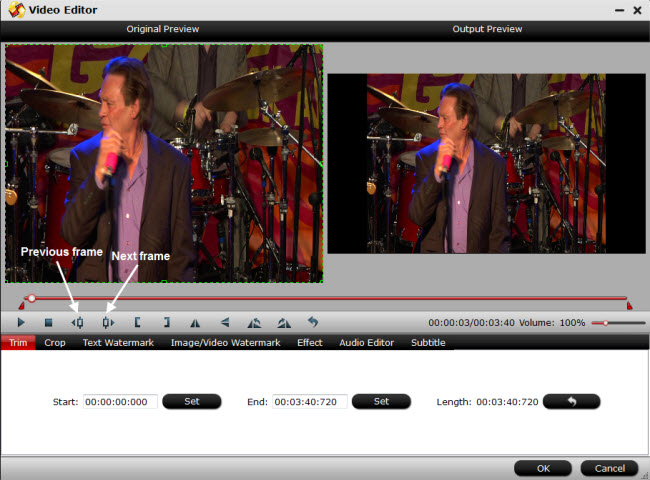
Step 4: Trim video file.
To reduce file size with no quality loss, you can trim video length in the "Video Editor" window by setting the start time and ending time to cut out unwanted clips from the video.
5: Start the conversion.
Start AVCHD mts/m2ts video to YouTube best format conversion process by hitting the right bottom convert button, when the conversion is over, you will have no limitation to upload and share AVCHD video on YouTube.
If you encounter any problems during YouTube video uploading process, please read this article: fix YouTube video not uploading problem.
Apart from turning AVCHD video to YouTube, the program also acts as a AVCHD video player, or assists you to convert AVCHD video for watching on iPhone, iPad, Android Phone/Tablets, TV, game consoles or AVCHD editor software.


