Kodi has come a long ways from its early days as XBMC and continues to only get better. Kodi 17 Krypton is the newest version of Kodi which gives people better video enjoyment. Kodi 17 is available on MacOS. But Kodi v17 requires Mac OS X 10.8 or later. Kodi 17 can play HEVC video on Mac under the condition that your Mac has a hardware that decodes HEVC codec.
HEVC Playback Supported Hardware
Most desktop hardware released in 2015, and most mobile hardware from late 2014 onwards, supports dedicated HEVC playback. Here’s a quick rundown of well-known hardware that includes dedicated HEVC decoding blocks, which definitely support efficient HEVC playback:
- Intel 6th-generation ‘Skylake’ Core processors or newer
- AMD 6th-generation ‘Carizzo’ APUs or newer
- AMD ‘Fiji’ GPUs (Radeon R9 Fury/Fury X/Nano) or newer
- Nvidia GM206 GPUs (GeForce GTX 960/950) or newer
- Other Nvidia GeForce GTX 900 series GPUs have partial HEVC hardware decoding support
- Qualcomm Snapdragon 805/615/410/208 SoCs or newer. Support ranges from 720p decoding on low-end parts to 4K playback on high-end parts.
- Nvidia Tegra X1 SoCs or newer
- Apple A8 SoCs or newer
- Some MediaTek SoCs from mid-2014 onwards
When your Mac can handle HEVC codec, you can play HEVC video on Kodi 17 without hassle. Now, you can install Kodi 17 on Mac to stream H.265 video.
How to install Kodi 17 on a Mac?
Here, we show you how you can install Kodi 17 on your Mac. That's where we come in, and don't worry, the process is a lot simpler than you might've thought.
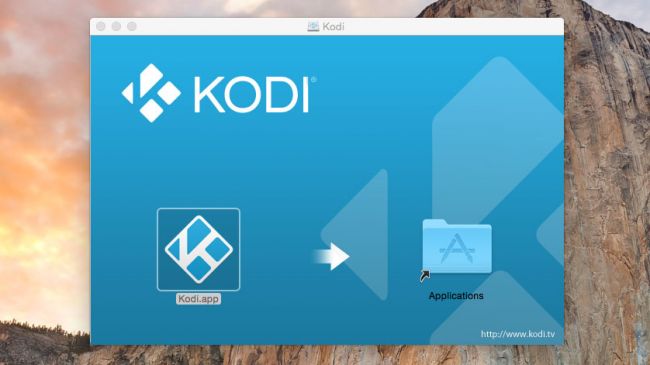
1. Download the latest version of Kodi 17 for Mac from here, available as a disk image.
2. Open the Kodi 17 disk image (if it doesn’t open automatically – it will if downloaded via Safari).
3. Drag the Kodi icon into the Applications folder to install the software on your Mac.
4. Open Kodi 17 – the first time you open the app, depending on your Gatekeeper settings, you may get a message informing you that Kodi “can’t be opened because it is from an unidentified developer”. Simply right click (CMD + click) the Kodi app and click Open, and it’ll bypass this feature. Alternatively, you can head to the Security & Privacy section of System Preferences and select “Anywhere” where it says “Allow applications downloaded from:”.
5. You’re done! Kodi 17 should then open, and you’re free to use it as you see fit.
That’s about it! You’ll be using Kodi for all your media streaming needs in no time.
Add HEVC video to Kodi 17 Library for Playback
Step 1: Select "Movies" in the home screen menu.
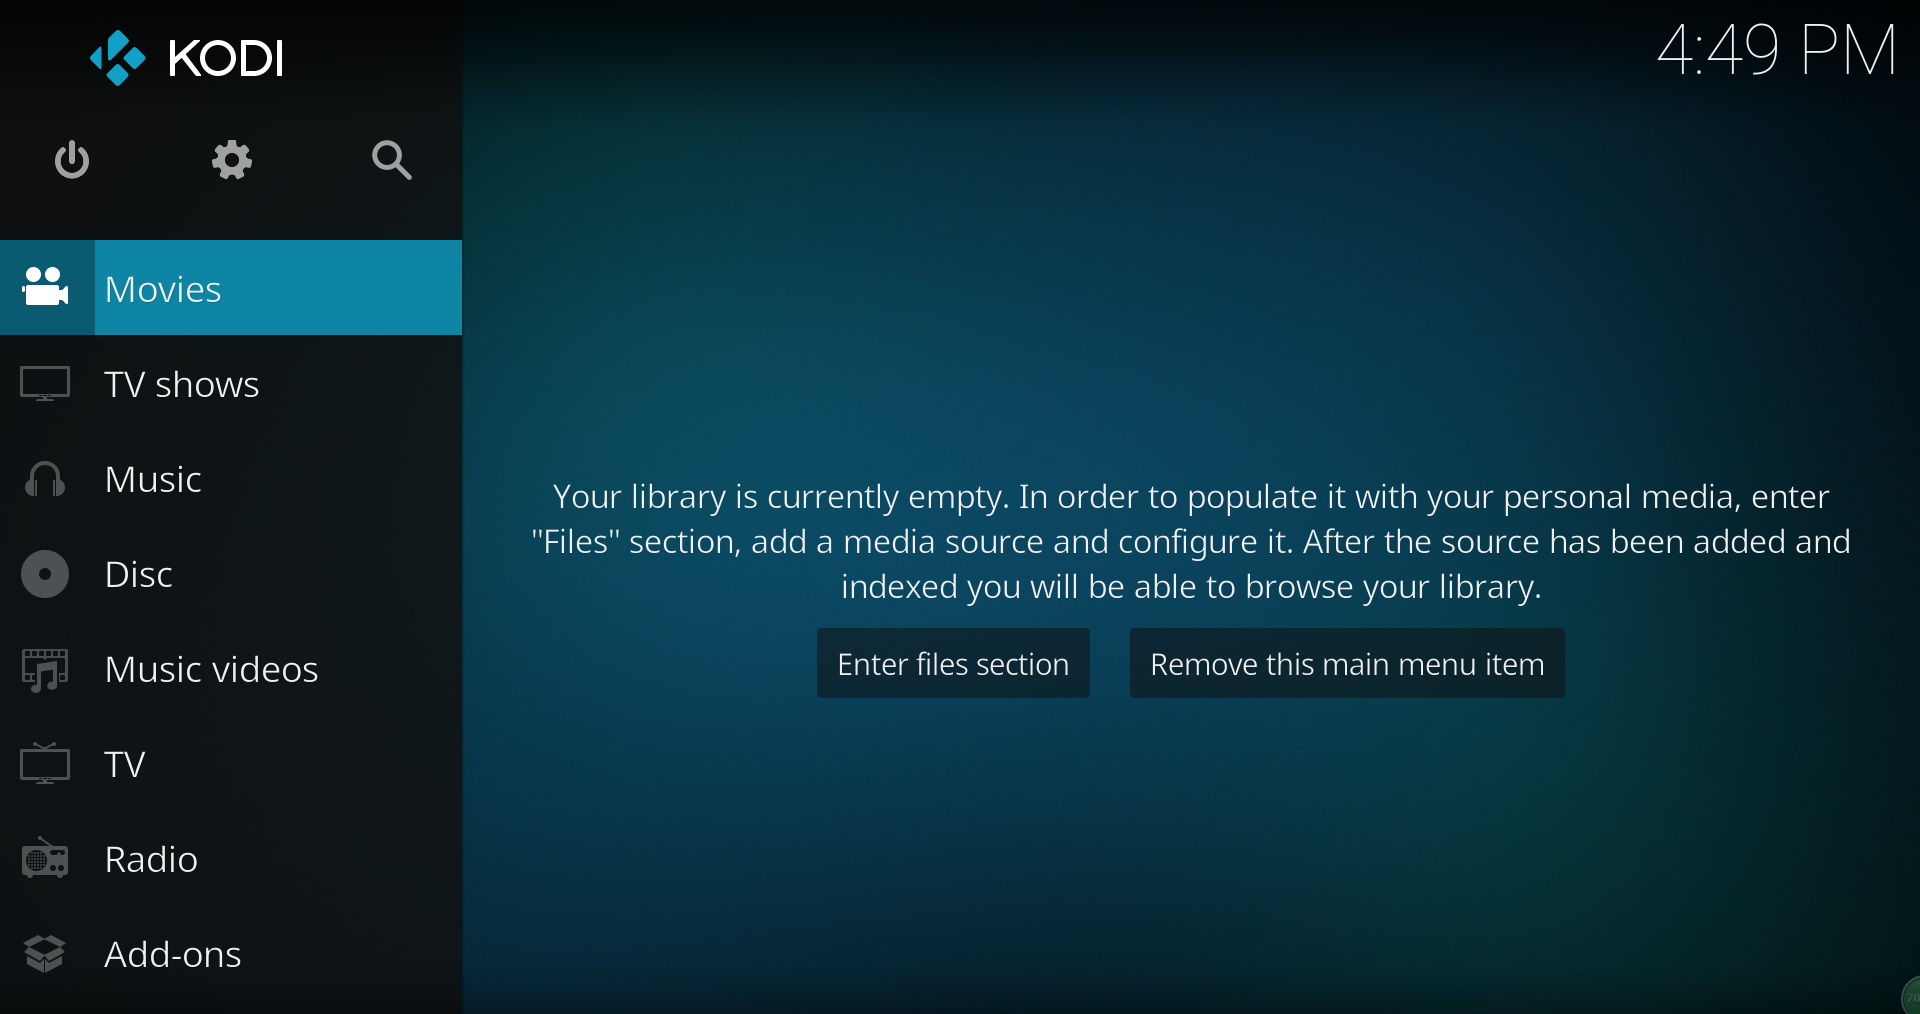
Step 2: Select Enter Files Section, then select "Add Videos". Note: if you do not see an option "Add Videos", you need to enable it by going to Settings > Appearance > File Lists > Show 'add source' buttons.
Step 3: The "Add Video Source" screen will be displayed. Then select the "Browse" button. Note: You can also type a local or network file path directly into this box, if you already know the address/path. For example,smb://192.162.0.4 could be typed in directly and saved, which will skip the "browsing" step.
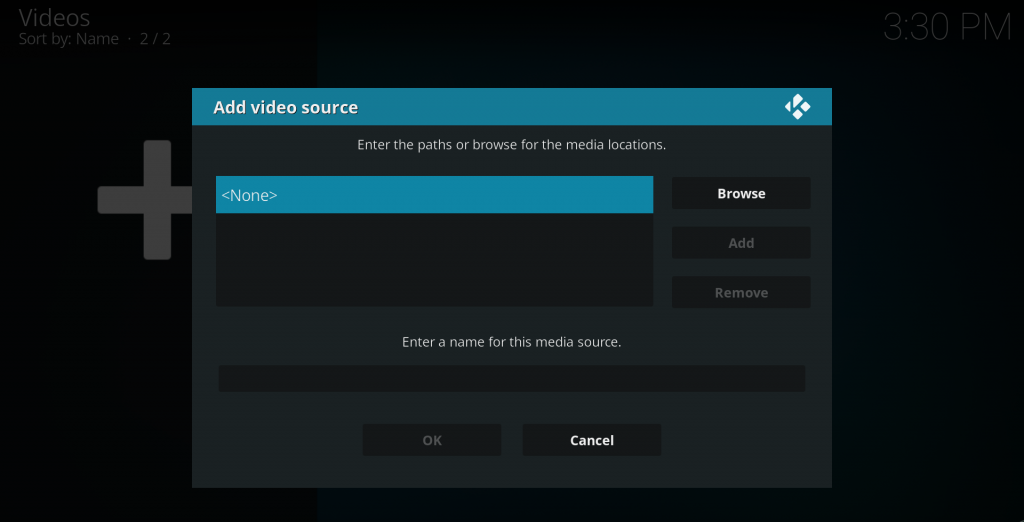
Step 4: Now browse to where you keep your H.265 videos stored. Once you have found the folder you keep your videos in, select the "OK" button. If you keep them shared on a network drive, read the Configuring PC Shares article for more information about setting up a share on your computer first.
Step 5: Name this Video Source however you like. If it is a movie folder, you will probably want to name it "Movies", and if it is a TV Show folder then you will probably want name it TV Shows. The name doesn't matter to Kodi 17. Then select "OK".
Step 6: The set content window will display, this is where you tell Kodi what type of media is in the folder. Press the down arrow until you reach the correct type (in this example movies)
Step 7: There are a number of options underneath, see Setting content and scanning to check what options to enable. Then select "OK"
Step 8: Press Yes to scan the HEVC content to the library (if no is pressed, it can be scanned later).
HEVC Playback Issues With Kodi 17 on Mac
When you are using Mac Mini or an iMac to play HEVC video on Kodi 17, you are likely to get choppy x265 video playback. One of the reason is that your harddware can't decode HEVC while another reason maybe that the rendering vcref buffers that come out of VTB. Anyway, x264 video playback will be much smoother than x265 video playback. So from time to time, it is needed to convert H.265 to H.264 on Mac for Kodi 17 playback.
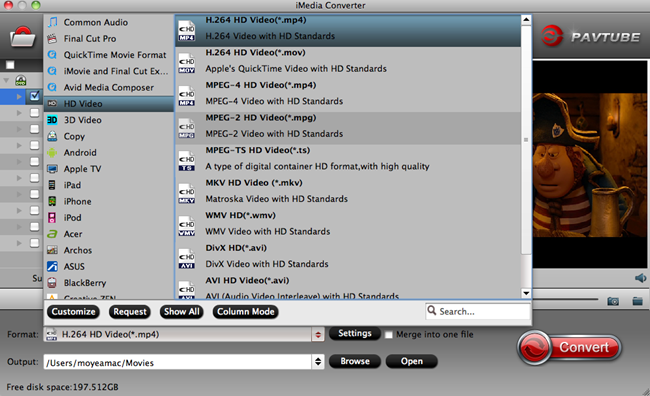
Pavtube iMedia Converter for Mac is an expert in H.265 decoding and encoding conversion. It can easily convert HEVC MP4, HEVC MKV to H.264 MP4, H.264 MOV, H.264 MKV for Mac playback with Kodi 17. It also can compress 4K HEVC video to 1080p for much smoother playback on Mac taking up less CPU/GPU. For 4k display, it can upscale your HEVC 1080P video to H.264 4K video for better visual effect without mosaic video. Simply by drag-drop feature to load HEVC video and choose output H.264/AVC codec video, you can finish HEVC to Kodi 17 H.264 conversion on Mac withink 3 clicks. Read review to learn more.
Step 1. Download a copy of this H.265 Converter, click “Add Video” to import your H.265 video files.

Step 2. Click "Format" to choose Kodi 17 supported format video such as H.264 HD MP4. You are allowed to adjust video and audio parameters if you are not satisfied with the default settings. Presets like size, bitrate, frame rate, audio channels, etc. can be customized in your own way.
Step 3: Now hit on the “Convert” button on software main interface to start the HEVC to Kodi 17 conversion.
Once the process ends, locate the H.264 files in output folder. Then add the video files to Kodi 17 library for smooth playback on Mac.


