Raspberry Pi (version 3/2/1) is a very good basic video, and music playback device when you have the right media players installed on it like Kodi. With the right video player, you can play audio and video file formats like MP4, MKV, MP3, OGG, etc on Raspberry Pi (3/2/1). But although your Kodi/XBMC media player center supports ISO, some people still have issues on ISO playback on Raspberry Pi (3/2/1).
Playing ISO's on Raspberry Pi appears to be Buggy
"So I've been trying to play my DVD ISO files on the Raspberry using Kodi. Playing ISO's appears to be a pretty mixed bag.....when I try one of the following happens:
1. The ISO simply won't play.
2. The first chapter appears to start playing but nothing shows on the screen. If I click the "previous chapter" button then sometimes the DVD menu will pop up.
3. The ISO will start playing but freeze in the first chapter.
4. My Raspberry Pi crashes and reboots. (It does this every time I try to play my ISO of John Carter)
5. The first chapter won't play. If I hit the next chapter button the 2nd chapter will play but if I try to go back to play the 1st chapter the file crashes and kicks me back out to the XBMC interface."
"I use a Raspberry Pi 3 (running osmc) and i'm having some problems with it: Whenever I play one of my Bluray-Iso discs/files the movie stops from time to time a few seconds to load the content or the movie laggs every few seconds for a short moment. I overclocked the Pi to 1GHz, hopeing it will help. But no success. My movies are at the Moment on my Windows 7 Machine (my NAS is broken at the Moment). I use symbolic links so I only need to share one folder via nfs. I also tried to Play around with the kodi video-Settings but it doesn't help."
Why You Can't Play ISO on Raspberry Pi (3/2/1)?
So are your ISOs encrypted ones? Kodi on Raspberry Pi (3/2/1) can't play encrypted ISO images. Normally the encryption is removed when ripping from the Blu-ray and DVD discs. (Learn rip Blu-ray to ISO)
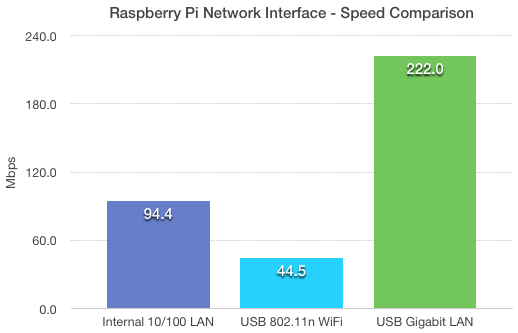
When Raspberry Pi (3/2/1) laggs while playing ISO images, buffering will be mainly due to the network, not due to the Raspberry Pi. Usually, when you use a Pi3 to play ISO files via Mac Mini, it will be somewhat buffering. But if you switch over a NAS, the issue will disappear to some degree.
In addition, the bandwidth also affects streaming speed. It will have different speed when playing ISO on Raspberry Pi by disk (microSD), external SSD, external HDD, memory, and networking.
Rip Encrypted ISO to Unprotected MP4/MKV for Raspberry Pi (3/2/1) Playback on Kodi
If you have some encrypted ISO and want to stream via Raspberry Pi (3/2/1), you can rip it to Raspberry Pi (3/2/1) media player supported format. What's more, ripping ISO to MP4, MKV will also make the media streaming on Raspberry Pi (3/2/1) easier with Kodi/XBMC. You can download Pavtube ByteCopy to achieve this. It is a simple yet very effective piece of software which can assist you in turning your ISO image files to Raspberry Pi (3/2/1) media player comaptible MP4, MOV, MKV, WMV video formats with lossless quality. It not only can convert Blu-ray and DVD ISO to Pi but also can directly rip DVD and Blu-ray disc to Raspberry Pi (3/2/1).
You can configure the video and audio encoder, bitrate, sample rate, frame rate, channel to make the exported video more compatible with Raspberry Pi (3/2/1) media player. Now, you can download a trial version software to try to convert ISO to Raspberry Pi (3/2/1).
Step 1: Import ISO image file
Run the ISO to Raspberry Pi converter on your computer. Click “File” > “Load IFO/ISO” to add ISO images to this software. This app supports batch conversion so you can add more than one ISO images at a time.

Step 2: Choose Format for Raspberry Pi
Raspberry Pi decodes 1080p H.264 HD video smoothly and this video format is also compatible with Kodi and HD TV. So here, you are suggested to click "Format" > "HD Video" > "H.264 HD Video(*.mp4)".

Tip:
1. If you want to change the default profile settings, please click "Settings" to adjust both video and audio settings according to your need. Here you are allowed to set video size, bitrate, frame rate, etc to achieve the best movie effect on your TV via Raspberry Pi.

Step 3. Start ISO to Raspberry Pi conversion
When all setting are done, you can go back to the main interface and click the big red button "Convert" to start ISO to Raspberry Pi for streaming on TV.
Kodi/XBMC is one of the most popular media player center software for the Raspberry Pi. You can also stream music and videos from a Kodi media server which is hosted on another computer on your home network. You can also install Kodi/XBMC on Raspbian, but it would be easier to use OpenElec to use Kodi than to install Kodi on Raspbian because you also need to manually setup the keyboard and mouse to work in Kodi on Raspbian Wheezy.
How to Install OpenELEC on a Raspberry Pi?
Step 1 : Download all the needed files
You will need the following
A copy of SDFormatter (https://www.sdcard.org/downloads/formatter_3/).
The binary version of win32diskimager from this location: https://launchpad.net/win32-image-writer/+download
An image of openELEC http://openelec.thestateofme.com/ (Download the latest image file at the bottom) or official images here http://resources.pichimney.com/OpenELEC/official_images/?C=M;O=D (thank's Chris for the link)
Step 2 : Format the Memory Card
First thing to do is to format the memory card. Open up the SDformatter and run the install/setup.
Once installed, run SDformatter (start > all programs > SDFormatter). Select the drive that your Raspberry Pi memory card is inserted in, then click 'format'. Please note this will swipe your memory card so if you want to keep what's on it, we suggest using a different memory card.

You will be asked to confirm the format. Click OK to continue.
Next you will be informed not to remove the memory card during format. Click OK.
Once the format is complete, click OK and close SDformatter by clicking Exit.
Step 3 : Install openELEC to the SD Card
Open Win32 Disk Imager and click the browse button then select the openELEC img file you downloaded earlier.
Next thing to do is put the image onto the card. Make sure the drive your memory card is in is selected in the 'device' dropdown, then click the 'Write' button.
You will be asked to confirm the write, click OK or Yes to continue.
OpenELEC XBMC will now install on your SD Card.
Finally once the writing is complete you will see a 'Write Successful' box. Click OK to finish.
That's it. Pop your memory card into your Raspberry Pi, hook it up to the TV and enjoy your new media center.


