As the first video sharing sites to support high-definition video, Vimeo allow users to upload and share video with people all around the world. However, like fellow video sharing sites like YouTube, Facebook, Vimeo also has limitations and special settings for the video uploaded to it. The video must be created by your own or you must own the necessary right to the video, in addition, you need to include your role in the video description to avoid problems. Wish to smoothly upload and share video via Vimeo, the following article will offered a detailed illustration of Vimeo video upload limit, guides lines and solutions to fix Vimeo video uploading problems.

Part 1: Vimeo Video Upload Limitations
Part 2: Vimeo Video Upload Guidelines
Part 3: Best tool to fix all Vimeo video uploading problems
Part 1: Vimeo Video Upload Limitations
Vimeo has limitation on both the file size and video formats uploaded to it. Following are the specific limits:
Size: The videos should be at least 200KB in size, Vimeo uploads 500MB of video per week up to 25 GB a year
Video formats: Vimeo supports to upload video with the format of h.264 MP4, FLV, AVI, WMV , MOV, MPEGPS WebM and MPEG4
Hot Search: Best Formats for YouTube Uploading | Facebook Supported File Formats | Upload Video to Instagram
Best uploading settings for Vimeo
If you wish to achieve a smooth Vimeo video uploading process with best video quality, it would be ideal to encode your video with the following codec and settings:
Codec
H.264 Main Profile mp4 video for SD video
H.264 High Profile MP4 video for HD video or UHD video uploading
Frame rate
When preparing your video for upload, it's best to maintain the video's native frame rate when compressing your video. If your footage exceeds 60 FPS, Vime will automatically reduce the frame rate. If there is an option for keyframes, choose the same value you used for frame rate. Important: Always choose "constant" frame rate instead of "variable" frame rate.
Bit rate
Bit rate (also known as data rate) controls the visual quality of the video and its file size. If your video editing software gives you the option, choose a "variable" bit rate and select a value from the ranges below. You can experiment with different rates if your file is too large or you're not happy with the quality of your source file.
Resolution
Video come in all shapes and sizes but there are some of the most common formats.
Audio compression settings
Codec: AAC-LC(Advanced Audio Codec)
For best results, you are recommend using AAC-LC(low complexity) for the audio codec
Data rate: 320 kbit/s
For best results, encode your audio at constant rate of 320 kbit/s.
Sample rate: 48 kHz
For best results, set your audio sample rate to 48 kHz. If your working setting is already less than or equal to 48 kHz, leave it as is.
Part 2: Vimeo Video Upload Guidelines
You can following the simple steps below to upload video to Vimeo
Step 1: log in to your account.
The first thing that you should do is visit the Vimeo website and create an account. If you already have an account, log into it by clicking the login link. If you don't have an account, then you will need to follow the prompts to set up your account/channel.
Step 2: Get to Uploading the video.
Click the "Upload Video" button which is located on the home page of the site. You will also be able to find the same link in the navigation bar which is under the Upload heading.
Step 3: Follow directions to upload file.
Once you click the upload link, you will be taken to the upload page. You will need to ensure that you are permitted to upload the videos. You can only upload videos that are owned and created by you since it's not possible to upload any videos that are copyrighted by anyone else.
Step 4: Choose video and Upload.
Hit the "Choose a File to Upload "button then mark the video files to upload. Thereafter click on "Select". Automatically your videos will begin to upload. The progress bar will show the progress of the upload. After a few minutes, your videos will have finished uploading depending on the size.
Part 3: Best tool to fix all Vimeo video uploading problems
Output Vimeo most favorable format and settings
Have some video in hand with incompatible file format, size or settings and looking for a simple way to fix the Vimeo uploading problems when posting those video to it. Here comes Pavtube Video Converter Ultimate (review), which can do you a great favor to convert all the unsupported SD/HD/2K/4K and even commercial Blu-ray/DVD disc with copy protection and region code to Vimeo best favorable H.264 Baseline/Main Profile MP4 video codec (for SD video uploading) or H.264 High Profile MP4 video codec (for HD or 4K video uploading) and AAC-LC audio codec. To generate other compatible uploading settings such as video bit rate/frame rate/resolution and audio bit rate/sample rate/channels , just flexibly adjust them in the program's profile settings window.
Tips: The programs supports up to 6x speed H.264 encoding acceleration on a computer with Nvidia Graphic cards that supports Nvidia CUDA or AMD App technology.
Split or trim video for Vimeo uploading
Is your video is too large for Vimeo uploading, you can reduce its file size with no quality loss by trimming or cutting video to remove unwanted parts or segments from the video or split the large video into small clips by file size, count or length.
For Mac users, please download the Mac version - Pavtube iMedia Converter for Mac to fix Vimeo video sharing problems on Mac OS X El Capitan or macOS Sierra.
Step by Step Guide to Convert and Upload Video to Vimeo
Launch the program on your computer, click "File" menu and select "Add Video/Audio" or "Add from folder" to import unsupported videos to the application. Click "File" > "Load from folder" or press the "Folder" icon on the main interface, you can batch load multiple files into the program.

Step 2: Define output format.
Click "Format" bar, select Vimeo best uploading H.264 video codec from its drop-down options, for uploading SD videos, it is idea for you to choose "H.264 Baseline Profile Video(*.mp4)" under "Common Video" main category. If you plan to upload HD or UHD video, you are recommended to select "H.264 High Profile Video(*.mp4)".
Best video codec for uploading SD video
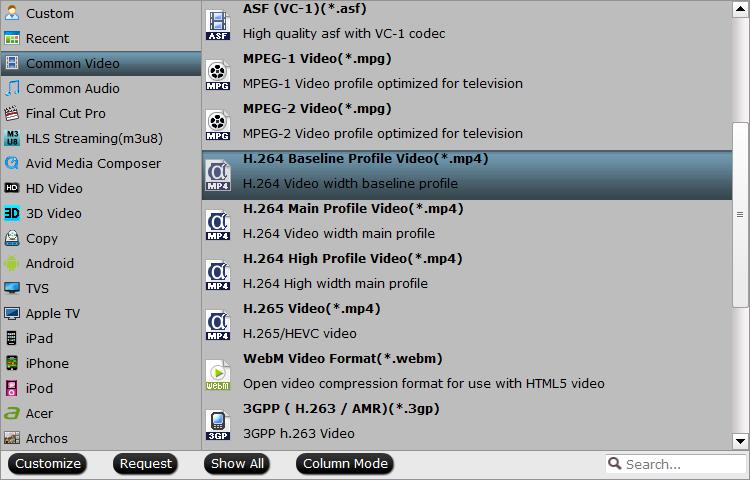
Best video codec for uploading HD or UHD video

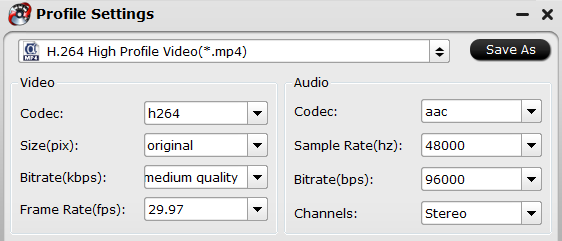
Step 3: Customize output profile parameters for Vimeo uploading.
Click "Hit "Settings" to open the "Profile Settings" window, here you can adjust the output video codec, resolution, bit rate, frame rate and audio codec, bit rate, sample rate and channels to make them adapt with best Vimeo uploading settings listed above.
Step 4: Trim or split video.
Trim video length
Check an item to active the "Video Editor" function, then click the pencil like icon on the top tool bar to open the "Video Editor" window, under the "Trim" tab in "Video Editor" window, drag the slider bars to include the segment you want to remain, click the left square bracket to set start point, and click the right square bracket to set end point when previewing the video or directly input specific values to "Start" and "End" box.

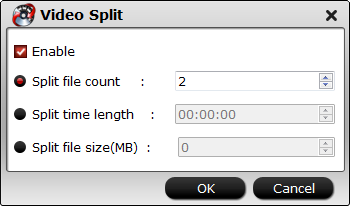
Split video length
By clicking the "Split" button video converter split button on file list, or from "Edit" menu, you can launch the "Video Split" window. Checking "Enable" to enable it, and then you can split the file by file count, time length, or file size.
Step 5: Start the conversion.
Start video to Vimeo best uploading format, settings and size conversion process by hitting the right bottom convert button, when the conversion is over, you will have no limitation to upload and share videos on Vimeo.


