Pavtube Video Converter is an easy-to-use program, which just needs several clicks to complete the conversion. This part presents the details on how to load files, preview & take snapshots, select output format, merge & split, edit video and start conversion.
Preview & Take Snapshots/Thumbnails
Merge, Split and select subtitles and audio track
Choose Output Directory and Find the Output Folder
Load file(s)
When you start up Pavtube Video Converter, the main interface pops up:
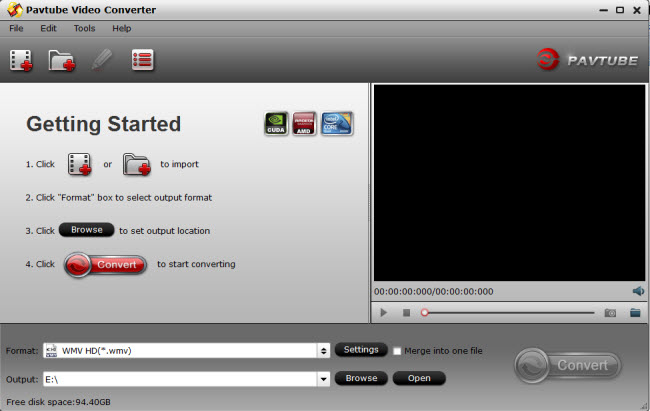
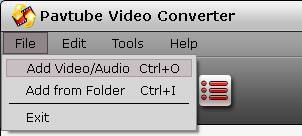
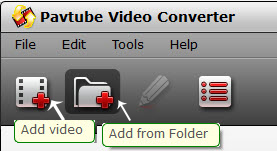
Load video files to the software using any of the three ways below:;
A. Click “File” menu, and select "Add Video/Audio" or "Add from folder" to import source video, audio and image files.
B. Click “Add Video” button or “Add from folder" button to import source files.
C. Open the folder that contains source files, and drag and drop video, audio and image files to the program.
Useful Tips:
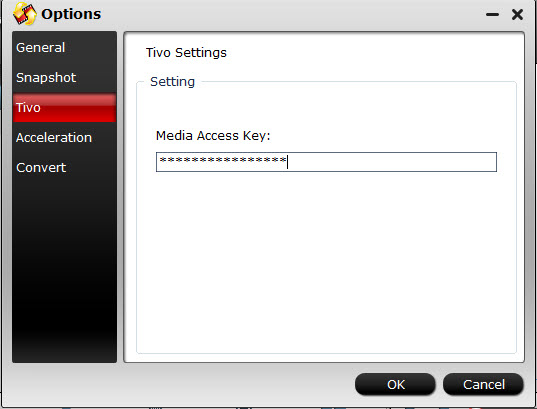
If you are loading TiVo shows to Pavtube Video Converter, please enter your Media Access Key as the program asks, and then click "OK" button to confirm.
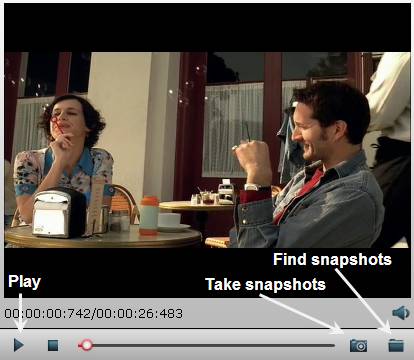
Preview & Take Snapshots/Thumbnails
After importing, all video files will be listed in the program. You can preview the imported movie file by double clicking or checking one of them and click the play button under preview window.
By clicking the camera button under the preview window, you can take snapshot from the playing window as Thumbnail or for other use. By clicking the folder button, you can find the snapshots you took.
Set output format
Clicking the Format bar, you can choose output format from the format list or customize which formats to be shown on the list.
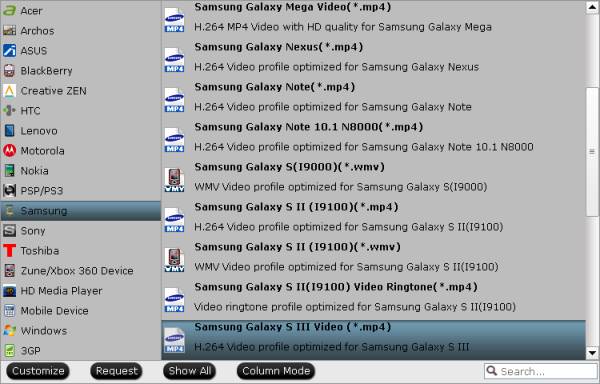
All formats here are set with optimized video/audio codecs, bitrates, frame rates, etc. But you can still specify as you like by clicking Settings button.
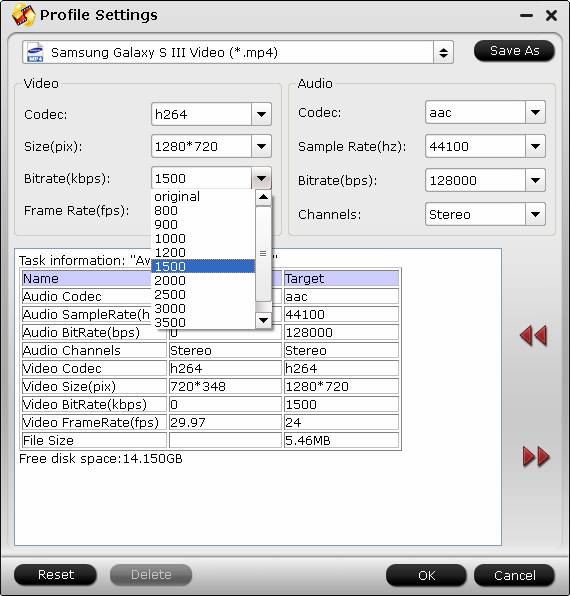
In the Profile Settings window, you can choose or specify exactly the parameters you like. And in the Task information section, you can compare the detailed information of the source video and the target video.
Merge, Split and Select Subtitles and Audio Track
Merge selected files into one: By ticking off “Merge into one file” option behind “Settings” button, you can merge the ticked files in list into one single file.
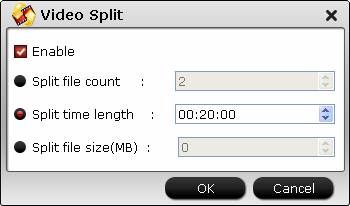
Split selected file into several small pieces: By clicking the “Split” button ![]() on file list, or from “Edit” menu, you can launch the “Video Split” window. Checking “Enable” to enable it, and then you can split the file by file count, time length, or file size.
on file list, or from “Edit” menu, you can launch the “Video Split” window. Checking “Enable” to enable it, and then you can split the file by file count, time length, or file size.
Choose Output Directory and Find the Output Folder
By clicking Browse button on main interface, you can choose the directory where you’d like to put the output files.
By clicking Open button, you can popup the output folder.

Edit Video
Pavtube Video Converter is not only a video converter program, but also a simple and easy video editor.
By default the “Edit” icon is grayed out . To activate the “Edit” menu, you have to select an item first. When a video file is selected, you can click the “Edit” icon
  on the tool bar of main interface to edit selected file.
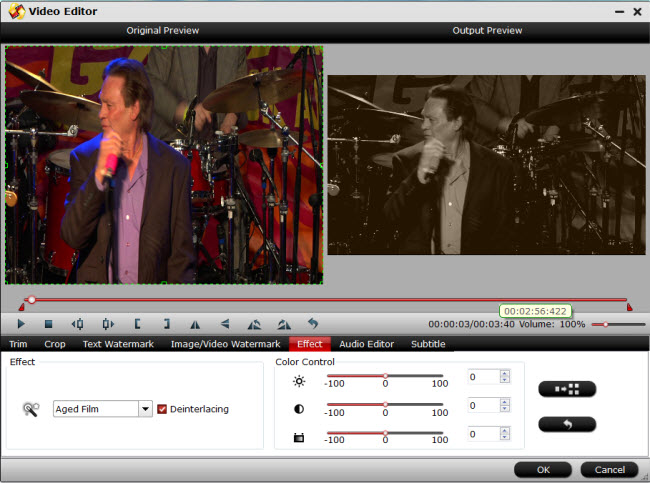
On the “Video Editor” Window, you can play and preview the original video and output effects. Also you can flip video, trim, add special effect, reset, and adjust volume.
![]()
Play/Pause: Click to start playing the current video or pause the playing.
Stop: Click to quit playback.
Previous Frame: Click and go back to the previous frame.
Next Frame: Click and go to the next frame.
Left square bracket: Click to set the start time for trimming.
Right square bracket: Click to set the end time for trimming.
Flip Horizontal: Click to flip the image horizontally.
Flip Vertical: Click to flip the image vertically.
Flip 90°towards left: Click to flip the image 90°towards left.
Flip 90°towards right: Click to flip the image 90°towards right.
Special Effect: Add special effect to source files.
Reset: Click to restore default value.
Volume slider: Drag to adjust volume.
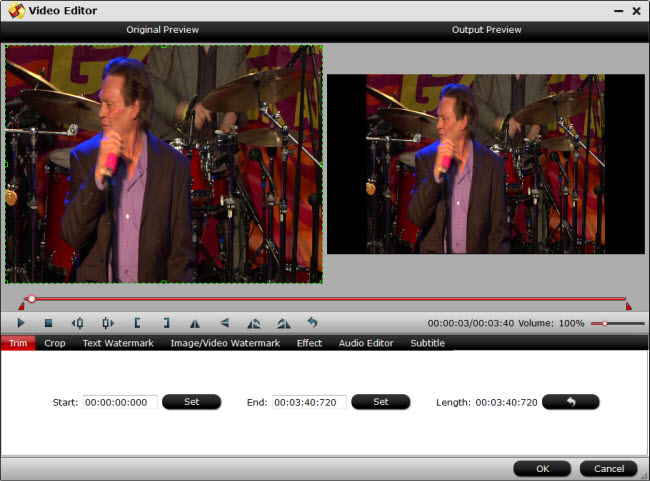
In “Video Editor” there are seven edit tabs: Trim, Crop, Text Watermark, Image/Video Watermark, Effect, Audio Editor and Subtitle.
![]()
Trim:"The "Trim" feature allows users to decide where to start and where to end when converting the selected clip, so that unwanted segments will be cut out after conversion.
To trim a video, please switch to "Trim" tab in “Video Editor” Interface and follow any of the methods below:
1. Drag the control sliders ![]()
![]() to include the segment you want to remain.
to include the segment you want to remain.
2. Click the left square bracket ![]() to set start point, and click the right square bracket
to set start point, and click the right square bracket ![]() to set end point when previewing the video
to set end point when previewing the video
3. Input specific values to “Start” and “End” box.
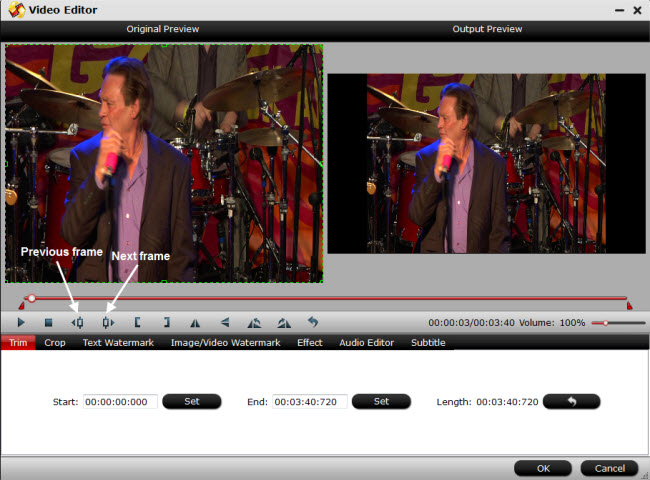
Trim frame by frame
Pavtube Video Converter offers "Previous Frame" and "Next Frame" options for users to select frames and trim accurately.
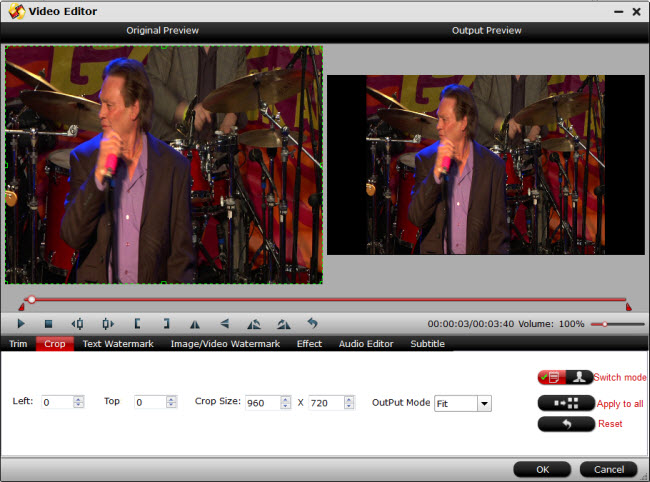
Crop: The "Crop" facility enables users to get rid of the black edges and unwanted area of the image.
Switch to "Crop" tab, and follow the below methods to crop selected video:
A. Crop video by dragging and dropping the crop frame
Simply move your mouse cursor to drag and adjust the green frame to desired position.

B. Crop video by setting values
There are "Simple Mode" and "Advanced Mode" under Crop feature. In "Simple Mode", you can customize values in the box of "Left","Top" and "Crop Size" to make your crop decision.
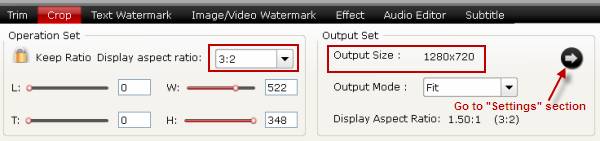
Under "Advanced Mode", there are four value fields: Left, Top, Width and Height. You can either type in specific values to the fields or adjust sliders to crop the source file.
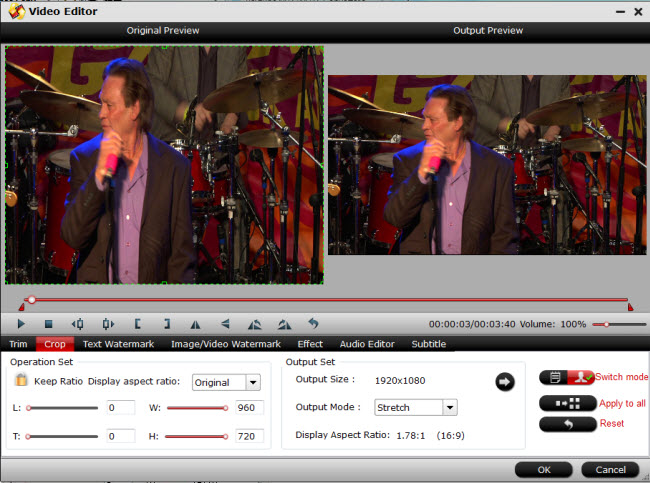
Keep original aspect ratio and cropped aspect ratio
To keep original aspect ratio, users need make sure the "Display aspect ratio” and the 'Size (pix)" in "Settings" option are all set as "Original". If you want to keep the cropped aspect ratio, Pavtube software offers several aspect ratios for you to choose from, including 16:10, 16:9, 5:4, 4:3, 3:2, and 2:1.
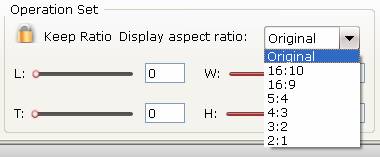
Once you selected a "Display aspect ratio", the "green crop frame" will keep this ratio to crop video and you are able to preview the final effect in real time. If you want to keep the same aspect ratio in your final output files, do remember to set the Video "Size (pix)" in "Settings" section as the same ratio as display aspect ratio. For example, if you want to export a file with "3:2" aspect ratio, firstly, you choose "3:2" in "Display aspect ratio", and then go to "Settings" section to adjust the Video "Size(pix)" as 720x480 or 1440x960. After finished, click "OK" to confirm.
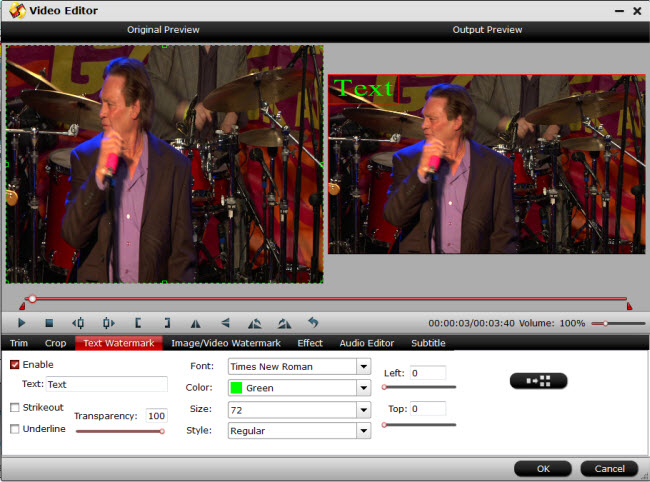
Text Watermark: Check Enable, you can add text watermark to selected video clip. You can either set parameters or drag the text on preview screen to set its location.
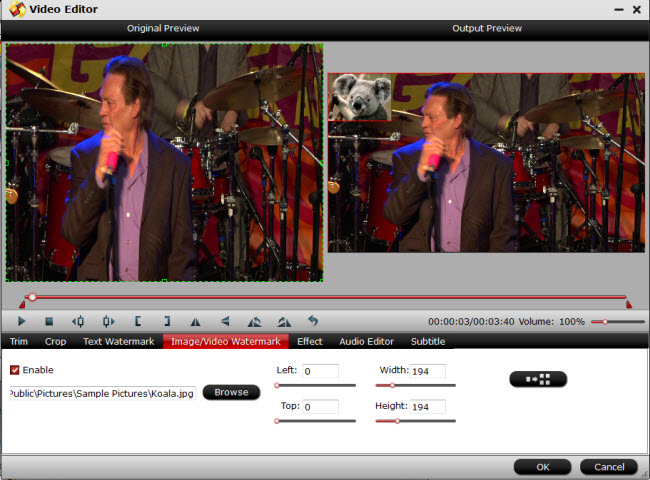
Image/Video Watermark: Check Enable, you can add images or videos as watermark onto selected video file. The location can also be set by dragging on the preview screen.
Effect: Under Effect tab, you can add special effect and other special effects like Simple Gauss Blur, Flip Color, Invert, Aged Film to your source video. In Color Control section, you can correct color by adjusting brightness, contrast, and saturation. You can also tick off “Deinterlacing” to keep good image quality.
Audio Editor: You can either replace/remove original audio, or set audio fade in/out effects.

Subtitle: In this tab, you can add *.srt or *.ass/*.ssa subtitle-files to the video as hard subtitles.

Start Conversion
Clicking the Convert button on main interface, you can go to Conversion window to start conversion.
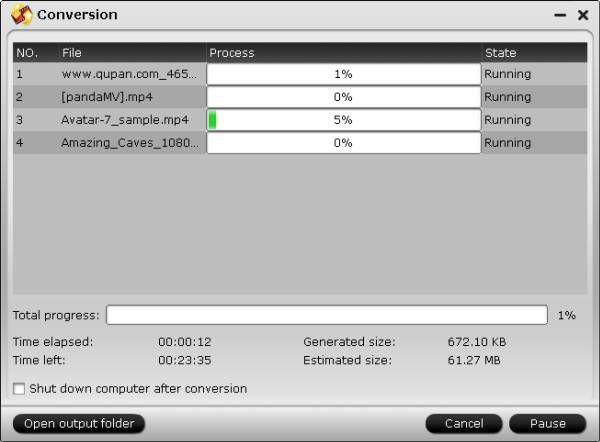
You can find conversion information on the window, such as Time elapsed, Time left, Generated size, and Estimated size.
Ticking off Shut down computer after conversion option, you can leave the program running and do other things instead of waiting around for the conversion.
After the conversion, you can click Open output folder to popup output directory with the converted files.
Note: If you are using a trial version, there will be Pavtube logo watermark in the middle of output files. To get rid of the logo watermark and get better performance, please click Help > Register > Order to buy full version.


