MKV is a powerful video container which can hold the multiple audio tracks. Sometimes, users want to remove some audio tracks they don't want, how to do? You may remember the perfect video converter: HandBrake which can provide the MKV and MP4 videos with high quality. How to auto-select in an MKV file in HandBrake? HandBrake does not store Audio and Subtitle tracks in presets. Instead, we store behaviour rules for automatically selecting audio and subtitle tracks each time you scan a new source or select a title. Following will tell you the way.
How to Auto-select in an MKV File With HandBrake
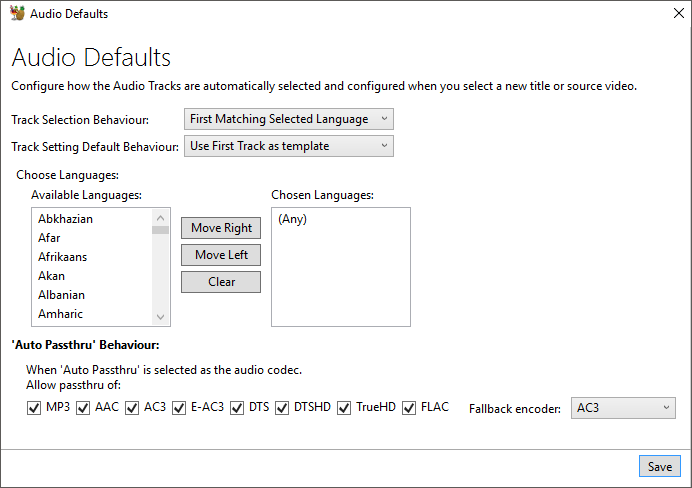
Step 1. In order to configure the track selection behaviour, click the “Configure Defaults” button on the Audio.
Step 2. Track Selection Behaviour
- None
- No audio tracks will be automatically added.
- First matching selected Language
- The first track that matches the each of the languages in the “Chosen Languages”, otherwise the first track will be selected.
- All matching selected languages
- All the tracks that match the “Chosen Languages”.
Step 3. Choose Languages
- Move any languages you are interested in into the “Chosen Languages” list in order to have tracks selected based on the track selection behaviour.
Step 4. Auto Passthru
- HandBrake can pass thru several different audio formats. There are separate options the audio encoder dropdown for these. When you select “Auto Passthru”, it will pass thru any of those supported types. You can limit what it will automatically passthru. For example, if you only ever want AC3 or DTS passthru, but not any of the other choices, untick the relevant checkboxes.
Step 5. Fallback Encoder
- When you have a passthru encoder selected, if the source track format does not match this format, HandBrake will automatically re-encode the track. The fallback encoder is the default encoder it will fallback to.
Best Way to Select the Audio Tracks At Will
IF you get the MKV video from the Blu-ray disc, you may love this tool: Pavtube ByteCopy which is an excellent Blu-ray to lossless MKV ripper, you can install it on the latest Windows 10 and macOS High Sierra. This software support the Blu-ray disc, images and folder, you can remove the mosy Blu-raycopy protection, like the BD+, AACS, Blu-ray region code, etc. Best of all, you can get the audio-track lossless MKV videos which can keep all the Blu-ray content, like the chapters, audio tracks, subtitles, ads, you can select the audio tracks, subtitles you want and remove some of them you don't want. Follwoing will tell you how to use this perfect Blu-ray ripper.
Step 1. Run the program on the computer, click "File" > "Load from disc" to load Blu-ray into the program. When both Blu-ray disc exists, the program will detect the main title automatically. You also can import the Blu-ray ISO images and folder to it.
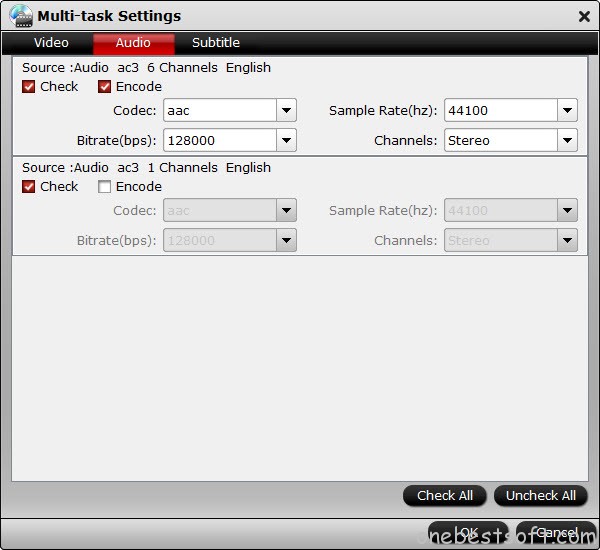
Step 2. Click Format button and choose the Multi-track Video" > "Lossless/encoded Multi-track MKV(*.mkv)" which can be the best option for you. You also can choose other audio track videos, like the audio track MP4, MOV, etc.

Step 3. Click Setting button to choose the audio tracks you want or don't want.
Step 4. Press the Convert button to start the video conversion.
Conclusion: If you have the MKV videos, you can choose the HandBrake and select the audio tracks, if you want to get the audio-track MKV videos from the Blu-ray disc, Bytecopy won't let you down.


